Mastering Raspberry Pi VNC: Discovering Ports & Free Access
Table of Contents
- Introduction
- Understanding VNC on Raspberry Pi: The Basics
- Setting Up VNC Server on Your Raspberry Pi
- The Concept of VNC Ports: Why They Matter
- How to Find Raspberry Pi VNC Port Free: Practical Methods
- Connecting to Your Raspberry Pi VNC: Free Viewers and Best Practices
- Enhancing Security for Your Raspberry Pi VNC Connection
- Troubleshooting Common VNC Port and Connection Issues
- Beyond Basic VNC: Advanced Tips & Alternatives
- Conclusion
Introduction
Are you looking to control your Raspberry Pi remotely, perhaps from another room or even across the globe? The idea of a headless setup, where your Pi operates without a dedicated monitor, keyboard, or mouse, is incredibly appealing for many projects, from home automation servers to media centers. This is where Virtual Network Computing (VNC) comes into play, offering a robust graphical interface for seamless remote interaction. Many users specifically search for ways to "find Raspberry Pi VNC port free" because they want to establish this connection without extra costs or complications, and often, they're looking for guidance on how to locate the specific network port their VNC server is using.
This comprehensive guide will demystify the process of setting up VNC on your Raspberry Pi, explain how VNC ports work, and show you precisely how to locate them. We'll cover everything from initial setup to advanced security considerations, ensuring you can access your Pi freely and securely, wherever you are. Our aim is to provide you with the expertise to confidently manage your Raspberry Pi remotely, turning that initial search query into a clear path to successful remote control.
Understanding VNC on Raspberry Pi: The Basics
At its core, VNC is a graphical desktop sharing system that uses the Remote Framebuffer (RFB) protocol to allow you to remotely control another computer. Think of it as having your Raspberry Pi's desktop displayed directly on your laptop, tablet, or smartphone, complete with mouse and keyboard control. It's an incredibly powerful tool for managing your Pi without needing to physically connect peripherals every time you want to interact with its graphical environment.
Why is VNC so popular for Raspberry Pi users? Primarily, it enables what's known as "headless" operation. A Raspberry Pi, being a small, low-power computer, is often tucked away in a corner, running a server, a smart home hub, or a robotics project. In such scenarios, connecting a monitor, keyboard, and mouse every time you need to make an adjustment is impractical. VNC solves this by projecting the Pi's desktop to your main computer, making remote administration intuitive and efficient. While command-line access via SSH is excellent for many tasks, VNC provides the full graphical experience, which is indispensable for applications requiring a visual interface or for users more comfortable with a desktop environment.
The VNC system consists of two main components: a VNC server and a VNC viewer (or client). The VNC server runs on your Raspberry Pi, capturing its screen output and sending it over the network. The VNC viewer runs on your local computer, receiving these images and sending your mouse and keyboard inputs back to the Pi. For Raspberry Pi, the most commonly used and recommended VNC server is RealVNC Server, which comes pre-installed or is easily installable on Raspberry Pi OS. For the client side, RealVNC Viewer is also widely available for various operating systems, and it's completely free for personal use, making it an ideal solution to "find Raspberry Pi VNC port free" and connect.
Setting Up VNC Server on Your Raspberry Pi
Before you can even begin to "find Raspberry Pi VNC port free," you first need to ensure the VNC server is properly set up and running on your Raspberry Pi. This process is straightforward and typically involves a few simple steps.
Initial Preparation: Updating Your Pi
It's always a good practice to start with an up-to-date system. This ensures you have the latest software, security patches, and dependencies for a smooth VNC setup. Open a terminal on your Raspberry Pi (or connect via SSH if you already have command-line access) and run the following commands:
sudo apt update sudo apt upgrade -yThe `sudo apt update` command refreshes the list of available packages, and `sudo apt upgrade -y` installs any available updates for your installed software. The `-y` flag automatically confirms any prompts, making the process hands-free.
Enabling VNC via Raspberry Pi Configuration
Raspberry Pi OS makes enabling VNC incredibly easy, especially if you're using the desktop version. RealVNC Server is often pre-installed. If not, you can install it:
sudo apt install realvnc-vnc-serverOnce installed (or if it's already there), the simplest way to enable it is through the `raspi-config` tool:
- Open a terminal and type:
sudo raspi-config - Navigate using the arrow keys to "3 Interfacing Options" and press Enter.
- Select "P3 VNC" and press Enter.
- When prompted, select "Yes" to enable the VNC server.
- You'll be returned to the main `raspi-config` menu. Select "Finish" and then "No" if it asks to reboot (we'll do it later if needed).
Alternatively, if you're on the desktop, you can enable it graphically:
- Click on the Raspberry Pi icon (menu) in the top-left corner.
- Go to "Preferences" -> "Raspberry Pi Configuration".
- Click on the "Interfaces" tab.
- Ensure "VNC" is set to "Enabled".
- Click "OK".
After enabling VNC, you'll likely see a VNC icon appear in your desktop's taskbar. Click on it to open the RealVNC Server window. Here, you'll need to set up a strong password for VNC connections. This password is distinct from your Pi's login password and is crucial for securing your remote access. Ensure the VNC server is set to start automatically when your Pi boots up, which is usually the default behavior once enabled.
The Concept of VNC Ports: Why They Matter
To truly understand how to "find Raspberry Pi VNC port free," it's essential to grasp the concept of network ports. Imagine your Raspberry Pi is a large apartment building, and each application or service running on it is an apartment resident. For someone to visit a specific resident (e.g., the VNC server), they need the building's address (your Pi's IP address) and the specific apartment number (the port number).
In networking, a port is a communication endpoint. When data is sent over a network, it's directed to a specific IP address and a specific port number. This allows multiple services to run on a single machine simultaneously without interfering with each other. For example, your Pi might be running a web server on port 80, an SSH server on port 22, and a VNC server on another port.
The default port for VNC connections is 5900. However, VNC also uses a concept called "display numbers." When you connect to a VNC server, you're actually connecting to a specific VNC "display." The default display is `:0`, which corresponds to port 5900. If you were to start a second VNC session (e.g., for another user or a different graphical environment), it might be assigned display `:1`, which would correspond to port 5901, and so on. Each display number increments the port number by one (5900 + display number).
Why do different ports matter?
- Multiple Sessions: If you need to run more than one VNC server or session on your Pi, each will require a unique port.
- Security: While not a true security measure, changing the default port (e.g., from 5900 to something less common) can offer a very minor layer of obscurity, making it slightly harder for automated scanners to find your VNC service. True security comes from strong passwords and encryption (which we'll discuss later).
- Avoiding Conflicts: If another application on your network or even on your Pi itself happens to use port 5900, you'd need to assign VNC a different port to avoid conflicts.
How to Find Raspberry Pi VNC Port Free: Practical Methods
Now that you understand the role of VNC ports, let's get to the core of how to "find Raspberry Pi VNC port free." This isn't about searching for an available port on the internet, but rather about identifying the specific port your VNC server on your Raspberry Pi is listening on, using free, built-in tools and methods.
Checking VNC Server Status on the Pi Itself
The most direct way to find the VNC port is to check the VNC server's status on your Raspberry Pi itself. This assumes you have local access (monitor, keyboard) or SSH access to your Pi.
- Using `systemctl` for RealVNC Server: If you're using the default RealVNC Server, you can check its service status. Open a terminal on your Pi and type:
Look for lines indicating "listening on port" or similar. You'll typically see something like `listening on port 5900`. This command provides detailed information about the VNC server's operation, including the port it's using and whether it's running correctly.systemctl status vncserver-x11-service.service - Using `netstat` or `ss`: These commands display network connections, routing tables, interface statistics, and more. They can show you which ports are open and listening.
Or, the more modern alternative:sudo netstat -tulnp | grep vnc
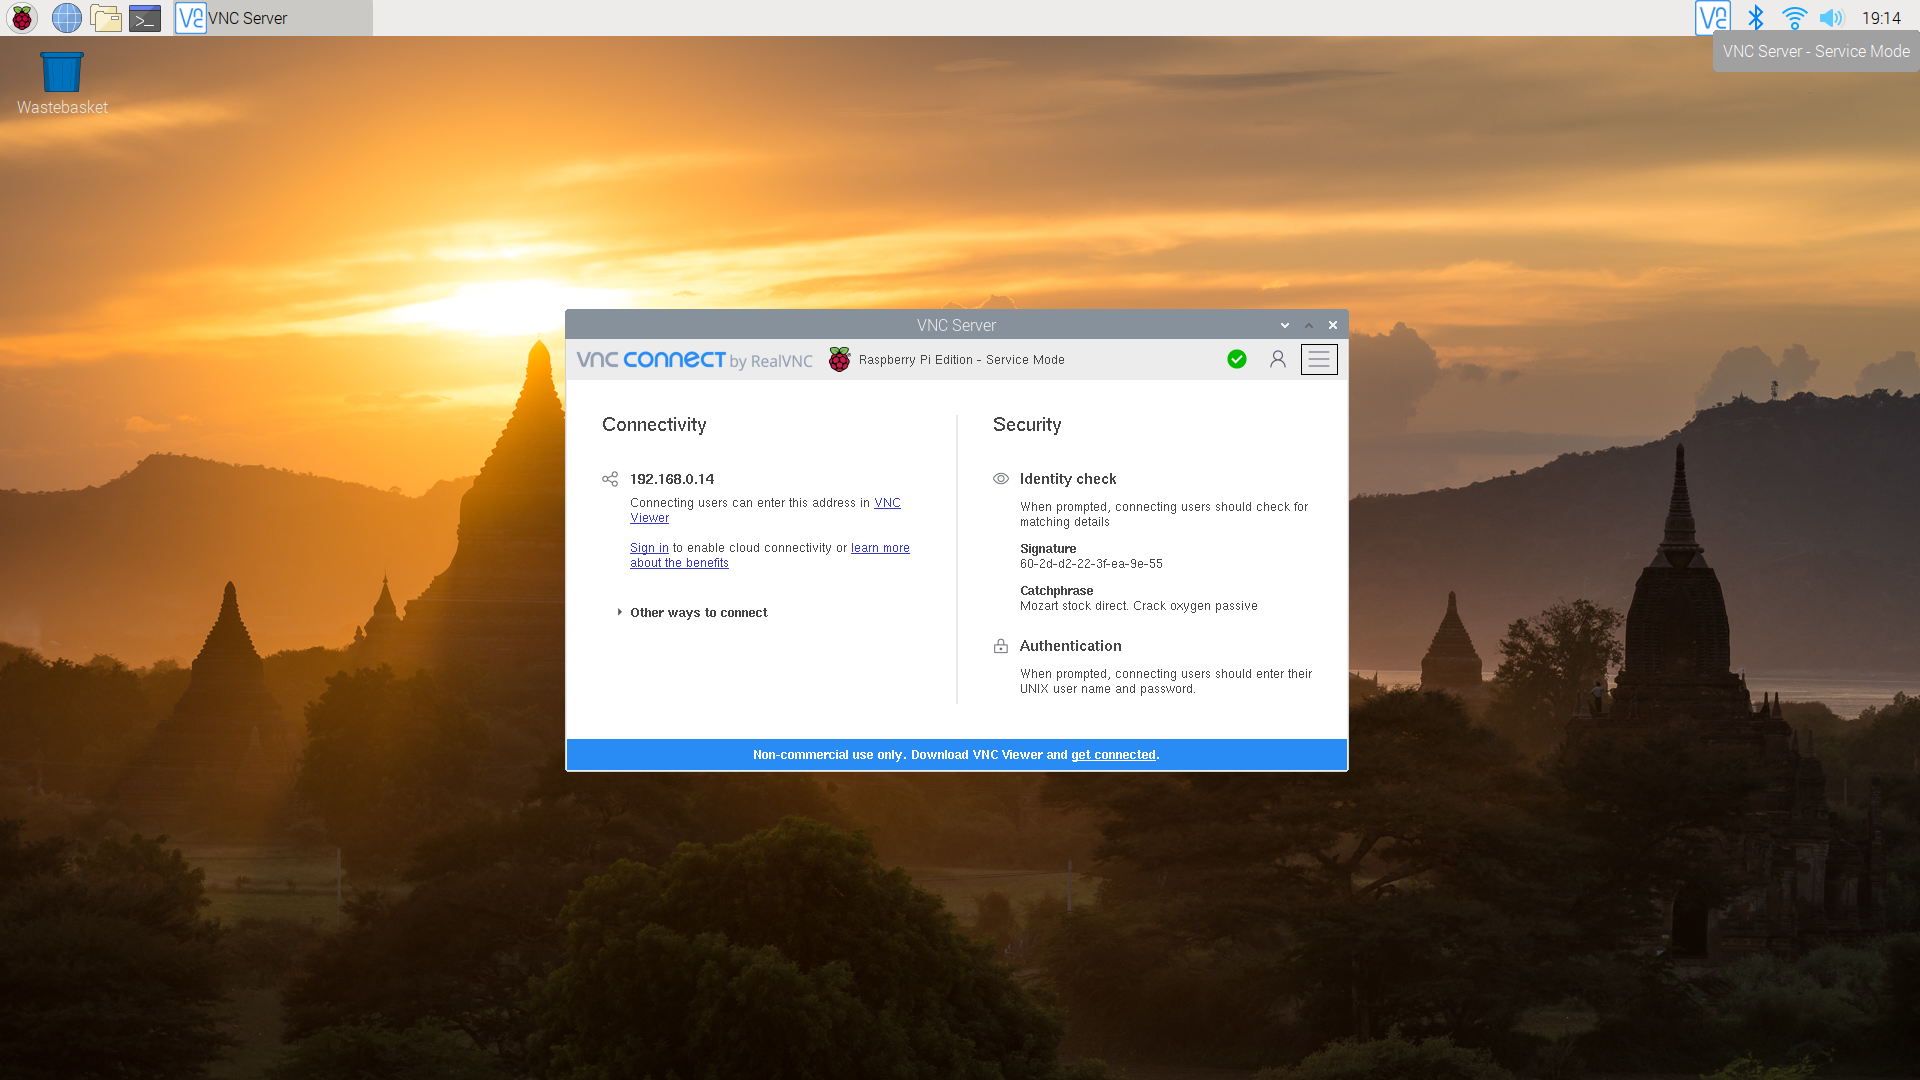
The output will show you the local address and port number. For example, `tcp LISTEN 0 5900` indicates that port 5900 is open and listening for TCP connections. The `vnc` in the `grep` command filters the output specifically for processes related to VNC.sudo ss -tulnp | grep vnc - Checking RealVNC Server GUI: If you have a desktop environment on your Pi, click the VNC icon in the taskbar. The RealVNC Server window will open, often displaying the IP address and port number it's listening on, usually in the "Connections" or "Licensing" tab, or directly on the main screen. It will typically show something like "Your Pi is accessible at 192.168.1.100:5900".
Using Network Scanning Tools (from Client PC)
If you don't have direct access to your Raspberry Pi's terminal but know its IP address, you can use network scanning tools from your client computer to discover open VNC ports. This is particularly useful if you're trying to connect to a Pi on your local network.
- Finding Your Pi's IP Address: First, you need the Raspberry Pi's IP address. If you don't know it, you can often find it by:
- Checking your router's connected devices list.
- Using a network scanner app on your smartphone (e.g., Fing).
- If you have SSH access, simply type `hostname -I` in the Pi's terminal.
- Using `nmap` (Command-Line Tool): `nmap` is a powerful, free, and open-source network scanner available for Windows, macOS, and Linux. To scan for common VNC ports on your Raspberry Pi, open a terminal or command prompt on your client computer and type:
This command scans for open ports in the range 5900 to 5910 on the specified IP address. If VNC is running on one of these ports, `nmap` will report it as "open" and often identify the service as "vnc." For example:nmap -p 5900-5910 192.168.1.100
This clearly indicates that port 5900 is open and running a VNC service.PORT STATE SERVICE 5900/tcp open vnc - Using Graphical Network Scanners: For users who prefer a graphical interface, tools like "Advanced IP Scanner" (Windows) or "Angry IP Scanner" (cross-platform) can scan your local network and identify open ports on devices. Simply enter your network range (e.g., 192.168.1.1-254) and let the scanner run. It will list all active devices and their open ports, making it easy to spot the VNC port on your Raspberry Pi. These tools are free and provide a user-friendly way to "find Raspberry Pi VNC port free" on your network.
Connecting to Your Raspberry Pi VNC: Free Viewers and Best Practices
Once you've identified the VNC port, connecting to your Raspberry Pi is the next step. Fortunately, there are excellent free VNC viewers available that ensure you can "find Raspberry Pi VNC port free" and then connect to it without any additional cost.
The most recommended VNC viewer for connecting to a Raspberry Pi running RealVNC Server is, predictably, RealVNC Viewer. It's free for personal use and available for Windows, macOS, Linux, Android, and iOS, ensuring broad compatibility and a smooth user experience. You can download it directly from the RealVNC website.
Steps to Connect using RealVNC Viewer:
- Install RealVNC Viewer: Download and install the appropriate version for your client device.
- Open RealVNC Viewer: Launch the application.
- Enter Connection Details: In the address bar (or a new connection window), you'll typically enter your Raspberry Pi's IP address followed by the port number.
- If VNC is on the default display `:0` (port 5900), you can often just type the IP address: `192.168.1.100`
- If VNC is on a non-default display (e.g., `:1` which is port 5901), you would specify it as `192.168.1.100:5901` or `192.168.1.100::5901` (the double colon is often used by RealVNC to specify the port explicitly, while a single colon can sometimes imply a display number).
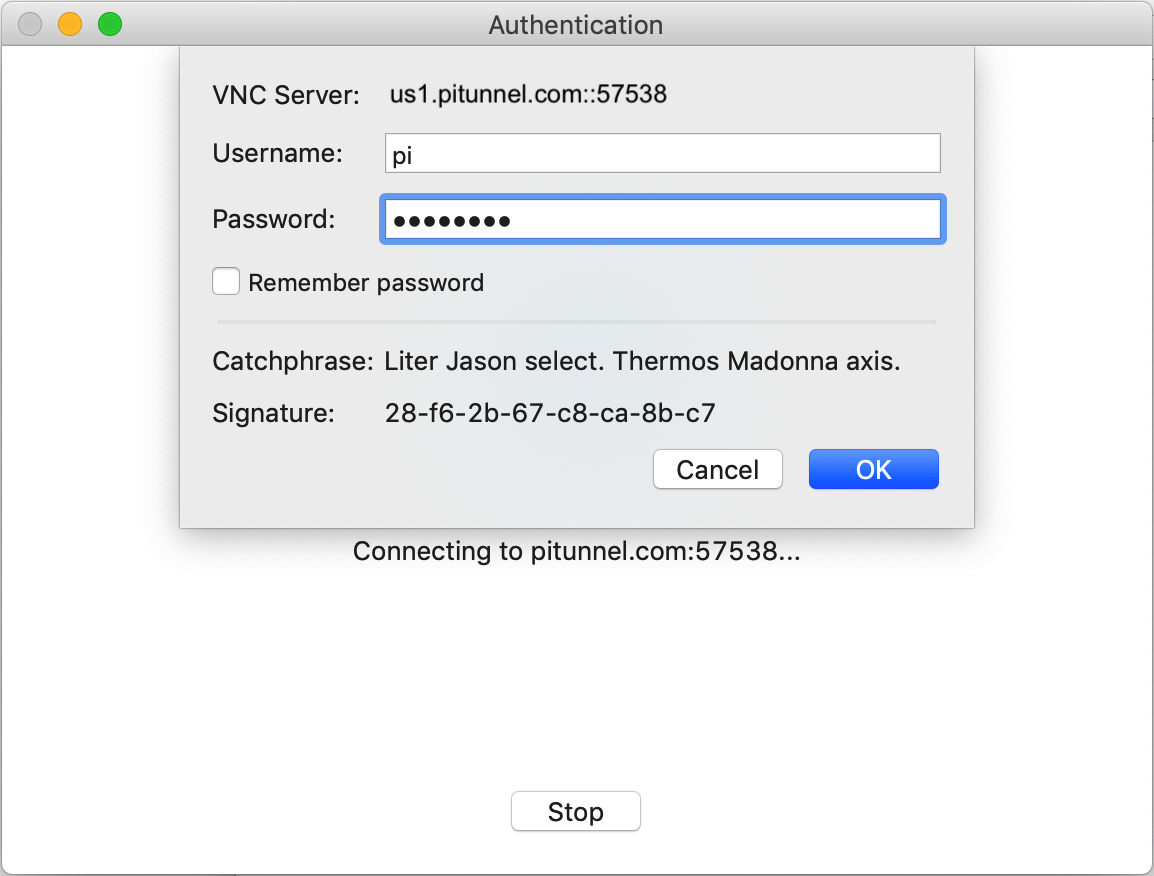
- Authenticate: A window will pop up asking for your VNC password (the one you set on the Raspberry Pi, not your Pi's login password). Enter it and click "OK" or "Connect."
- Accept Encryption Warning (if applicable): The first time you connect, you might get a warning about the encryption not being verified. You can usually accept this to proceed.
Best Practices for Connecting:
- Strong VNC Password: Always use a strong, unique password for your VNC server. This is your primary line of defense against unauthorized access.
- Local Network First: Initially, try connecting from a device on the same local network as your Raspberry Pi. This helps rule out firewall or router configuration issues if you encounter problems.
- Resolution Settings: If your remote desktop appears too small or too large, you can adjust the resolution settings within the VNC server configuration on your Pi or sometimes within the viewer itself. For headless setups, you might need to manually set a preferred resolution using `raspi-config` or by editing `/boot/config.txt`.
While RealVNC Viewer is highly recommended for its compatibility with RealVNC Server on the Pi, other free VNC clients like TightVNC Viewer or UltraVNC Viewer (primarily for Windows) can also work. However, RealVNC's proprietary extensions often provide better performance and features when paired with their server.
Enhancing Security for Your Raspberry Pi VNC Connection
While the ability to "find Raspberry Pi VNC port free" and connect is fantastic, security should always be a top priority, especially when accessing your Pi remotely. Leaving VNC open and exposed to the internet without proper security measures is a significant risk. Here's how to enhance the security of your VNC connection:
- SSH Tunneling: The Gold Standard for Security This is by far the most secure way to access your VNC server, especially if you're connecting from outside your local network. SSH (Secure Shell) creates an encrypted tunnel through which your VNC traffic can safely pass. This means your VNC data is encrypted, and the VNC port itself doesn't need to be directly exposed to the internet.
How to set up an SSH Tunnel:
- Enable SSH on your Pi: If you haven't already, enable SSH via `sudo raspi-config` -> Interfacing Options -> SSH.
- On your client computer (Linux/macOS): Open a terminal and use the following command:
Replace `ssh -L 5901:localhost:5900 pi@<Raspberry_Pi_IP>` with your Pi's actual IP address. This command forwards local port 5901 on your client machine to port 5900 on your Raspberry Pi, through the secure SSH tunnel. - On your client computer (Windows with PuTTY):
- Open PuTTY.
- Enter your Pi's IP address in the "Host Name (or IP address)" field.
- Go to "Connection" -> "SSH" -> "Tunnels".
- In the "Source port" field, enter `5901`.
- In the "Destination" field, enter `localhost:5900`.
- Click "Add".
- Go back to "Session" and click "Open" to establish the SSH connection.
- Connect VNC Viewer: Once the SSH tunnel is established, open your VNC Viewer and connect to `localhost:5901` (or `127.0.0.1:5901`). Your VNC traffic will now be encrypted and routed through the secure SSH tunnel.
- Firewall (UFW): Implement a firewall on your Raspberry Pi to control incoming and outgoing network traffic. UFW (Uncomplicated Firewall) is easy to use.
If you are using an SSH tunnel, you might only need to allow SSH (port 22) and keep VNC port 5900 blocked from external access, allowing it only from `localhost`.sudo apt install ufw sudo ufw enable sudo ufw allow 22/tcp # Allow SSH sudo ufw allow 5900/tcp # Allow VNC (if not using SSH tunnel) sudo ufw status verbose - Strong Passwords: This cannot be stressed enough. Use a complex, unique password for your VNC server. Avoid easily guessable passwords.
- Keep Software Updated: Regularly update your Raspberry Pi OS and all installed software (`sudo apt update && sudo apt upgrade`). Updates often include security patches that protect against known vulnerabilities.
- Change Default VNC Port (Optional): While not a robust security measure on its own (as port scanners can still find it), changing the default VNC port (5900) to a less common one can deter casual scanning attempts. However, this should never be seen as a substitute for SSH tunneling or a strong firewall.
Troubleshooting Common
Vnc raspberry pi from windows
How to remotely access the Desktop of your Raspberry Pi over the
Raspberry Pi 3 Install Vnc – Raspberry
