Fortifying Your Pi: A Deep Dive Into Raspbian VNC Security
In today's interconnected world, the ability to access and manage devices remotely has become indispensable. For enthusiasts and professionals alike, the Raspberry Pi, a versatile single-board computer, often serves as a central hub for various projects, from home automation to custom servers. However, to truly unlock its potential from anywhere, you need a reliable remote access solution, and VNC (Virtual Network Computing) stands out as a popular choice. This guide delves deep into the critical aspects of Raspbian VNC security, ensuring your remote connections are not just convenient, but also robustly protected against potential threats.
Whether your Raspberry Pi is just across the room or, as one user noted, "over 100 miles away," VNC offers the flexibility to control it as if you were sitting right in front of it. Yet, this convenience comes with inherent security considerations. By default, VNC is often disabled on Raspbian for good reason, highlighting the importance of understanding its security mechanisms before enabling remote access. This article aims to provide a comprehensive understanding of VNC setup, configuration, and, most importantly, how to secure your connection, covering everything from basic password authentication to navigating compatibility issues and the evolving landscape of VNC technology on Raspberry Pi 5 and OS Bookworm.
Table of Contents
- Understanding VNC: The Basics of Remote Access
- Why Raspbian VNC Security Matters
- Initial Setup and Enabling VNC on Raspberry Pi
- Configuring VNC Security Settings
- Navigating Authentication Challenges and Viewer Compatibility
- Advanced Security Considerations for Raspbian VNC
- Troubleshooting Common VNC Security Issues
- The Future of Remote Access: Wayland and WayVNC
- Conclusion
Understanding VNC: The Basics of Remote Access
VNC, or Virtual Network Computing, is a graphical desktop sharing system that allows you to remotely control another computer. It's an incredibly useful tool for managing a headless Raspberry Pi or accessing its graphical interface from a distance. The fundamental principle behind VNC is its client-server architecture, which facilitates the transmission of visual and input data over a network.
Client-Server Relationship
At its core, VNC relies upon a client and a server. The server component runs on the computer you wish to control remotely—in our case, your Raspberry Pi. This server captures the graphical output of the Raspberry Pi's desktop environment and sends it over the network. Conversely, the client runs on a device you can physically interact with, such as a personal laptop, desktop, tablet, or phone. When you use VNC, the client transmits keyboard and mouse events to the server, allowing you to interact with the remote desktop as if you were directly connected. This seamless interaction is what makes VNC so powerful for remote management, but it also underscores the importance of robust Raspbian VNC security.
VNC on Raspberry Pi: A Default Disabled Feature
For users running Raspberry Pi OS (formerly Raspbian), you'll often find that a VNC server, typically RealVNC, is pre-installed and configured. This means you'll have to do a lot less setup than using other VNC servers. However, it's crucial to remember that VNC is disabled by default for security reasons. This default setting is a clear indicator of the potential risks associated with open remote access. Activating it allows for remote access to your Pi, opening up a world of possibilities, letting you control your device from anywhere. Once enabled, you can easily connect to your Raspberry Pi and manage it effortlessly, ensuring a smooth and secure experience, provided you've taken the necessary security precautions.
Why Raspbian VNC Security Matters
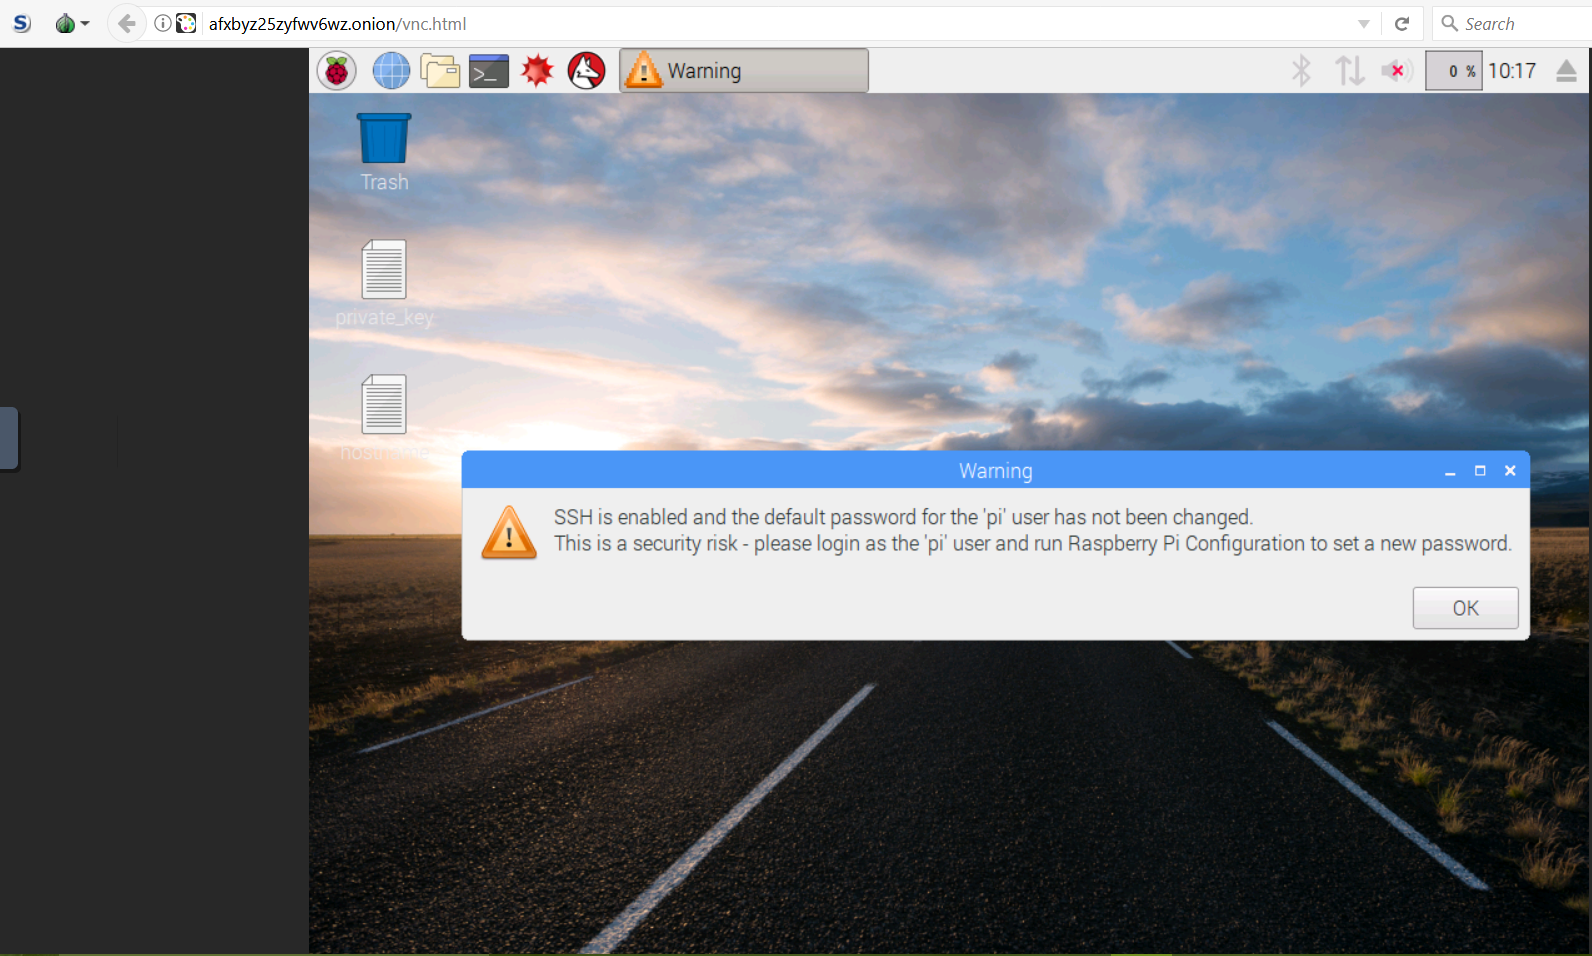
The phrase "VNC is disabled by default for security reasons" should resonate deeply with anyone considering remote access. Every open port or enabled service on a network device represents a potential entry point for unauthorized access. For a device like the Raspberry Pi, which might be running critical services or storing sensitive data, neglecting Raspbian VNC security can have severe consequences. Imagine your Pi, sitting "over 100 miles away," becoming compromised because of weak VNC settings. An attacker could gain full control, access your files, inject malware, or use your Pi as a launchpad for further attacks on your network.
The remote access industry itself acknowledges that security is the biggest concern. Proprietary remote access software often boasts built-in security tools that are regularly updated. While VNC is an open standard, its security largely depends on how you configure it. A basic VNC setup without proper authentication or encryption is akin to leaving your front door unlocked. Therefore, understanding and implementing strong security practices for your Raspbian VNC connection is not just recommended, it's absolutely essential for protecting your digital assets and maintaining the integrity of your Raspberry Pi system.
Initial Setup and Enabling VNC on Raspberry Pi
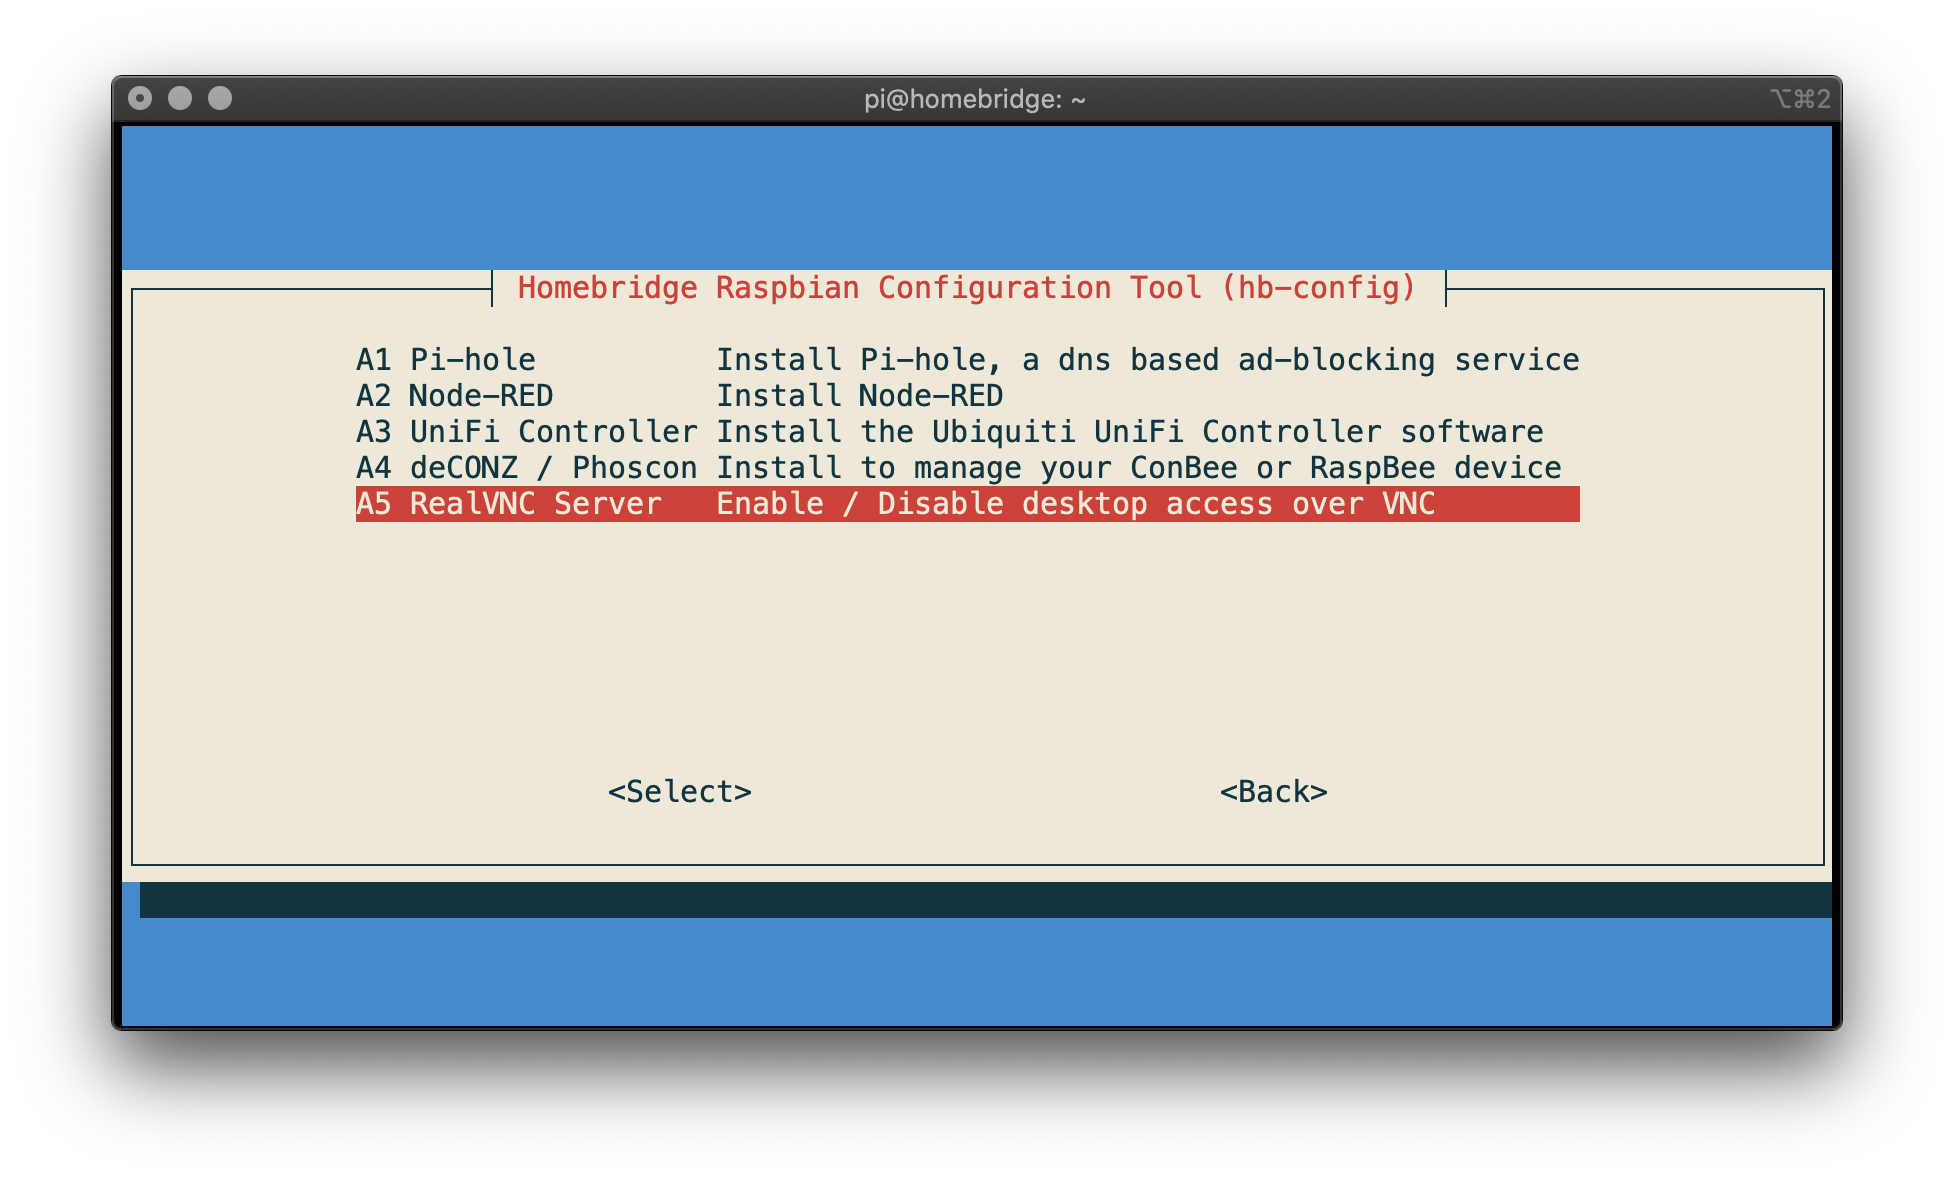
Before diving into the intricacies of Raspbian VNC security, you first need to enable the VNC server on your Raspberry Pi. This guide covers the setup on Raspberry Pi 5 and OS Bookworm, which generally comes with RealVNC server pre-installed, simplifying the initial steps for beginners and hobbyists.
If you're already booted into the graphical desktop, the process is straightforward:
- Click on the Raspberry Pi icon (Menu) in the top-left corner.
- Navigate to 'Preferences' > 'Raspberry Pi Configuration'.
- A configuration window will appear.
The 'Interfaces' Tab and VNC Activation
Within the 'Raspberry Pi Configuration' window, locate the 'Interfaces' tab. This tab manages various hardware interfaces and services. In the interfaces tab, find the line about VNC. The interface can be slightly different depending on your version of Raspberry Pi OS, but basically, it’s just a checkbox to enable it. Ensure VNC is set to 'Enabled'. Once done, click on 'OK' to apply the changes. A few seconds later, VNC is enabled, and you can move to the next part to install VNC on your computer (client device). This simple step is the gateway to remote control, but it's also the point where your Raspbian VNC security journey truly begins.
Configuring VNC Security Settings
Enabling VNC is just the first step; securing it is paramount. The default security settings might not be robust enough for your needs, especially if your Pi is exposed to the internet. Proper configuration of your VNC server settings is critical for maintaining strong Raspbian VNC security.
To configure your VNC server settings, you'll typically interact with the VNC server application itself on your Raspberry Pi:
- Clicking on the VNC server icon in the taskbar (usually near the clock).
- Then click on the menu icon (top right corner of the “VNC Server” window) and select “Options”.
- This will open the VNC Server Options dialog.
Choosing Authentication: VNC Password vs. Proprietary
In the “Security” section of the VNC Server Options, you'll find the authentication settings. This is where you set the authentication method. For a basic level of security, change the authentication to “VNC Password”. This allows you to specify a separate password for use with VNC, independent of your Raspberry Pi's user account password. Choose a strong password – one that is long, complex, and unique – and click “Apply.” Next, still in the “Options” dialog, you might want to set the resolution to match your client device for optimal viewing, though this is a usability setting rather than a security one.
It's important to note that while RealVNC offers its own proprietary security type, which might provide enhanced features like cloud connectivity and stronger encryption, "this security type is only supported by the RealVNC Viewer." If you wish to use other viewers, such as TightVNC or TigerVNC, then you will need to configure the server to use VNC password authentication. This flexibility comes at a trade-off: while VNC password authentication is widely compatible, the proprietary methods often offer more advanced security tools built in and updated regularly, reflecting the industry's biggest concern: security.
Navigating Authentication Challenges and Viewer Compatibility
One of the most common stumbling blocks users encounter with Raspbian VNC security is related to authentication and client compatibility. The VNC ecosystem is diverse, with various server and client implementations, and they don't always play nicely together without specific configuration.
A classic example of this is when a user tries to connect with a generic VNC client to a Raspberry Pi running RealVNC. As one user experienced: "$ vncviewer pi.local connected to rfb server, using protocol version 3.3 no configured security type is supported by 3.3 vnc viewer it looks like the pi is running realvnc and i'm trying to run tightvnc on the client." This scenario perfectly illustrates the compatibility issue. RealVNC's default security type, especially when encryption is set to "always maximum," is often proprietary and designed to work exclusively with the RealVNC Viewer. This can be frustrating because it "refused to connect until I lowered encryption from 'always maximum'." It did work again when the setting was changed to 'let VNC server choose', but this is not very transparent, leaving users guessing about the underlying security protocols.
To ensure broad compatibility while maintaining a reasonable level of Raspbian VNC security, the recommendation is often to explicitly configure the RealVNC server on your Raspberry Pi to use "VNC Password" authentication. This method is an industry standard and is supported by almost all VNC clients, including TigerVNC and TightVNC. By doing so, you create a universal access point that doesn't rely on specific client software, while still requiring a strong password for entry. This balance between accessibility and security is key for remote management.
Advanced Security Considerations for Raspbian VNC
While a strong VNC password provides a foundational layer of Raspbian VNC security, truly fortifying your remote access requires considering additional measures, especially if your Raspberry Pi is accessible from the internet. Relying solely on a password for a connection that might traverse public networks is risky.
One critical aspect is encryption. While some VNC implementations offer built-in encryption, its strength and compatibility can vary. The anecdote about having to lower encryption from 'always maximum' to 'let VNC server choose' to establish a connection highlights the complexities. For robust encryption, tunneling your VNC connection through a secure shell (SSH) tunnel is highly recommended. SSH provides a strong, encrypted channel over which your VNC traffic can flow, effectively protecting your keyboard and mouse events, as well as the screen data, from eavesdropping. This method adds an extra layer of authentication (your SSH credentials) and encryption, significantly enhancing your Raspbian VNC security posture.
Furthermore, consider implementing network-level security. If your Pi is behind a router, configure port forwarding only when necessary and restrict access to specific IP addresses if possible. Using a VPN (Virtual Private Network) to connect to your home network before initiating a VNC session is another excellent strategy. A VPN encrypts all your network traffic and makes your remote device appear as if it's on the local network, circumventing the need for direct port forwarding and significantly reducing your attack surface. These advanced configurations for security are crucial for anyone serious about protecting their Raspberry Pi, moving beyond basic setup to a truly secure remote access solution.
Troubleshooting Common VNC Security Issues
Even with careful setup, users might encounter common issues like black screens, lag, or connection refusals when trying to establish a VNC session. Many of these problems can be traced back to security configurations or compatibility quirks. Addressing these effectively is part of maintaining good Raspbian VNC security.
One frequent issue, as highlighted by the error "no configured security type is supported by 3.3 vnc viewer it looks like the pi is running realvnc and i'm trying to run tightvnc on the client," is a mismatch in security protocols between the VNC server (Raspberry Pi) and the client (your laptop/desktop). If you're running RealVNC on your Pi and using a different client like TightVNC, you must ensure the server is configured to use a universally compatible authentication method, such as "VNC Password." As previously mentioned, this can be changed in the VNC Server options under the "Security" section. If you're already using an older version of RealVNC server, a simple restart of the VNC server application or even the Raspberry Pi itself can often resolve minor glitches.
Another subtle security-related issue can arise from encryption settings. The observation that a connection "refused to connect until I lowered encryption from 'always maximum'" and worked again when set to 'let VNC server choose' is a prime example. While 'always maximum' sounds secure, it might enforce a proprietary or very specific encryption standard that older or different VNC clients don't support. If you encounter connection problems, experimenting with this setting (while understanding the security implications) might be necessary. For persistent issues, reviewing the VNC server logs on your Raspberry Pi can provide valuable clues about why connections are failing, helping you diagnose whether it's a network problem, a security setting, or a client-server incompatibility. Remember, troubleshooting common issues like black screens and lag often involves checking network connectivity, VNC server status, and ensuring your client and server configurations are aligned for optimal viewing and secure communication.
The Future of Remote Access: Wayland and WayVNC
As technology evolves, so do the underlying graphical display systems that VNC interacts with. The Raspberry Pi OS, particularly with Raspberry Pi 5 and OS Bookworm, is increasingly moving towards Wayland as its default display server, replacing the older X11 system. This shift has significant implications for remote desktop access and, consequently, for Raspbian VNC security.
The Wayland security model prevents traditional remote desktop access methods that rely on directly capturing the display buffer, which is how older VNC servers like RealVNC primarily operate. This stricter security model is a double-edged sword: it enhances security by design, making it harder for unauthorized applications to snoop on your screen, but it also breaks compatibility with existing VNC solutions. As a result, a new VNC server, called WayVNC, is being used instead of RealVNC on Wayland-based systems. This transition is crucial for anyone upgrading their Raspberry Pi or installing the latest OS versions.
WayVNC, designed specifically for Wayland, addresses the new security paradigm. However, it comes with its own set of considerations. "This is a bit more restrictive in terms of the client applications which can connect to it." While RealVNC Viewer is widely compatible with RealVNC server, WayVNC might require specific clients. Anecdotal evidence suggests that "we have had good results with the TigerVNC client, available here." This highlights the importance of choosing the right client to match your server when dealing with the newer Wayland/WayVNC setup. As the Raspberry Pi ecosystem continues to mature, staying informed about these changes and adapting your VNC setup accordingly will be vital for maintaining seamless and secure remote access.
Conclusion
Securing your Raspberry Pi with robust Raspbian VNC security is not merely a technical task; it's a fundamental commitment to protecting your digital environment. From understanding the basic client-server relationship to navigating the complexities of authentication, encryption, and evolving display technologies like Wayland and WayVNC, each step contributes to a safer remote access experience. We've seen how VNC is disabled by default for critical security reasons, emphasizing the need for careful configuration, strong passwords, and, where possible, advanced security measures like SSH tunneling or VPNs.
Whether you're a beginner setting up your first remote connection or a seasoned hobbyist troubleshooting advanced issues, remember that the goal is always a smooth and secure experience. By meticulously following the setup and configuration steps, choosing strong passwords, and understanding the nuances of client-server compatibility, you can confidently control your Raspberry Pi from anywhere, even if it's "over 100 miles away," without compromising its integrity. The world of possibilities opened by remote access to your Pi is vast, and with proper security, you can explore it with peace of mind.
Have you faced unique Raspbian VNC security challenges or found innovative solutions? Share your experiences in the comments below! Your insights can help fellow Raspberry Pi enthusiasts build even more secure and reliable remote setups. Don't forget to share this article with anyone looking to fortify their Pi's remote access!
Control your home IoT: Remotely and Graphically – Mir Saman Tajbakhsh
How To Connect Via VNC · homebridge/homebridge-raspbian-image Wiki · GitHub

How To Connect Via VNC · homebridge/homebridge-raspbian-image Wiki · GitHub
