SSH Into Raspberry Pi From Anywhere: Your Ultimate Guide
Let’s face it—connecting to your Raspberry Pi remotely is one of the coolest things you can do in the tech world today. Whether you're a hobbyist, a developer, or just someone who loves tinkering with gadgets, learning how to ssh into Raspberry Pi outside your local network opens up a whole new realm of possibilities. This is critical in IoT since you can control your device from anywhere in the world with this technique.
Gone are the days when you needed to be physically present next to your tiny computer to manage it. The ability to SSH into your Raspberry Pi from outside your network transforms it into a truly versatile device, perfect for smart home setups, remote servers, or even just checking on your projects while you're away. This guide will walk you through the essential steps and methods to achieve secure and reliable remote access, ensuring you can manage your Raspberry Pi from virtually anywhere.
Table of Contents
- Understanding SSH and Its Importance for Raspberry Pi
- Enabling SSH on Your Raspberry Pi
- Method 1: Traditional Port Forwarding – The Classic Approach
- Method 2: VPN Solutions – Secure and Flexible Access
- Method 3: Cloud-Based Tunnels – Simplifying Remote Connections
- Enhancing Security for Your Remote Raspberry Pi
- Troubleshooting Common Connection Issues
- Conclusion
Understanding SSH and Its Importance for Raspberry Pi
SSH, or Secure Shell, is a cryptographic network protocol that allows secure remote access to a computer over an unsecured network. It provides a secure channel over which a network service can be operated remotely. For your Raspberry Pi, SSH means you can open a terminal session on your computer (laptop, desktop, even a smartphone) and interact with your Pi as if you were sitting right in front of it, typing commands directly. By default, Raspberry Pi OS (previously called Raspbian) comes with OpenSSH server preinstalled, which can handle user authentication, terminal connections, encryption, file transfers, and tunneling. This built-in capability is what makes the Raspberry Pi such a powerful tool for remote projects. The ability to connect to your Raspberry Pi from another machine using SSH or VNC is fundamental for headless setups or when your Pi is deployed in a hard-to-reach location. This is an extension of previous setups where we only showed how to set up SSH on the local network; now, we're taking it global.Enabling SSH on Your Raspberry Pi
Before you can even think about how to SSH into your Raspberry Pi from outside your network, you first need to ensure SSH is enabled on the Pi itself. While the server software is preinstalled, the service isn't always active by default for security reasons. To fully leverage the remote management features on your Raspberry Pi, enabling the SSH service is essential. This method provides secure access to a terminal session, allowing you to manage your device from anywhere, whether it's for personal projects or smart home setups.Activating the SSH Service
There are a few easy ways to enable SSH on your Raspberry Pi: 1. **Using `raspi-config` (Recommended for headless setup):** * Connect a keyboard and monitor to your Raspberry Pi. * Open a terminal and type: `sudo raspi-config` * Navigate to `Interface Options` -> `SSH` -> `Yes`. * Reboot your Pi: `sudo reboot` 2. **Creating an `ssh` file (for fresh installations):** * If you're setting up a new Raspberry Pi OS installation on an SD card, you can enable SSH before booting it up. * After flashing the OS image onto your SD card, simply create an empty file named `ssh` (no extension) in the `boot` partition of the SD card. * When the Raspberry Pi boots up, it will detect this file and automatically enable the SSH service. 3. **From the Desktop Environment (if you have a display):** * If you're using the desktop version of Raspberry Pi OS, go to `Menu` -> `Preferences` -> `Raspberry Pi Configuration`. * Click on the `Interfaces` tab. * Ensure `SSH` is set to `Enabled`. * Click `OK` and reboot if prompted. Once SSH is enabled, you can connect to your Pi from within your local network using its local IP address. For example, if you have SSH working and can connect from your home network using PuTTY on a PC or vSSH on an iPad, you're halfway there. The next challenge is to extend this access beyond your local network.Method 1: Traditional Port Forwarding – The Classic Approach
This is one of the most common methods to SSH into your Raspberry Pi from outside your network, though it requires some configuration on your router. To SSH into your Raspberry Pi from outside the local network, you’ll need to forward a port on your router to your Raspberry Pi.Finding Your Raspberry Pi's Local IP Address
In order to connect to your Raspberry Pi from another machine using SSH or VNC, you need to know the Raspberry Pi’s IP address. This is easy if you have a display connected, and there are a number of methods for finding it remotely from another machine on the network. * **From the Pi itself:** Open a terminal and type `hostname -I`. * **From another device on your local network:** You can use network scanning tools like `nmap` or `arp -a`, or check your router's connected devices list. * **Set a Static IP:** It's highly recommended to set a static IP address for your Raspberry Pi on your local network. This prevents its IP from changing, which would break your port forwarding rule. I have set a static IP on the RPi.Configuring Your Router for Port Forwarding
This will require configuring your router to forward requests on a specific port (usually port 22 for SSH) to your Raspberry Pi. 1. **Access your Router's Admin Panel:** Open a web browser and type your router's IP address (often 192.168.1.1 or 192.168.0.1). Log in with your admin credentials. 2. **Find Port Forwarding Settings:** Look for sections like "Port Forwarding," "NAT," "Virtual Servers," or "Firewall." 3. **Create a New Rule:** * **External Port:** This is the port you'll use from outside your network. While the default SSH port is 22, it's a common security practice to use a different external port (e.g., 2223, 2222, or something less common) to avoid constant scanning attempts on port 22. For instance, I configured the SSHD daemon on port 2223 by modifying the file `/etc/ssh/sshd_config`. * **Internal Port:** This should be the actual SSH port on your Raspberry Pi, which is usually 22. * **Internal IP Address:** Enter the static local IP address of your Raspberry Pi. * **Protocol:** Select TCP. * **Enable the Rule:** Make sure the rule is active. * For example, you might forward port 2223 TCP to the IP of your Pi on internal port 22. I have set up port forwarding on port 80 for my Raspberry Pi (though for SSH, it should be 22 or a custom port). 4. **Find Your Public IP Address:** From outside your network, you need your public IP address, which is provided by your Internet Service Provider (ISP). You can find this by simply searching "what is my IP" on Google from a device connected to your home network. Note that this IP address can change (dynamic IP), unless you have a static IP from your ISP. **Connecting from Outside:** Once port forwarding is set up, you can try to access your Pi from outside your LAN network. From outside your network, use the public IP address provided by your internet service provider (ISP) and the forwarded port (e.g., 22 or 2223) to connect to your Raspberry Pi. Example command: `ssh pi@YOUR_PUBLIC_IP -p YOUR_FORWARDED_PORT` (e.g., `ssh pi@203.0.113.45 -p 2223`) **Challenges with Port Forwarding:** * **Dynamic IP:** If your public IP changes, you'll need to update your connection details or use a Dynamic DNS (DDNS) service. * **Security Risks:** Opening ports on your router can expose your network to potential threats if not configured securely. * **Firewall:** If you have a firewall enabled on your Raspberry Pi, ensure that it allows incoming connections on the specified port (e.g., port 22 for SSH). When I try to connect from outside, sometimes I cannot SSH into Raspberry Pi from outside home network. This is a common issue, and it usually boils down to incorrect port forwarding, a firewall blocking the connection, or an ISP blocking the port.Method 2: VPN Solutions – Secure and Flexible Access
A VPN (Virtual Private Network) is a secure connection that allows you to create a private network over a public network. This is a much more secure and often simpler method than port forwarding, as it doesn't require opening specific ports on your router to the public internet. Instead, your devices securely connect to a private network that includes your Raspberry Pi.Tailscale: A Modern VPN Solution
Tailscale is an excellent example of a modern VPN that simplifies remote access. It builds on WireGuard and creates a secure mesh network between your devices, regardless of their physical location or the network they're on. This means you can access your Raspberry Pi as if it were on the same local network as your laptop or phone, even if you're thousands of miles away. **How Tailscale Works:** Tailscale assigns each device on your "tailnet" (your private network) a unique IP address within that network. All connections are encrypted end-to-end. It handles NAT traversal and firewall rules automatically, eliminating the need for manual port forwarding. **Setting up Tailscale on your Raspberry Pi:** 1. **Sign up for Tailscale:** Pricing Tailscale offers a straightforward pricing structure, starting with a free tier that supports up to 100 devices and includes all the key features needed for secure remote access. No credit card or payment is required for free account signup. 2. **Install Tailscale on your Raspberry Pi:** * Open a terminal on your Pi. * Follow the installation instructions on the Tailscale website (usually a simple `curl` command to add their repository and then `apt install tailscale`). * Run `sudo tailscale up` to connect your Pi to your tailnet. It will provide a URL to authenticate your device. 3. **Install Tailscale on your client device(s):** Install the Tailscale client on the computer or phone you want to use to connect to your Pi. 4. **Connect:** Once both devices are connected to your tailnet, you can simply SSH into your Raspberry Pi using its Tailscale IP address (e.g., `ssh pi@100.x.x.x`). With your tailnet set up, you’re ready to access your Raspberry Pi from anywhere in the world, securely and without any complicated network configurations. This is a significant advantage over traditional port forwarding, especially if you have a complex home network setup or issues with your wireless modem in the basement and ethernet cables causing connectivity woes. I want to be able to SSH into my Pi from outside my home network, and Tailscale offers a robust solution for this.Method 3: Cloud-Based Tunnels – Simplifying Remote Connections
Cloud-based tunneling services provide another way to bypass router configurations and dynamic IP issues. These services create a secure tunnel from your Raspberry Pi to a public server, which then allows you to access your Pi via a public URL or IP address provided by the service.Ngrok: Quick and Temporary Tunnels
Ngrok is a popular service for creating secure tunnels to expose a local server to the internet. It's often used for testing webhooks or sharing local development environments, but it can also be used for SSH. **How to use Ngrok for SSH:** 1. **Sign up for Ngrok:** Get an authtoken from their website. 2. **Install Ngrok on your Raspberry Pi:** Download the appropriate ARM version and extract it. 3. **Connect your authtoken:** `ngrok authtoken YOUR_AUTH_TOKEN` 4. **Start the SSH tunnel:** Type the following command in your Raspberry Pi terminal to enable access PuTTY terminal from remote: `./ngrok tcp 22`. 5. **Connect:** Ngrok will provide a public host address and port number (e.g., `tcp://0.tcp.ngrok.io:12345`). Note the host address and the port number shown in the picture below. You’ll use these to access the Raspberry Pi. If your tunnel status is “online,” you can open your Raspberry Pi terminal using PuTTY anywhere. Example command: `ssh pi@0.tcp.ngrok.io -p 12345` Ngrok is great for quick, temporary access, but for persistent connections, you might need a paid plan.SocketXP IoT Agent for Persistent Access
SocketXP is another cloud-based tunneling service specifically designed for IoT devices like the Raspberry Pi, offering persistent and secure remote access. **How to use SocketXP for SSH:** 1. **Sign up for SocketXP:** No credit card or payment is required for free account signup. 2. **Download and install SocketXP IoT Agent on your Raspberry Pi:** Follow their instructions, which usually involve a simple curl command to download and install. 3. **Connect your agent:** You'll typically run a command like `socketxp agent connect --ssh-server-port 22` and enter your Raspberry Pi's credentials when prompted. 4. **Access:** SocketXP will provide you with a public URL or command that you can use to SSH into your Pi from anywhere. Here is what you need to do to remote access Raspberry Pi from outside local network. SocketXP offers a more robust solution for always-on remote access, ideal for long-term projects where you need reliable connectivity without the complexities of port forwarding.Enhancing Security for Your Remote Raspberry Pi
Regardless of the method you choose to SSH into your Raspberry Pi from outside your network, security must be a top priority. Your Raspberry Pi, once exposed to the internet, becomes a potential target. 1. **Change the Default Password:** This is absolutely critical. The default password for the `pi` user is well-known (`raspberry`). Change the default password of the `pi` user to enhance security immediately after enabling SSH. * Command: `passwd` 2. **Use Strong, Unique Passwords:** For any user accounts on your Pi, use complex passwords that are difficult to guess. 3. **Use SSH Key-Based Authentication:** Instead of passwords, use SSH keys for authentication. This is significantly more secure. You generate a public/private key pair, put the public key on your Pi, and use the private key on your client machine. PuTTY, which is the tech behind MobaXterm, works well with public/private keys. 4. **Change the Default SSH Port:** As mentioned in the port forwarding section, changing the default SSH port (22) to a non-standard port (e.g., 2223) can reduce automated scanning attempts. Remember to update `/etc/ssh/sshd_config` and restart the SSH service (`sudo systemctl restart ssh`). 5. **Configure a Firewall (UFW):** Enable a firewall on your Raspberry Pi and configure it to only allow incoming connections on the SSH port (and any other necessary ports). * Install UFW: `sudo apt install ufw` * Enable SSH: `sudo ufw allow 2223/tcp` (if you changed the port) or `sudo ufw allow ssh` (if using default port 22). * Enable firewall: `sudo ufw enable` 6. **Regularly Update Your Raspberry Pi:** Regularly update your Raspberry Pi to keep it secure. This ensures you have the latest security patches and bug fixes. * Commands: `sudo apt update && sudo apt full-upgrade -y` 7. **Disable Root Login:** Ensure direct SSH login for the root user is disabled in `/etc/ssh/sshd_config`. 8. **Implement Fail2Ban:** This tool automatically bans IP addresses that show malicious signs, such as too many failed login attempts.Troubleshooting Common Connection Issues
Even with the best planning, you might encounter issues when trying to SSH into your Raspberry Pi from outside your network. "I cannot find how to SSH into my Pi from the outside network" is a common cry for help. Here are some common problems and solutions: 1. **"Cannot SSH into Raspberry Pi from outside home network":** * **Is SSH enabled on the Pi?** Double-check using `sudo systemctl status ssh`. * **Is the Pi powered on and connected to the network?** Simple, but often overlooked. * **Correct IP Address:** Are you using the correct public IP address for your home network? Is it dynamic and has it changed? * **Port Forwarding Issues:** * Did you forward the correct external port to the correct internal port (22) and the correct internal IP address of your Raspberry Pi? * Is the port forwarding rule enabled on your router? * Is your ISP blocking the port? Some ISPs block common ports like 22 for residential connections. Try using a different external port (e.g., 2223). * **Firewall on Raspberry Pi:** Is the Raspberry Pi's firewall (UFW) blocking the incoming connection? Ensure you've allowed the correct SSH port. * **Router Firewall:** Is your router's firewall configured to block outgoing connections on the port you're using, or is it preventing the forwarded traffic? * **Local Network Test:** Can you SSH into the Raspberry Pi from another computer *within* your home network using its local IP? If not, the issue is internal to your Pi or local network setup. * **Custom SSH Port:** If you changed the SSH port on your Pi (e.g., to 2223), ensure you are specifying that port when connecting from outside (e.g., `ssh pi@YOUR_PUBLIC_IP -p 2223`). 2. **"I try to access my Pi from outside my LAN network, but it doesn't work":** * Verify your public IP address. * Use an online port checker tool (e.g., `canyouseeme.org`) to see if the external port you configured is actually open and reachable from the internet. If it's not, your port forwarding is likely incorrect, or your ISP is blocking it. * Ensure the SSH daemon is running on the Pi and listening on the expected port (`sudo netstat -tuln | grep 22`). 3. **"My main issue is that I have my wireless modem in the basement and because my house is wired with ethernet cables, I have a cable coming from the jack in my wall into my wireless router and then into my Pi 2 B":** * This setup suggests a cascaded router scenario or a complex internal network. Ensure that port forwarding is correctly configured on the *main* router (the one connected directly to your ISP) and that any intermediate devices (like a second router acting as an access point) are not interfering with the traffic. Sometimes, double NAT (Network Address Translation) can occur, making port forwarding extremely difficult. VPN solutions like Tailscale often bypass these complexities entirely. Remember, patience and systematic troubleshooting are key. Check one thing at a time, and verify each step.Conclusion
The ability to SSH into your Raspberry Pi from outside your network is a game-changer for anyone looking to maximize the utility of this versatile little computer. There are a few different ways to SSH into your Raspberry Pi from outside your network, and we've covered two of the most common methods: traditional port forwarding and modern VPN solutions like Tailscale, alongside cloud-based tunnels like Ngrok and SocketXP. Each method has its pros and cons, from the direct control of port forwarding to the simplicity and enhanced security of VPNs and cloud services. By following the steps outlined in this guide, you can confidently set up remote access to your Raspberry Pi, whether it's for managing smart home devices, hosting a personal server, or simply tinkering from afar. Always remember to prioritize security by changing default passwords, using SSH keys, and keeping your system updated. The world of remote access to your Raspberry Pi is now open to you—go forth and explore the possibilities! What are your favorite methods for remote access? Have you encountered any tricky network configurations? Share your experiences and tips in the comments below, and don't forget to explore our other articles on maximizing your Raspberry Pi's potential!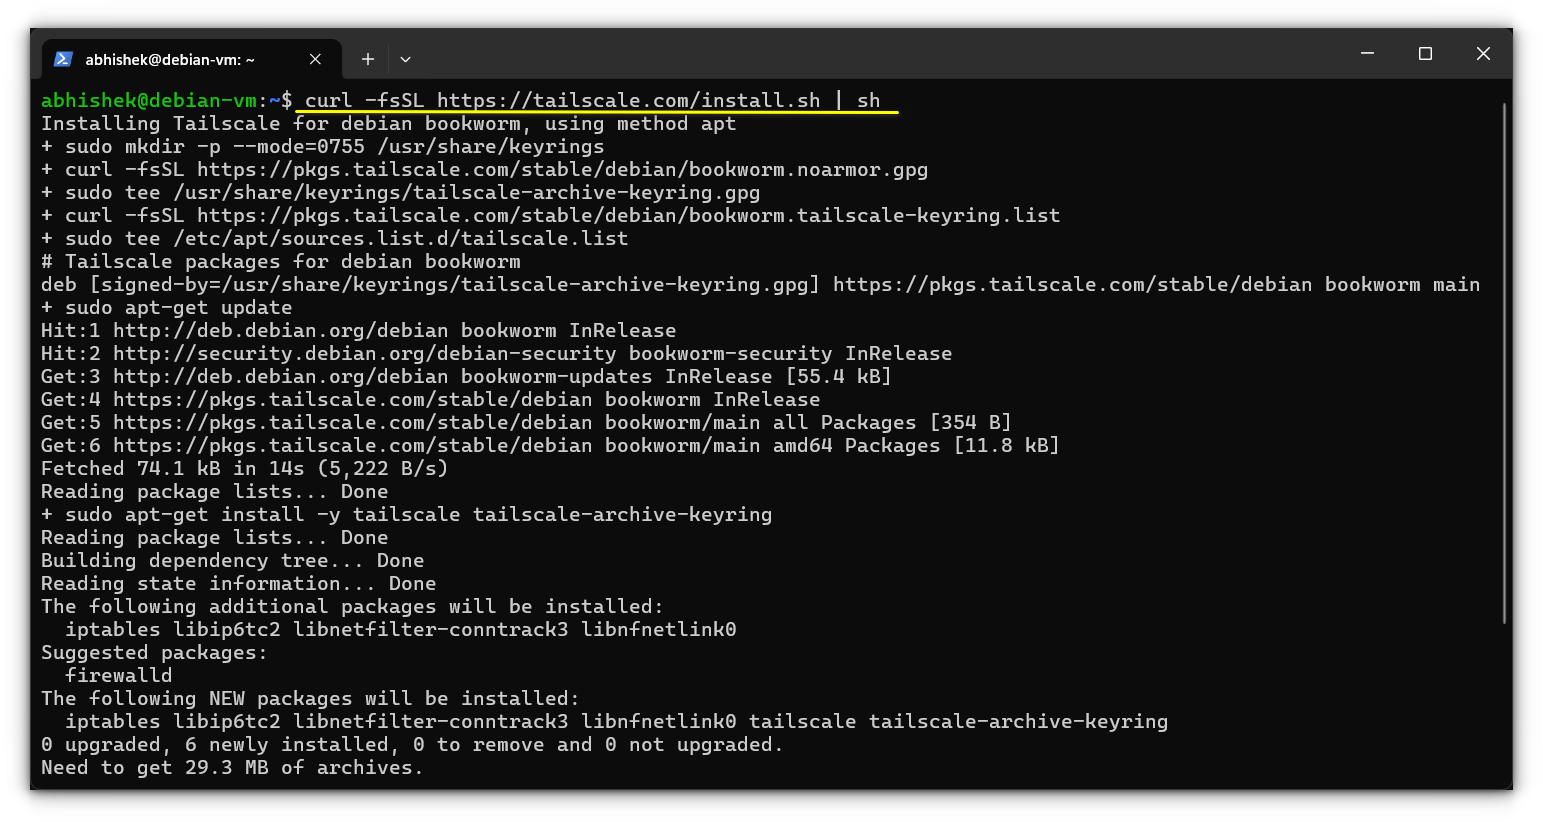
Belajar Agar Berkembang: SSH into Raspberry Pi from Outside Home

How To Use SSH Raspberry Pi Behind Firewall On Windows: A Comprehensive

Mastering Remote Access: How To SSH Into Raspberry Pi From A Different
