Securely Access Your Raspberry Pi Anywhere: SSH Outside Your Network
For many Raspberry Pi enthusiasts, the journey begins with local projects, controlling devices, or running simple servers within the confines of their home network. However, the true power and utility of this versatile single-board computer are unlocked when you can access it from anywhere in the world. This is where the ability to ssh to Raspberry Pi outside network becomes an indispensable skill, transforming your Pi into a truly remote-managed powerhouse.
Whether you're using your Raspberry Pi for personal projects, as a crucial part of your smart home setup, or even for more advanced server applications, reliable and secure remote access is paramount. The convenience of managing your Pi without needing a monitor or keyboard connected directly to it opens up a world of possibilities, from quick troubleshooting to deploying updates while you're away. This comprehensive guide will walk you through the various methods and crucial security considerations for achieving this seamless remote control.
Table of Contents
- Why SSH Your Raspberry Pi from Outside Your Local Network?
- Understanding the Basics: How SSH Works with Raspberry Pi
- Essential Pre-Configuration Steps on Your Raspberry Pi
- Traditional Methods for Remote SSH Access: Port Forwarding
- Enhanced Security and Simplicity: VPN Solutions
- Fortifying Your Raspberry Pi: Essential SSH Security Practices
- Troubleshooting Common SSH Connection Issues
- The Future of Remote Pi Access: Beyond Basic SSH
- Conclusion: Mastering Remote Raspberry Pi Access
Why SSH Your Raspberry Pi from Outside Your Local Network?
The question isn't just "how," but "why?" If you've already got your Raspberry Pi configured to connect via SSH to other devices like your desktop or laptop on your local network, you might wonder about the next step. The answer lies in maximizing its utility and securely managing it from anywhere. Imagine you're on vacation, and you need to check on your home automation system powered by the Pi, or perhaps you want to upload a new script for a personal project. Without the ability to ssh to Raspberry Pi outside network, you're stuck. You'd have to physically be there, or rely on less secure, often cumbersome, alternatives.
Enabling SSH provides a robust, encrypted channel to control your Raspberry Pi remotely. It allows you to perform tasks, run commands, transfer files, and even troubleshoot issues without the need for a monitor or keyboard connected directly to the Pi. This capability is particularly vital if your Pi is located in an inconvenient spot, or if you simply prefer the efficiency of command-line management. For those venturing into IoT projects, you'll quickly realize that serving web pages or data beyond your local network requires overcoming significant hurdles – and remote SSH access is often the first step in jumping through those hoops.
Understanding the Basics: How SSH Works with Raspberry Pi
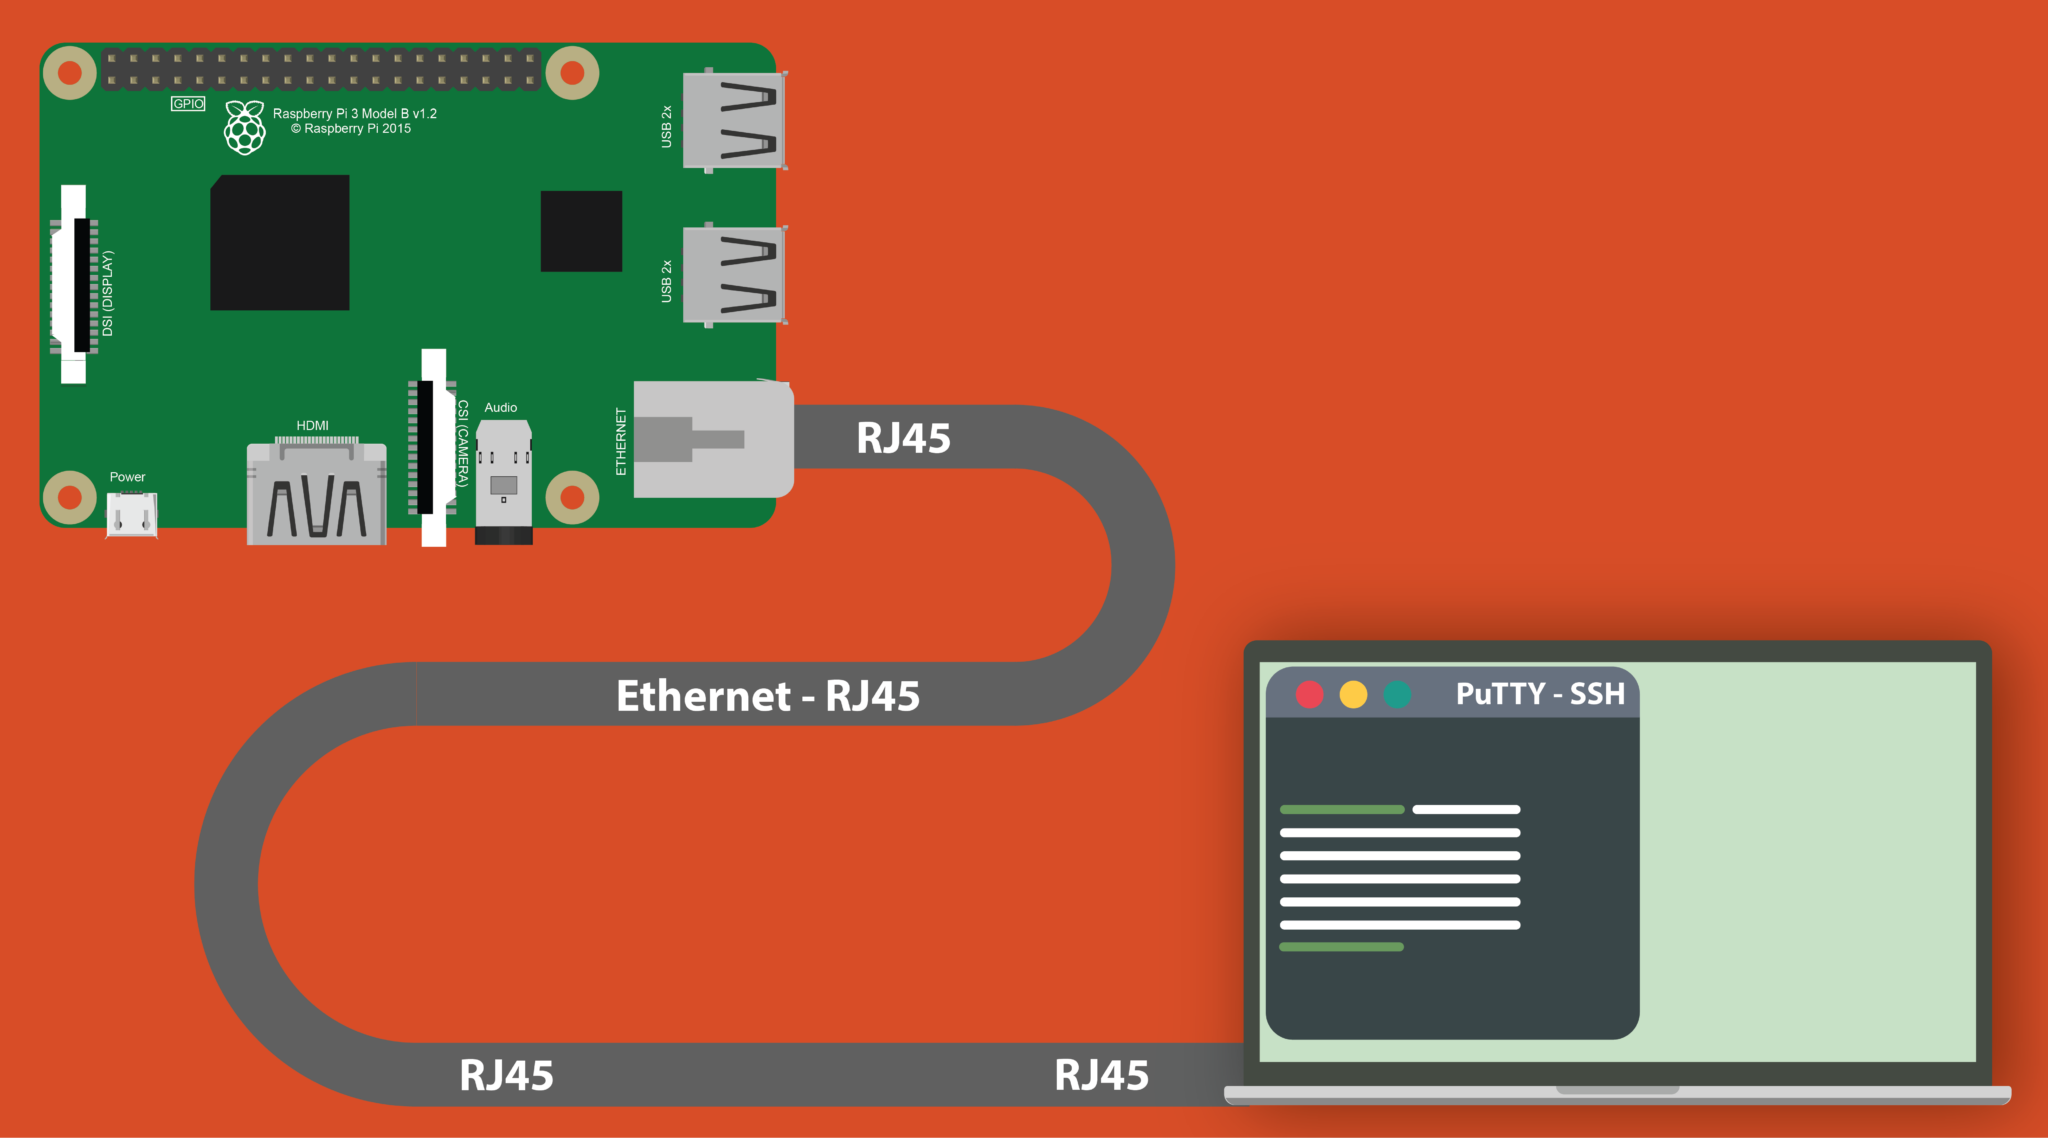
SSH, or Secure Shell, is a cryptographic network protocol for operating network services securely over an unsecured network. It's designed to provide a secure channel over an unsecured network by using a client-server architecture, connecting an SSH client application with an SSH server. For your Raspberry Pi, this means you'll be running an SSH server on the Pi itself, and using an SSH client (like PuTTY on Windows, or the built-in terminal on Linux/macOS) on your remote device.
The good news is that by default, Raspberry Pi OS (previously known as Raspbian) comes with the OpenSSH server preinstalled. This powerful tool handles user authentication, terminal connections, encryption, file transfers (via SCP or SFTP), and even tunneling. However, while it's preinstalled, it's not enabled by default for security reasons. To use it, we first need to enable the service on your Raspberry Pi, which is a straightforward process.
Essential Pre-Configuration Steps on Your Raspberry Pi
Before you can even think about how to ssh to Raspberry Pi outside network, there are a couple of fundamental steps you need to complete on the Pi itself. These ensure your device is ready to accept incoming connections and remains accessible on your local network.
Enabling SSH on Your Raspberry Pi
This is the very first step. If SSH isn't enabled, no amount of network configuration will help. There are a few easy ways to do this:
- Via Raspberry Pi Configuration Tool (GUI): If you have a monitor and keyboard connected to your Pi, go to the Raspberry Pi icon (menu) > Preferences > Raspberry Pi Configuration. Under the 'Interfaces' tab, ensure 'SSH' is set to 'Enabled'.
- Via Terminal (CLI): Open the terminal on your Raspberry Pi and type the following command:
Navigate to 'Interface Options' > 'SSH' > 'Yes' > 'OK' > 'Finish'. This will enable the SSH service.sudo raspi-config - Via a Headless Setup (Creating a file): If you're setting up a new Pi without a monitor, you can enable SSH by placing an empty file named
ssh(no extension) in the boot partition of the SD card. When the Pi boots, it will detect this file and enable SSH.
Once enabled, you should be able to SSH into your Raspberry Pi from another device on the same local network using its local IP address (e.g., ssh pi@192.168.1.100). If you can't do this, then remote access will certainly fail.
Setting a Static IP Address for Your Raspberry Pi
When your Raspberry Pi connects to your local network, your router typically assigns it an IP address dynamically (DHCP). This address can change over time, which is problematic for remote access. Imagine setting up port forwarding to an IP address, only for that address to change next week! Setting up your Raspberry Pi with a static IP ensures it always has the same local address. This is crucial for reliable port forwarding and other network configurations.
You can configure a static IP either on your Raspberry Pi itself (by editing /etc/dhcpcd.conf) or, more commonly and preferably, by reserving an IP address for your Pi's MAC address within your router's DHCP settings. The latter is generally recommended as it centralizes network management and avoids potential conflicts.
Traditional Methods for Remote SSH Access: Port Forwarding
The most common and historically used method to ssh to Raspberry Pi outside network involves port forwarding. This technique essentially tells your home router to direct incoming traffic on a specific port from the internet to a particular device (your Raspberry Pi) on your local network.
Here's how it generally works:
- Find Your Public IP Address: From outside your network, you'll need your home's public IP address. This is the IP address assigned to your router by your Internet Service Provider (ISP). You can find this by simply searching "What is my IP address" on Google while connected to your home network.
- Configure Port Forwarding on Your Router: Log into your router's administration interface (usually via a web browser, e.g.,
192.168.1.1or192.168.0.1). Look for sections like "Port Forwarding," "NAT," or "Virtual Servers." You'll need to create a new rule:- External Port: This is the port you'll use from outside. While the default SSH port is 22, it's highly recommended to change it to something else (e.g., 2000, 2222, or any unassigned high port number like 49152-65535) for security reasons. This reduces the number of automated scanning attempts on the default port.
- Internal Port: This is the port your Raspberry Pi's SSH server is listening on (default 22, or whatever you changed it to).
- Internal IP Address: This is the static local IP address of your Raspberry Pi (e.g., 192.168.1.100). You can't tell your router to just send it to "my Raspberry Pi"; you must specify its exact local IP address.
- Protocol: TCP.
- Adjust Raspberry Pi Firewall (if applicable): If you have a firewall enabled on your Raspberry Pi (e.g., UFW), ensure that it allows incoming connections on the specified port (e.g., port 22 or your custom port).
- Connect from Outside: Once configured, you can use your public IP address and the forwarded external port to connect. For example, if your public IP is
203.0.113.45and you forwarded external port 2000 to internal port 22 on your Pi, the command would be:
If using PuTTY, you'd enter the public IP as the Host Name and the custom port (e.g., 2000) in the Port field.ssh -p 2000 pi@203.0.113.45
Dynamic DNS (DDNS) for Dynamic Public IPs
A common challenge with port forwarding is that most residential ISPs provide dynamic public IP addresses. This means your public IP can change periodically, breaking your remote SSH connection. This is where a dynamic DNS (DDNS) service comes in handy. A DDNS service maps a static hostname (like myrpi.ddns.net) to your dynamic public IP address. Your router or a client on your Raspberry Pi periodically updates the DDNS service with your current public IP, ensuring that your chosen hostname always points to your home network.
Popular DDNS providers include No-IP, Dynu, and DuckDNS. Using a static IP address for your Pi and a dynamic DNS service for your public IP creates a robust system for consistent remote access.
Enhanced Security and Simplicity: VPN Solutions
While port forwarding works, it exposes a port on your router directly to the internet, which can be a security risk if not managed carefully. A more secure and often simpler approach to ssh to Raspberry Pi outside network involves using VPN (Virtual Private Network) solutions or tunneling services. These methods create a secure, encrypted tunnel to your Raspberry Pi without the need for direct port exposure on your router.
A few readers have suggested using services like Tailscale or Cloudflare Tunnels, and indeed, these are incredibly handy tools if your aim is to SSH into your Raspberry Pi securely from outside your home network without the hassle of complicated network setups.
Using Tailscale for Secure Remote Access
Tailscale is a modern VPN service built on WireGuard that creates a secure mesh network between your devices, regardless of their location. It's incredibly easy to set up and provides a highly secure way to access your Raspberry Pi. Here's a simplified overview:
- Sign Up for Tailscale: Create a free account on the Tailscale website.
- Install Tailscale on Raspberry Pi: Open the terminal on your Raspberry Pi and run the installation commands provided by Tailscale (usually a single line script).
- Authenticate Pi with Tailscale: After installation, run
sudo tailscale up. This will provide a URL to authenticate your Pi with your Tailscale account via your web browser. Once authenticated, your Pi becomes a node on your private Tailscale network. - Install Tailscale on Your Client Device: Install the Tailscale client on your laptop, desktop, or mobile device from which you want to connect. Authenticate it with the same Tailscale account.
- Connect to Pi: Once both devices are on your Tailscale network, you can SSH into your Raspberry Pi using its Tailscale IP address (which usually starts with 100.x.x.x) or its Tailscale hostname (e.g.,
my-pi).
orssh pi@100.x.x.xssh pi@my-pi
Tailscale handles all the complex NAT traversal and firewall configuration for you, making it a fantastic solution for secure remote access without port forwarding. Cloudflare Tunnels offer a similar concept, creating a secure tunnel from your Pi to Cloudflare's network, which then exposes your service securely without direct port exposure.
Fortifying Your Raspberry Pi: Essential SSH Security Practices
When you expose your Raspberry Pi to the internet, even through secure tunnels, security becomes paramount. We've already discussed the security implications of SSH, and protecting your Raspberry Pi from unauthorized access is critical. Neglecting security can lead to your Pi being compromised, used for malicious activities, or your data being stolen. Here are key practices:
- Change Default SSH Port: As mentioned, change the default SSH port (22) on your Raspberry Pi to something else (e.g., port 2000, 2222, or a high, unused port). This won't stop a determined attacker, but it significantly reduces automated brute-force attacks that target the default port. You can change this in the
/etc/ssh/sshd_configfile. - Use Strong Passwords: Ensure the 'pi' user (or any other user you SSH with) has a very strong, unique password. Better yet, disable password authentication entirely.
- Implement SSH Key-Based Authentication: This is far more secure than passwords. Generate an SSH key pair (public and private keys). Place the public key on your Raspberry Pi (in
~/.ssh/authorized_keys) and keep the private key secure on your client device. Then, disable password authentication in/etc/ssh/sshd_configby settingPasswordAuthentication no. - Disable Root Login: Never allow direct SSH login for the root user. Ensure
PermitRootLogin noin/etc/ssh/sshd_config. - Limit User Access: Only allow necessary users to SSH into the Pi. You can specify allowed users in
/etc/ssh/sshd_configusingAllowUsers. - Implement a Firewall: Even if you use VPN solutions, having a local firewall like UFW (Uncomplicated Firewall) on your Raspberry Pi is a good layer of defense. Ensure that it allows incoming connections only on the specified SSH port (if you're using port forwarding) or from trusted VPN interfaces.
- Keep Software Updated: Regularly update your Raspberry Pi OS and all installed packages to patch security vulnerabilities. Use
sudo apt update && sudo apt upgrade. - Fail2Ban: Consider installing Fail2Ban, a service that automatically blocks IP addresses that show malicious signs (e.g., too many failed SSH login attempts).
Troubleshooting Common SSH Connection Issues
It's not uncommon to encounter issues when trying to ssh to Raspberry Pi outside network. Here are some common errors and how to approach them:
- "Operation timed out" / "Connect to host X.X.X.X port 22: Operation timed out":
- Public IP Address Issue: Your public IP might have changed if you don't use DDNS.
- Port Forwarding Issue: The port forwarding rule on your router might be incorrect, or the router itself isn't forwarding traffic. Double-check the external port, internal port, and the Pi's static local IP.
- ISP Blocking: Some ISPs block incoming connections on certain ports (like 22) or don't allow port forwarding on residential accounts. Contact your ISP if you suspect this.
- Firewall on Router/Pi: A firewall on your router or Raspberry Pi might be blocking the connection. Ensure the specified port is open.
- Pi is Off/Disconnected: Obvious, but ensure your Raspberry Pi is powered on and connected to the network.
- "SSH connection refused" / "putty give me this error(ssh connection refused)":
- SSH Service Not Running: SSH might not be enabled or running on your Raspberry Pi. Check its status with
sudo systemctl status ssh. If it's not running, enable it viasudo raspi-configorsudo systemctl enable ssh --now. "Obviously SSH is enabled on Raspberry Pi as I can SSH it locally" is a good starting point, but external access can still fail if the service crashes or is misconfigured for external connections. - Incorrect Port: You're trying to connect to the wrong port. Ensure you're using the correct external port that you configured for forwarding.
- Firewall Blocking: A firewall on the Raspberry Pi is explicitly refusing the connection. Check UFW rules.
- SSH Server Configuration: The
sshd_configfile might have restrictive rules (e.g.,AllowUsers,DenyUsers,ListenAddress). - Authentication Failure: While the message is "connection refused," sometimes it can mask underlying authentication issues if the server quickly rejects the connection before a full authentication handshake. Double-check username and password/key.
- SSH Service Not Running: SSH might not be enabled or running on your Raspberry Pi. Check its status with
- "Is the commands and setting correct?": This is a common question. Always verify:
- The Pi's local IP is static.
- SSH is enabled on the Pi.
- Port forwarding rules on the router are exact (external port, internal port, Pi's static local IP, TCP protocol).
- Your public IP is current (if not using DDNS).
- Any firewalls (router, Pi) allow the connection.
The Future of Remote Pi Access: Beyond Basic SSH
While SSH provides a powerful command-line interface, the realm of remote Raspberry Pi access extends further. Tools like Ngrok offer a quick way to expose local services to the internet via secure tunnels without complex router configuration. For instance, typing /ngrok tcp 22 in your Raspberry Pi terminal can create a tunnel for SSH. If your tunnel status is "online," you can open your Raspberry Pi terminal using PuTTY anywhere by noting the host address and port number shown by Ngrok. You'll use these to access the Raspberry Pi.
Beyond SSH, you might explore web-based interfaces like Webmin or Cockpit for a more graphical remote management experience, or even VNC for a full desktop environment. However, SSH remains the foundational and most secure method for direct, low-level control, often serving as the gateway to setting up these other services.
Conclusion: Mastering Remote Raspberry Pi Access
The ability to ssh to Raspberry Pi outside network fundamentally changes how you interact with your device. It transforms your Pi from a local hobbyist board into a truly global, accessible computing platform. We've explored the traditional method of port forwarding, the complexities it introduces with dynamic IPs, and the modern, more secure, and user-friendly alternatives like Tailscale. We also delved deep into the critical security practices that are non-negotiable when exposing your Pi to the internet, and provided guidance on troubleshooting common connection woes.
By following these steps and prioritizing security, you can confidently access and control your Raspberry Pi effortlessly from anywhere in the world. This newfound freedom not only enhances your productivity but also unlocks a myriad of possibilities for your projects, from remote data collection to home automation management. What remote projects are you planning to tackle now that your Pi is truly connected? Share your thoughts and experiences in the comments below, or explore our other guides on maximizing your Raspberry Pi's potential!

SSH Raspberry Pi Outside Network: Enabling Remote Access 2023
SSH Raspberry Pi Outside Network: Enabling Remote Access 2023
Comment connecter ordinateur ssh ? - Raspberry Pi France
