Unlocking Remote IoT: Your Ultimate Guide To Raspberry Pi VPC Networks
In the rapidly evolving world of IoT (Internet of Things), devices like the Raspberry Pi have become central to innovation and creativity, offering unparalleled versatility for hobbyists and professionals alike. When paired with advanced networking concepts, particularly a Virtual Private Cloud (VPC), the tiny yet mighty Raspberry Pi transforms into a powerhouse for remote device management and data collection. This article is your ultimate guide to mastering the best remote IoT VPC network Raspberry Pi setup.
Whether you're a beginner eager to explore the frontiers of connected devices or an advanced user looking to optimize your existing IoT infrastructure, this comprehensive guide will walk you through everything you need to know about setting up the best remote IoT VPC network Raspberry Pi. So grab your favorite beverage, settle into a comfortable spot, and prepare to delve into the intricacies of secure, scalable, and efficient remote IoT solutions.
Table of Contents
- The Evolution of IoT and the Raspberry Pi's Role
- Understanding Remote IoT VPC Networks
- Essential Tools and Concepts for Your Remote IoT VPC Network
- Setting Up Your Raspberry Pi for Remote IoT VPC
- Building Your Remote IoT VPC Network on AWS (Free Tier Focus)
- Best Practices for a Resilient Remote IoT VPC Network
- Advanced Applications and Future Possibilities
- Troubleshooting Common Issues
The Evolution of IoT and the Raspberry Pi's Role
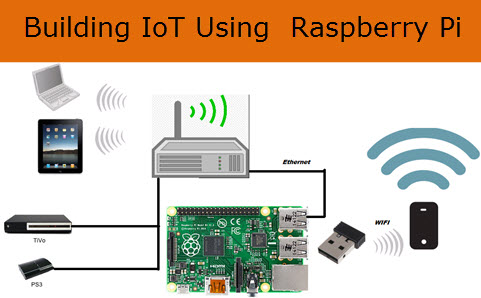
The Internet of Things (IoT) has rapidly evolved from a niche concept to a pervasive technology, integrating billions of devices into our daily lives and industries. From smart homes that anticipate our needs to industrial sensors monitoring complex machinery, IoT is transforming how we interact with the physical world. At the heart of much of this innovation lies the Raspberry Pi – a series of small, single-board computers developed in the UK by the Raspberry Pi Foundation. The Raspberry Pi's affordability, versatility, and robust community support have made it an indispensable tool for IoT development. Its compact size, low power consumption, and GPIO (General Purpose Input/Output) pins make it ideal for prototyping and deploying a wide array of IoT projects. Whether it's collecting sensor data, controlling actuators, or acting as a local gateway, the Raspberry Pi excels. However, managing these devices remotely, especially when they are deployed in diverse locations behind firewalls, presents a significant challenge. This is where the concept of a Virtual Private Cloud (VPC) network becomes not just useful, but essential, especially when aiming for the **best remote IoT VPC network Raspberry Pi** setup.Understanding Remote IoT VPC Networks
At its core, a Virtual Private Cloud (VPC) is a private, isolated section of a public cloud where you can launch resources in a virtual network that you define. Think of it as your own private data center within a larger cloud provider's infrastructure. For IoT, a VPC offers a secure and controlled environment for your devices to communicate, process data, and be managed remotely. The combination of a Virtual Private Cloud (VPC), Secure Shell (SSH), and Raspberry Pi offers an unparalleled solution for remote IoT device management. Secure remote control of IoT devices on your Raspberry Pi is made possible via a VPC, which lets you establish a private and secure network connection over the internet without sacrificing security or performance. This means you can imagine controlling your smart home, monitoring sensors, or managing remote systems—all from a tiny Raspberry Pi, regardless of its physical location. But where do you even start with such a powerful setup? This article delves deep into the concept of a remote IoT VPC network with Raspberry Pi, exploring its significance, applications, setup process, and best practices.Why a VPC for Remote IoT?
The primary reasons for leveraging a VPC for your remote IoT deployments are security, scalability, and direct connectivity.- Security: In a VPC, you have granular control over network access, including IP addresses, subnets, route tables, and network gateways. This allows you to create highly secure environments, isolating your IoT devices from the public internet while still enabling necessary remote access. This is crucial for protecting sensitive data and preventing unauthorized access to your devices.
- Scalability: As your IoT deployment grows, a VPC allows you to easily scale your network infrastructure without re-architecting your entire system. You can add more Raspberry Pis, integrate new services, and expand your network capacity seamlessly within your defined private cloud space.
- Reliability and Performance: By keeping traffic within the cloud provider's high-speed network, a VPC can offer more consistent performance and lower latency compared to routing traffic over the open internet.
The Power of Direct Connectivity
One of the most compelling advantages of a well-configured remote IoT VPC network is the ability to directly connect to your Raspberry Pi behind a firewall from anywhere as if it was on the local network. This eliminates the complexities of port forwarding, dynamic DNS, or VPN server setups on the local network side, which can be unreliable or insecure. With Remote.it VPC, you can securely and directly connect Raspberry Pi and IoT devices from virtually any location. This direct connection capability is a game-changer for maintenance, troubleshooting, and real-time interaction with your remote devices. You can send commands and batch jobs to the Raspberry Pi from a web portal, enabling powerful automation and control from a centralized interface.Essential Tools and Concepts for Your Remote IoT VPC Network
Building the **best remote IoT VPC network Raspberry Pi** setup requires familiarity with several key tools and concepts. This comprehensive guide serves as your trusted compass, navigating the best practices, indispensable tools, and crucial configurations required to construct a resilient and secure remote IoT system.- Secure Shell (SSH): This entails operating the Raspberry Pi through a network protocol like SSH (Secure Shell) or VNC (Virtual Network Computing). SSH is fundamental for secure remote command-line access to your Raspberry Pi. It encrypts all communication, protecting your credentials and data.
- Virtual Private Network (VPN): While a VPC provides network isolation, a VPN client on your Raspberry Pi can further enhance security by creating an encrypted tunnel to a VPN server, often within your VPC or a dedicated VPN service. This is particularly useful for connecting to private resources within your VPC.
- Cloud Platforms (e.g., AWS, Azure, Google Cloud): These platforms provide the infrastructure for building your VPC. AWS (Amazon Web Services) is a popular choice due to its extensive services, including a generous free tier that allows for experimentation.
- IoT Platforms (e.g., AWS IoT Core): These services facilitate secure, bi-directional communication between your IoT devices and the cloud. They handle device authentication, message routing, and data processing, simplifying the management of large-scale IoT deployments.
- Remote.it: This service simplifies secure remote access to devices behind firewalls without complex network configurations. It creates peer-to-peer connections, making it incredibly easy to connect to your Raspberry Pi from anywhere. Securely connecting your Raspberry Pi to an AWS VPC using Remote.it is no longer a complex task; it's a critical requirement for anyone aiming to build a robust and safe remote IoT infrastructure.
Setting Up Your Raspberry Pi for Remote IoT VPC
Before diving into the cloud configuration, your Raspberry Pi needs to be prepared. Setting up a remote IoT VPC network with Raspberry Pi involves several steps, from hardware preparation to software configuration. Below is a detailed guide to help you get started:- Hardware Preparation:
- Raspberry Pi Model: Any recent model (e.g., Raspberry Pi 3B+, 4, Zero 2 W) will work, but models with Wi-Fi and Bluetooth are more convenient for IoT projects.
- Power Supply: Use the official power supply for stability.
- MicroSD Card: A high-quality 16GB or 32GB (Class 10 or higher) microSD card is recommended.
- Peripherals (Initial Setup): Keyboard, mouse, and HDMI display for initial setup, though you can also do a headless setup.
- Operating System Installation:
- Download Raspberry Pi OS (formerly Raspbian) from the official Raspberry Pi website. The Lite version is often sufficient for headless IoT applications.
- Use Raspberry Pi Imager to flash the OS onto your microSD card. During this process, you can pre-configure SSH, Wi-Fi, and hostname, which is highly recommended for a headless setup.
- Initial Configuration:
- Boot your Raspberry Pi with the flashed SD card.
- Access it via SSH (if pre-configured) or directly with a monitor/keyboard.
- Update your system: `sudo apt update && sudo apt upgrade -y`
- Change default password: `passwd` (crucial for security).
- Configure locale, timezone, and enable necessary interfaces (e.g., I2C, SPI) using `sudo raspi-config`.
- Network Configuration:
- Ensure your Raspberry Pi has a stable internet connection. For remote IoT, a static IP address on your local network (if applicable) is beneficial, or rely on DHCP if your router provides consistent addressing.
- Verify connectivity: `ping google.com`
Building Your Remote IoT VPC Network on AWS (Free Tier Focus)
Setting up a remote IoT VPC network with Raspberry Pi on AWS provides a robust and scalable foundation for your IoT projects. By following the steps outlined in this section, you can leverage AWS's powerful cloud infrastructure, often within the limits of its free tier, to manage your Raspberry Pi devices remotely. This article will explore the best practices for setting up a remote IoT system using a combination of AWS services.AWS VPC Configuration Basics
To begin, you'll need an AWS account. Many of the services required for a basic setup fall within the AWS Free Tier, allowing you to experiment without significant cost.- Create a New VPC:
- Navigate to the VPC dashboard in the AWS Management Console.
- Choose "Your VPCs" and then "Create VPC."
- Define a CIDR block (e.g., `10.0.0.0/16`) for your private network.
- Create Subnets:
- Within your VPC, create at least one public subnet and one private subnet.
- Public subnets have a route to an Internet Gateway, allowing resources within them to communicate with the internet.
- Private subnets do not have a direct route to the Internet Gateway, enhancing security for your sensitive resources. Your Raspberry Pi will likely reside conceptually in a private network, accessed securely via a jump host or services like Remote.it.
- Internet Gateway (IGW):
- Create an Internet Gateway and attach it to your VPC. This allows resources in your public subnets to access the internet.
- Route Tables:
- Modify the route table associated with your public subnet to include a route to the Internet Gateway.
- For your private subnet, you might need a route to a NAT Gateway (for outbound internet access from private resources) or a VPN connection.
- Security Groups:
- Create security groups that act as virtual firewalls for your instances. Define inbound and outbound rules. For your Raspberry Pi, you might allow SSH (port 22) only from specific IP addresses or a bastion host.
Integrating Raspberry Pi with AWS IoT Core and Remote.it
This is where the magic happens for robust remote management.- AWS IoT Core Setup:
- Register a Thing: In the AWS IoT Core console, register your Raspberry Pi as a "Thing." This creates a digital representation of your device.
- Create Policies: Define an IAM policy that grants your Raspberry Pi permissions to publish messages to IoT Core topics and subscribe to command topics.
- Generate Certificates: AWS IoT Core provides device certificates and private keys. Download these securely; they are essential for your Raspberry Pi to authenticate with IoT Core.
- Install AWS IoT Device SDK: On your Raspberry Pi, install the AWS IoT Device SDK (e.g., for Python) and configure it with your downloaded certificates and endpoint. This allows your Pi to publish sensor data and receive commands via MQTT.
- Test Connectivity: Publish a test message from your Raspberry Pi to an IoT Core topic and observe it in the MQTT test client in the AWS console. You can then send commands back to the Pi. This enables you to send commands and batch jobs to the Raspberry Pi from a web portal.
- Remote.it Integration:
- Create a Remote.it Account: Sign up for a free account on the Remote.it website.
- Install Remote.it on Raspberry Pi: Follow the official Remote.it documentation to install their agent on your Raspberry Pi. This typically involves a simple script.
- Register Your Device: Use the `remoteit` command-line tool to register your Raspberry Pi with your Remote.it account.
- Create Services: For each service you want to access remotely (e.g., SSH, HTTP, VNC), create a corresponding service in the Remote.it portal. This will generate a unique endpoint for each service.
- Secure Connection: Remote.it establishes secure, peer-to-peer connections, allowing you to directly connect to your Raspberry Pi behind a firewall from anywhere as if it was on the local network. Securely connecting your Raspberry Pi to an AWS VPC using Remote.it is no longer a complex task; it's a critical requirement for anyone aiming to build a robust and safe remote IoT infrastructure. This greatly simplifies remote access compared to traditional VPNs or public IPs.
Best Practices for a Resilient Remote IoT VPC Network
Building a robust and reliable remote IoT system with your Raspberry Pi requires adherence to best practices, especially concerning security and resilience. This comprehensive guide serves as your trusted compass, navigating the best practices, indispensable tools, and crucial configurations required to construct a resilient **best remote IoT VPC network Raspberry Pi**.- Implement Strong Security Measures:
- Least Privilege: Grant only the necessary permissions to your IoT devices and users.
- Regular Updates: Keep your Raspberry Pi OS and all installed software up to date to patch security vulnerabilities.
- SSH Key Authentication: Disable password-based SSH login and use SSH keys instead.
- Firewall Rules: Configure `ufw` (Uncomplicated Firewall) on your Raspberry Pi to restrict incoming connections to only what's absolutely necessary.
- Secure Data Transmission: Always use encrypted protocols (like MQTT over TLS/SSL for IoT Core, and SSH/HTTPS for other services).
- Robust Monitoring and Logging:
- Monitor your Raspberry Pi's health (CPU usage, memory, disk space) and network connectivity.
- Utilize AWS CloudWatch for monitoring IoT Core metrics and device logs.
- Implement logging on your Raspberry Pi to track application behavior and potential issues.
- Automated Deployment and Configuration:
- Use tools like Ansible or cloud-init scripts to automate the setup and configuration of new Raspberry Pi devices. This ensures consistency and reduces manual errors.
- Consider using containerization (e.g., Docker) for your IoT applications on the Raspberry Pi for easier deployment and isolation.
- Redundancy and Failover:
- For critical applications, consider deploying multiple Raspberry Pis for redundancy.
- Design your cloud-side architecture to be highly available (e.g., using multiple Availability Zones in AWS).
- Data Management Strategy:
- Plan how data collected by your Raspberry Pi will be stored, processed, and analyzed in the cloud.
- Leverage AWS services like S3 for storage, Lambda for serverless processing, and DynamoDB for NoSQL databases.
Advanced Applications and Future Possibilities
The **best remote IoT VPC network Raspberry Pi** setup opens up a world of advanced applications and future possibilities. Imagine controlling your smart home, monitoring sensors, or managing remote systems—all from a tiny Raspberry Pi, securely connected to a robust cloud infrastructure. But where do you even start with such powerful capabilities?- Smart Home Automation: Beyond basic control, integrate multiple sensors (temperature, humidity, motion) and actuators (lights, smart plugs) with your Raspberry Pi. Use AWS IoT Core to send commands and receive data, allowing for complex automation routines that can be managed from anywhere.
- Industrial IoT (IIoT): Deploy Raspberry Pis as edge devices in industrial settings to monitor machinery, predict maintenance needs, and optimize operational efficiency. The secure VPC connection ensures data integrity and operational continuity.
- Environmental Monitoring: Set up Raspberry Pis with environmental sensors in remote locations to collect data on air quality, water levels, or wildlife. The remote access capabilities are crucial for deploying and maintaining these devices in challenging environments.
- Edge Computing: Perform data pre-processing and analysis directly on the Raspberry Pi (at the "edge") before sending aggregated data to the cloud. This reduces latency and bandwidth usage, especially for high-volume data streams.
- Machine Learning at the Edge: Deploy lightweight machine learning models on your Raspberry Pi for real-time anomaly detection or predictive analytics, further enhancing the intelligence of your remote IoT devices.
Troubleshooting Common Issues
Even with the most meticulous planning, you might encounter issues when setting up your **best remote IoT VPC network Raspberry Pi**. Here are some common problems and their solutions:- Connectivity Issues (Raspberry Pi to Internet):
- Check Wi-Fi/Ethernet: Ensure your Raspberry Pi is properly connected to your local network. Use `ip a` to check IP address and `ping google.com` to test internet connectivity.
- Firewall on Local Network: Your local router's firewall might be blocking outbound connections. Ensure necessary ports (e.g., 8883 for MQTT, 22 for SSH) are allowed.
- AWS IoT Core Connection Failures:
- Incorrect Certificates/Keys: Double-check that the correct certificates and private keys are installed on your Raspberry Pi and referenced correctly in your IoT application code.
- Policy Permissions: Verify that your AWS IoT policy grants the necessary `iot:Connect`, `iot:Publish`, and `iot:Subscribe` permissions to your device.
- Endpoint Mismatch: Ensure your code is connecting to the correct AWS IoT Core endpoint for your region.
- Remote.it Connection Problems:
- Agent Not Running: Check if the Remote.it agent is running on your Raspberry Pi (`sudo systemctl status remoteitd`).
- Device Not Registered: Confirm your Raspberry Pi is correctly registered with your Remote.it account.
- Service Configuration: Ensure the service you're trying to access (e.g., SSH) is correctly configured in the Remote.it portal and pointing to the correct local port on your Pi.
- Local Firewall: The Raspberry Pi's local firewall (`ufw`) might be blocking the Remote.it agent's ability to create connections. Temporarily disable it for testing (`sudo ufw disable`) or add specific rules.
- SSH Access Denied:
- Incorrect Username/Password/Key: Verify your credentials. If using SSH keys, ensure the public key is on the Pi and the private key is on your client.
- SSH Server Not Running: Check if the SSH server is active on your Pi (`sudo systemctl status ssh`).
- Firewall Blocking: Ensure your Raspberry Pi's firewall or AWS Security Group is not blocking port 22.
By systematically checking these common points, you can effectively troubleshoot and resolve most issues encountered during your remote IoT VPC network setup.
In conclusion, building the best remote IoT VPC network Raspberry Pi setup empowers you with unparalleled control and security over your distributed IoT devices. From preparing your Raspberry Pi to configuring a robust VPC on AWS and leveraging services like Remote.it and AWS IoT Core, this guide has provided a comprehensive roadmap. The integration of IoT P2P and IoT VPC with Raspberry Pi devices proffers a potent and versatile solution for contemporary IoT projects, allowing you to deploy, manage, and scale your innovations with confidence.
We hope this guide has illuminated the path to mastering remote IoT with Raspberry Pi. What are your experiences with remote Raspberry Pi deployments? Do you have any tips or challenges to share? Leave a comment below and join the conversation! If you found this article helpful, consider sharing it with your network or exploring other related articles on our site for more insights into IoT and cloud computing.
Building The (Internet of Things) IOT Using Raspberry Pi

Remote IoT VPC SSH Raspberry Pi Review: Your Ultimate Guide To Secure

How To Securely and Directly Connect Raspberry Pi with RemoteIoT P2P
