Mastering Raspberry Pi Health: Your Guide To Optimal Performance
Your Raspberry Pi, that tiny yet mighty single-board computer, has become an indispensable tool for countless projects, from home automation to media centers and even industrial applications. But just like any piece of technology, or even a living organism, it thrives on proper care and attention. To keep everything running smoothly and ensure the longevity of your investment, it’s absolutely essential to monitor its performance. Overheating, memory overuse, or sudden slowdowns can significantly impact its performance, leading to frustrating failures or data loss. Luckily, many great tools are available to help you keep your Raspberry Pi in top shape.
Checking the health of your Raspberry Pi isn't just about fixing problems when they arise; it's about proactive maintenance. Raspberry Pi health monitoring encompasses a comprehensive set of practices aimed at assessing and maintaining the overall health of the device. It involves monitoring critical parameters such as CPU temperature, system resources, and connectivity, alongside the integrity of its storage. In this comprehensive guide, we will delve into the various methods and tools you can employ to understand, monitor, and maintain your Raspberry Pi's well-being, ensuring it continues to serve your needs reliably.
Table of Contents
- Why Monitoring Your Raspberry Pi's Health is Crucial
- Core Indicators of Raspberry Pi Health
- Deep Dive: Monitoring Your Raspberry Pi's Vital Signs
- The Lifeline: Checking Your Raspberry Pi SD Card Health
- Leveraging Logs for Deeper Insights
- Remote Monitoring Solutions for Your Raspberry Pi
- Proactive Measures: Backups and Maintenance
- When Things Go Wrong: Troubleshooting and Next Steps
- Conclusion: Keeping Your Raspberry Pi in Top Shape
Why Monitoring Your Raspberry Pi's Health is Crucial
Think of your Raspberry Pi as a tiny, dedicated worker. Just like any worker, it needs to be in good health to perform optimally and reliably. Neglecting its health can lead to a myriad of issues, from sluggish performance and unexpected crashes to complete system failures and even data corruption. Regular monitoring allows you to catch potential problems early, before they escalate into major headaches. This proactive approach not only saves you time and frustration but also extends the lifespan of your device. By understanding how to check Raspberry Pi health, you empower yourself to maintain a stable and efficient system, whether it's running a critical home server or a simple hobby project.
The benefits of consistent Raspberry Pi health monitoring are clear: increased uptime, improved performance, and reduced risk of hardware failure. It helps you identify resource bottlenecks, prevent thermal throttling, and anticipate the end-of-life for components like the SD card. In essence, it's about safeguarding your digital creations and ensuring your Raspberry Pi remains a dependable asset.
Core Indicators of Raspberry Pi Health
To truly understand the health of your Raspberry Pi, you need to look at its core vital signs. These indicators provide a snapshot of its current state and can alert you to underlying issues.
CPU Temperature: The Heat Check
The central processing unit (CPU) is the brain of your Raspberry Pi, and like any brain, it generates heat when working. Excessive heat is the enemy of electronics, leading to performance degradation (known as thermal throttling) and potentially permanent damage. Monitoring your CPU temperature is paramount. A healthy Raspberry Pi typically operates within a comfortable temperature range, usually below 70°C (158°F) under load. Consistently high temperatures, especially above 80°C, indicate a need for better cooling, such as a heatsink or fan.
CPU Usage, Memory, and System Load
These metrics tell you how hard your Raspberry Pi is working. High CPU usage means a process is demanding a lot of processing power. Low available memory (RAM) can cause the system to use swap space on the SD card, which is much slower and can wear out the card more quickly. System load averages give you an idea of the number of processes waiting for CPU time. A consistently high load average, even with low CPU usage, might suggest I/O bottlenecks. Monitoring these helps you identify if your Pi is struggling to keep up with its tasks or if an application is misbehaving.
Power Supply Stability
A stable and sufficient power supply is fundamental to your Raspberry Pi's operation. Under-voltage, often indicated by a lightning bolt icon on the screen or in logs, can lead to erratic behavior, data corruption, and even prevent the Pi from booting. Power monitoring, especially on models like the Raspberry Pi 5, is crucial for system health. Ensure you're using a high-quality power supply that meets or exceeds the recommended current for your specific Pi model and any connected peripherals.
Deep Dive: Monitoring Your Raspberry Pi's Vital Signs
Now that we understand what to look for, let's explore the practical commands and tools available on your Raspberry Pi to check its health. These are your primary diagnostic instruments.
Using the `vcgencmd` for Core Metrics
The `vcgencmd` command is a powerful, built-in utility on Raspberry Pi OS (and other compatible distributions) that allows you to query various low-level system information directly from the VideoCore GPU. This is your go-to for quick checks of critical parameters.
- CPU Temperature: To check the CPU temperature, simply open a terminal and type:
This will return the temperature in degrees Celsius, e.g., `temp=45.6'C`.vcgencmd measure_temp - CPU Voltage and Frequency: You can see the CPU temperature, voltage, and frequency using the `vcgencmd` command. For voltage, use:
And for frequency:vcgencmd measure_volts core
These commands provide insights into whether your Pi is receiving adequate power and if its CPU is running at its expected speed.vcgencmd measure_clock arm
System Resource Monitoring with `htop` and `free`
While `vcgencmd` gives you hardware specifics, tools like `htop` and `free` provide a real-time overview of your system's resource utilization, helping you to check Raspberry Pi health from a software perspective.
- `htop` (or `top`): This interactive process viewer is invaluable for understanding CPU usage, memory consumption, and running processes. If `htop` isn't installed, you can get it with `sudo apt install htop`. Once running, you'll see a dynamic list of processes, their CPU and memory usage, and overall system load averages. High CPU usage by a single process or consistently high load averages can indicate a problem.
- `free`: To check your system's memory usage more precisely, use the `free -h` command. The `-h` flag makes the output human-readable. It will show you total memory, used memory, free memory, and swap space usage. If your "free" memory is consistently very low and "swap" is high, your Pi might be struggling with memory-intensive tasks, which can impact performance and SD card lifespan.
The Lifeline: Checking Your Raspberry Pi SD Card Health
The SD card is arguably the most vulnerable component of your Raspberry Pi. It serves as both the operating system drive and your primary storage. Its health directly impacts the stability and longevity of your entire setup. To check the health of your Raspberry Pi SD card, there are various methods you can employ, ranging from simple visual inspections to advanced software diagnostics. After investigating extensive user reports, we can summarize several effective ways to check SD card health on your Raspberry Pi.
Visual Inspection and Basic Checks
Sometimes, the simplest methods are the most effective.
- Physical Damage: Visually inspecting the card for physical damage is the first step. Look for cracks, bends, discoloration, or damaged contacts. A physically compromised card is a ticking time bomb.
- Available Storage Space: Checking the available storage space is crucial. A nearly full SD card can lead to performance issues and prevent the system from writing necessary temporary files or logs. Use the `df -h` command in the terminal to see disk space usage across all mounted file systems. If your root filesystem (`/`) is nearly full, it's time to clear some space or consider a larger SD card.
Performing a File System Check with `fsck`
One of the most common methods to check the health of your Raspberry Pi SD card is to perform a file system check using the `fsck` command. This command is available on most Linux distributions and can help identify and repair inconsistencies or errors within the file system.
Important: You should never run `fsck` on a mounted partition that is actively in use, especially your root filesystem, as this can lead to data corruption. It's best to perform this check by booting your Raspberry Pi from a different medium (like a USB drive with a live Linux distro) or by connecting the SD card to another Linux machine. If checking a specific partition, for example, `/dev/mmcblk0p2` (where 'p2' is the partition number), you would unmount it first (`sudo umount /dev/mmcblk0p2`) and then run:
sudo fsck -f /dev/mmcblk0pXReplace `X` with the partition number. The `-f` flag forces a check even if the filesystem appears clean. Recurring errors found by `fsck` will point to an SD card reaching the end of its lifetime.
Advanced SD Card Integrity and Lifetime Monitoring
Beyond basic checks, there are more advanced ways to assess the integrity and estimate the remaining life of your SD card.
- S.M.A.R.T. Data (if available): Some industrial-grade SD cards or eMMC modules support S.M.A.R.T. (Self-Monitoring, Analysis, and Reporting Technology) data, similar to SSDs or HDDs. By reading and analyzing the S.M.A.R.T. block, you can get the product name, serial number, firmware version, erase count, health, and other vital statistics of the device. This allows you to monitor and detect potential issues early. While consumer-grade SD cards rarely expose this, it's worth checking if you're using a more robust storage solution.
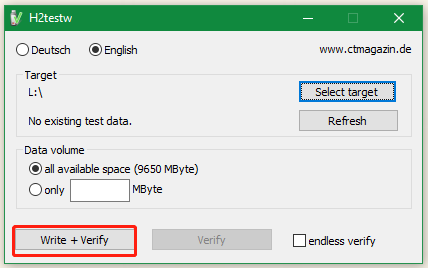
- Read/Write Speed Tests: There are suggestions to do some read/writes and measure how long it takes. A significant slowdown in read/write speeds over time can be an early indicator of a failing SD card. Tools like `dd` can be used for basic speed tests, but be cautious as improper use can lead to data loss.
- Dedicated SD Card Health Tools: RemoteIoT provides an excellent SD card health monitoring tool which can check the integrity of the SD card, detect disk errors, and report the remaining life of the SD card to determine when it might fail. These tools often use proprietary methods or leverage underlying system diagnostics to provide a more comprehensive health report. While estimating the exact lifetime is challenging (as the SanDisk product manual might suggest, it depends heavily on usage patterns), these tools offer valuable insights.
Leveraging Logs for Deeper Insights
Your Raspberry Pi continuously records events, errors, and system messages in various log files. These logs are an invaluable resource for understanding what's happening under the hood and diagnosing problems. They act as a historical record of your system's health.
- System Logs (`syslog`, `dmesg`): The main system log (`/var/log/syslog`) contains general system activity, while `dmesg` shows messages from the kernel buffer, particularly useful for hardware-related issues or boot problems. You can use `tail -f /var/log/syslog` to watch the log in real-time or `journalctl -xe` for a more structured view of systemd journal logs.
- Application Logs: Many applications and services running on your Raspberry Pi will have their own dedicated log files, often found in `/var/log/`. For example, a web server like Nginx or Apache will have access logs and error logs. Reviewing these can reveal issues specific to your applications.
- Error Messages: There are some useful logs in the damaged USB flash drive or SD card that can provide clues about what went wrong. Look for recurring error messages, warnings about disk I/O, or messages related to power fluctuations. Consistent error messages, especially those indicating I/O errors, are strong indicators of a failing storage device.
Remote Monitoring Solutions for Your Raspberry Pi
For those with multiple Raspberry Pis or setups in remote locations, manually checking each device's health can be impractical. Thankfully, several cloud-based and remote monitoring solutions exist that provide real-time data and alerts, making it easier to check Raspberry Pi health from anywhere. This tutorial will show you how to use a cloud service to monitor the health of your Raspberry Pi and alert you when something is wrong.
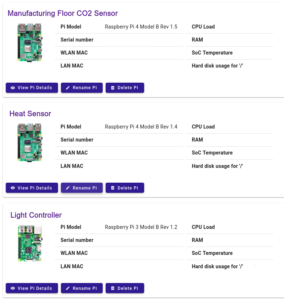
- PiCockpit (with PiDoctor app): To monitor your Raspberry Pi system’s health, you can use PiCockpit’s app, PiDoctor. PiDoctor will allow you to learn many details about your Raspberry Pi, including where it was manufactured, its CPU temperature, memory usage, and more. It provides a user-friendly dashboard to keep an eye on your fleet of devices.
- RemoteIoT: As mentioned earlier, RemoteIoT offers an excellent SD card health monitoring tool. Beyond just SD cards, many IoT platforms, including RemoteIoT, allow you to create a "device" for your Raspberry Pi, create a "node" for this device (e.g., named 'health'), and then send various sensor data and system metrics to the cloud. This enables real-time graphing, historical data analysis, and the setup of alerts based on predefined thresholds (e.g., email me if CPU temperature exceeds 75°C). First of all, we suggest to read our basic tutorials about devices, nodes and fields to get started.
- Other Solutions: Other popular options include Grafana with Prometheus (for self-hosted solutions), Datadog, or even custom scripts sending data to services like Pushbullet or Telegram for simple alerts. These solutions transform your Raspberry Pi health monitoring from a manual chore into an automated, insightful process.
Proactive Measures: Backups and Maintenance
Monitoring is reactive to some extent, but true system health involves proactive measures. The best way to mitigate the risk of data loss and downtime is through regular backups and diligent maintenance.
- Regular Backups: This cannot be stressed enough. Always test and check a backup has run and worked. A full image backup of your SD card is the ultimate safety net. Tools like `dd` (used carefully) or specialized Raspberry Pi backup tools can create bootable copies of your entire system. Store these backups off-site or on a separate drive.
- Test Your Restore Plan: A backup is only as good as its restore process. Always test your restore plan to ensure you can successfully recover your system in case of a failure. Don't wait until disaster strikes to discover your backup is corrupted or your restore procedure is flawed.
- RAID is Not a Backup: While RAID (Redundant Array of Independent Disks) can provide data redundancy and improve performance, always remember RAID is not a backup. RAID protects against single drive failure, but not against accidental deletion, file corruption, or catastrophic events.
- Software Updates: Regularly update your Raspberry Pi's operating system and installed software (`sudo apt update && sudo apt full-upgrade`). Updates often include bug fixes, security patches, and performance improvements that contribute to overall system health and stability.
- Clean Environment: Ensure your Raspberry Pi is in a well-ventilated area, free from dust and extreme temperatures. Dust can accumulate and act as an insulator, hindering heat dissipation.
When Things Go Wrong: Troubleshooting and Next Steps
Despite all the monitoring and proactive measures, sometimes things still go wrong. When your Raspberry Pi starts acting up, a systematic approach to troubleshooting is key.
- Check Basic Connectivity: Is the network cable plugged in? Is Wi-Fi connected? Can you ping other devices on your network?
- Review Logs: As discussed, logs are your best friend. Check `dmesg`, `syslog`, and any application-specific logs for error messages or unusual activity around the time the problem started.
- Power Cycle: A simple reboot can sometimes resolve transient issues. However, if problems persist after a reboot, it indicates a deeper issue.
- Isolate the Problem: If you've recently added new hardware or installed new software, try removing or disabling them one by one to see if the issue resolves.
- Test SD Card Health: If you suspect storage issues, perform a thorough check of your Raspberry Pi SD card health using the methods outlined above, including `fsck` and visual inspection. Recurring I/O errors are a strong sign of a failing card.
- Consult the Community: The Raspberry Pi community forums and online resources are vast. Describe your problem in detail, including any error messages, and you'll often find others who have encountered similar issues and can offer solutions.
- Consider Re-imaging: As a last resort, if you've tried everything else and have a good backup, re-imaging your SD card with a fresh OS installation can often resolve deep-seated software problems.
Conclusion: Keeping Your Raspberry Pi in Top Shape
Maintaining the health of your Raspberry Pi is not an arduous task, but rather an ongoing commitment that pays dividends in reliability and longevity. By regularly checking its temperature, monitoring system resources, ensuring power stability, and diligently assessing your Raspberry Pi SD card health, you create a robust foundation for all your projects. From simple command-line tools like `vcgencmd` and `fsck` to advanced remote monitoring solutions like PiCockpit and RemoteIoT, you have a comprehensive toolkit at your disposal.
Remember, proactive measures like consistent backups and timely software updates are just as vital as reactive troubleshooting. By embracing these practices, you'll not only keep your Raspberry
PiDoctor | PiCockpit
Best Raspberry Pi SD Card Health Checker | Get It Now

How to check Raspberry Pi model - Linux Tutorials - Learn Linux
