Mastering Remote IoT: Free AWS VPC SSH For Raspberry Pi
In today's rapidly evolving technological landscape, the ability to remotely manage and secure your Internet of Things (IoT) devices is not just a convenience—it's a necessity. This comprehensive guide delves into the powerful synergy of AWS, Virtual Private Cloud (VPC), and Secure Shell (SSH) to create a robust and accessible remote IoT environment, specifically focusing on how you can set up and manage a remote IoT system using SSH, Raspberry Pi, and AWS VPC. We understand the importance of cost-efficiency, which is why we'll walk you through the process of downloading and setting up aws remote iot vpc ssh download free on AWS, leveraging the generous AWS Free Tier.
Whether you're a seasoned developer looking to scale your IoT projects or a hobbyist eager to explore the frontiers of connected devices, this article is crafted to give you the full scoop on AWS remote IoT VPC SSH, focusing on how you can download it for free and leverage its capabilities. From understanding the basics of VPC and SSH to troubleshooting common issues, we’ve got you covered. So, buckle up, because we’re about to unlock endless possibilities for your IoT endeavors.
Table of Contents
- Understanding the Core Components of Remote IoT
- Why Remote IoT VPC SSH on AWS is a Game-Changer
- Getting Started: Leveraging AWS Free Tier for Remote IoT
- Step-by-Step Guide: Setting Up Your AWS Environment for IoT
- Configuring SSH Access for Your Remote IoT Devices
- Integrating Raspberry Pi with AWS VPC for Secure IoT
- Optimizing and Troubleshooting Common Remote IoT Issues
- Conclusion
Understanding the Core Components of Remote IoT
Before we dive into the practical steps of setting up your remote IoT system, it's crucial to grasp the fundamental technologies that make this powerful solution possible. Remote IoT integration with AWS Virtual Private Cloud (VPC) and SSH on Raspberry Pi is becoming increasingly prevalent, and understanding each piece is key to a successful implementation.
What is AWS VPC?
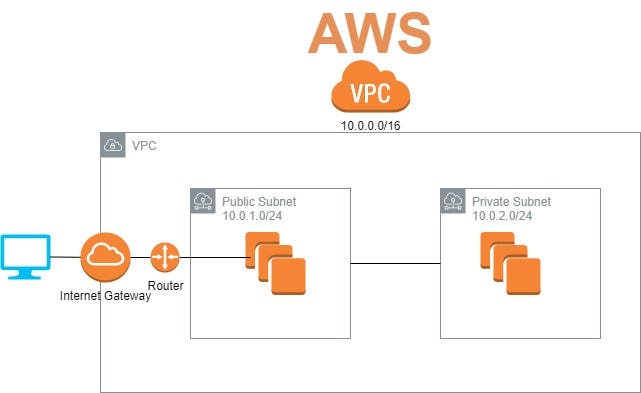
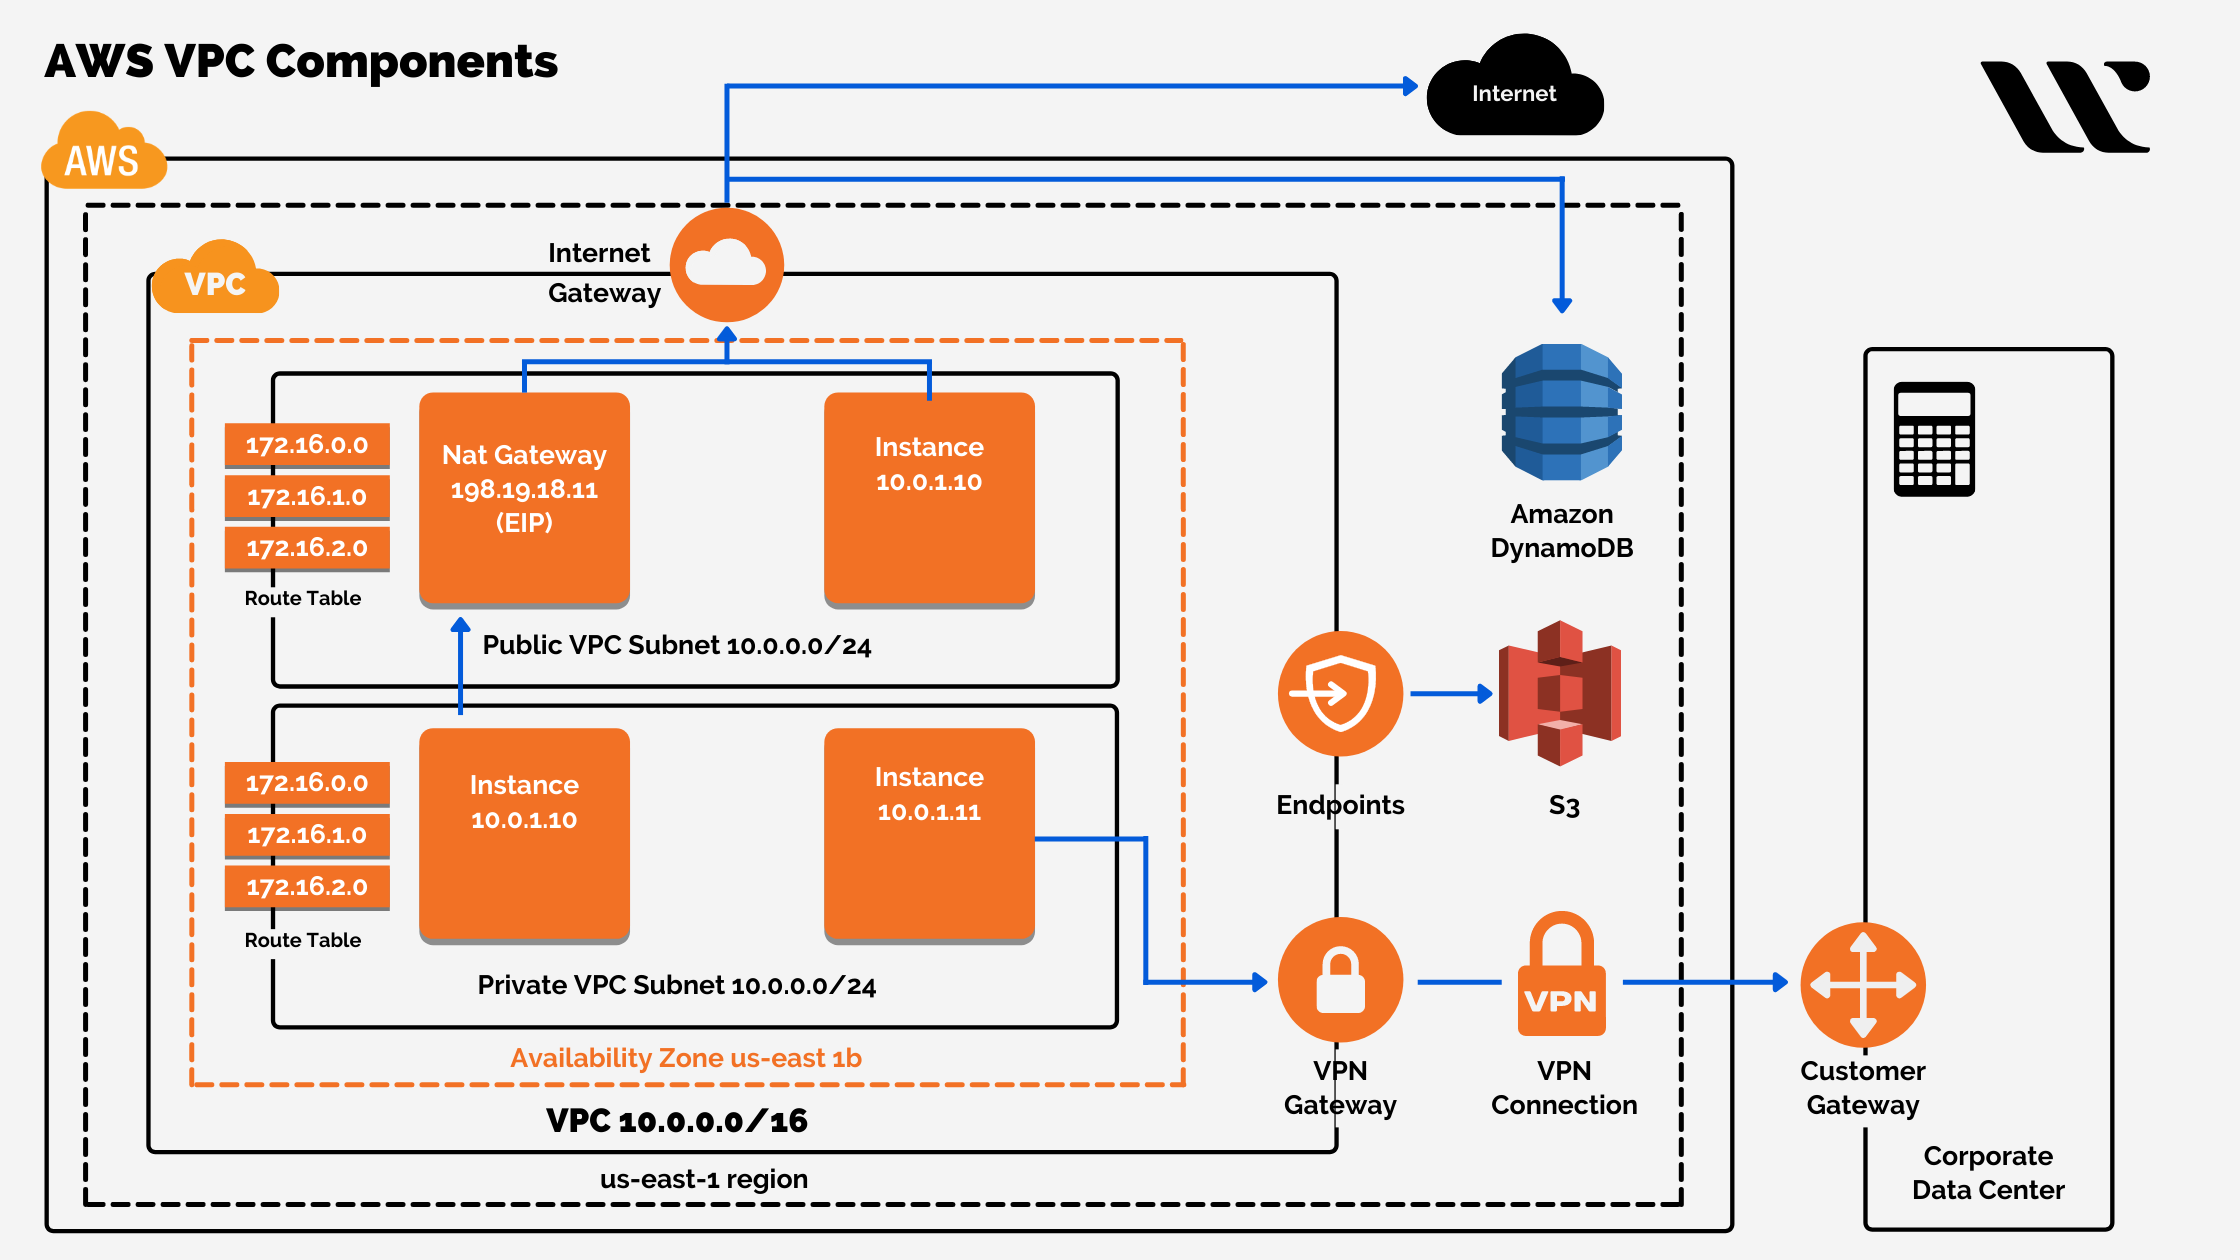
AWS Virtual Private Cloud (VPC) is a logically isolated section of the Amazon Web Services (AWS) Cloud where you can launch AWS resources in a virtual network that you define. Think of it as your own private data center in the cloud. Within your VPC, you have complete control over your virtual networking environment, including IP address ranges, subnets, route tables, and network gateways. This isolation is paramount for security and allows you to create a secure, dedicated network for your IoT devices, separate from the public internet.
The ability to define your network topology, including public and private subnets, allows for highly secure configurations. For instance, you can place your sensitive IoT devices in private subnets, making them inaccessible directly from the internet, and only allow controlled access via a jump host or VPN connection. This level of control is a cornerstone of secure remote IoT management.
The Power of SSH for Remote Access
SSH, or Secure Shell, is a cryptographic network protocol for operating network services securely over an unsecured network. It's widely used for remote command-line login and remote command execution. For IoT devices like the Raspberry Pi, SSH provides a secure channel for managing, updating, and troubleshooting your devices from anywhere in the world. Instead of needing physical access to your Raspberry Pi, SSH allows you to interact with it as if you were sitting right in front of it.
The beauty of SSH lies in its strong encryption, which protects your data from eavesdropping, connection hijacking, and other attacks. When combined with AWS VPC, SSH becomes the secure conduit through which you can interact with your remotely deployed IoT devices, ensuring that your commands and data remain confidential and untampered with. This guide will focus on setting up a remote, secure connection using this powerful protocol.
Raspberry Pi: The IoT Workhorse
The Raspberry Pi is a series of small single-board computers developed in the United Kingdom by the Raspberry Pi Foundation to promote the basic computer science in schools and developing countries. However, its low cost, versatility, and vast community support have made it an incredibly popular choice for IoT projects. It can run various operating systems, including different Linux distributions, making it highly adaptable for a wide range of applications, from home automation to industrial monitoring.
Setting up a Raspberry Pi within an AWS VPC with SSH access is a powerful way to manage remote IoT devices securely and efficiently. Its small form factor, low power consumption, and GPIO (General Purpose Input/Output) pins make it ideal for connecting sensors, actuators, and other peripherals, turning it into a capable edge device for your remote IoT system. The combination of its hardware capabilities and the software flexibility it offers makes it a perfect companion for cloud-based IoT solutions.
Why Remote IoT VPC SSH on AWS is a Game-Changer
The convergence of IoT technologies and cloud computing has unlocked unprecedented opportunities. Remote IoT VPC SSH with Raspberry Pi on AWS offers a powerful solution for developers and hobbyists alike, transforming how we interact with and manage distributed devices. The answer to whether this combination is revolutionary is, emphatically, yes.
Here's why this setup is a game-changer:
- Enhanced Security: In today's rapidly evolving technological landscape, securing your IoT environment is more crucial than ever. AWS remote IoT VPC SSH provides a robust solution to ensure your devices are protected. By isolating your IoT devices within a private VPC and using SSH for encrypted communication, you significantly reduce the attack surface compared to exposing devices directly to the public internet.
- Scalability and Flexibility: AWS provides a highly scalable infrastructure. As your IoT project grows from a few devices to hundreds or thousands, your AWS VPC can easily scale to accommodate the increasing network traffic and device count. You can provision new virtual machines (EC2 instances) or network configurations on demand.
- Cost-Effectiveness: By leveraging platforms such as AWS, users can harness the power of cloud computing to control IoT devices remotely via SSH. Crucially, with tools like AWS Free Tier, Raspberry Pi, and SSH, you can get started with this powerful setup without incurring significant upfront costs. The AWS Free Tier allows you to experiment and even run small-scale projects for free, making this technology accessible to everyone.
- Global Accessibility and Reliability: AWS global infrastructure ensures that your remote IoT system is highly available and accessible from anywhere in the world. You can deploy your VPC in regions geographically close to your IoT devices to minimize latency, enhancing the responsiveness of your remote commands.
- Simplified Management: SSH provides a standardized and powerful way to manage your Raspberry Pi devices. Whether you need to update software, retrieve sensor data, or troubleshoot issues, SSH makes it straightforward and efficient, streamlining the entire management process for your aws remote iot vpc ssh download free environment.
The convergence of remote IoT management, secure VPC configurations, the power of SSH, and the accessibility of free AWS resources creates an unparalleled platform for innovation in the IoT space. Remote IoT VPC SSH on Raspberry Pi with AWS Free Tier is a powerful combination that opens up endless possibilities for IoT projects.
Getting Started: Leveraging AWS Free Tier for Remote IoT
One of the most appealing aspects of setting up your remote IoT environment on AWS is the availability of the AWS Free Tier. This tier allows new AWS customers to explore and try out various AWS services for free up to certain usage limits. This is particularly beneficial for projects involving aws remote iot vpc ssh download free, as it enables you to experiment and build without immediate financial commitment.
To get started, you'll need an AWS account. If you don't have one, visit the AWS website and follow the registration process. You'll need a valid email address, a credit card (for verification, though you won't be charged for Free Tier usage), and a phone number for identity verification. Once your account is set up, familiarize yourself with the Free Tier limits for services you'll be using, such as Amazon EC2 (for your jump host), Amazon VPC, and data transfer. For instance, the Free Tier typically includes 750 hours per month of t2.micro or t3.micro EC2 instances, which is more than enough for a single jump host.
Remember that while many core services have a Free Tier, exceeding these limits or using services not covered by the Free Tier will incur charges. Always monitor your AWS billing dashboard to avoid unexpected costs. This guide will help you configure your environment to stay within the Free Tier as much as possible.
Step-by-Step Guide: Setting Up Your AWS Environment for IoT
This guide will walk you through the process of setting up your AWS environment, configuring a VPC, and enabling SSH access to your IoT devices. Our goal is to provide you with a thorough understanding of how to set up and manage a remote IoT system using SSH, Raspberry Pi, and AWS VPC.
1. Create a New VPC
Navigate to the VPC dashboard in the AWS Management Console. Select "Your VPCs" and then "Create VPC." Give your VPC a descriptive name (e.g., `remote-iot-vpc`) and choose a CIDR block (e.g., `10.0.0.0/16`). This CIDR block defines the IP address range for your private network.
2. Create Subnets
Within your new VPC, create at least two subnets: a public subnet and a private subnet. The public subnet will host resources that need direct internet access (like a jump host), while the private subnet will house your Raspberry Pi IoT devices, keeping them isolated from the public internet.
- Public Subnet: Assign a CIDR block (e.g., `10.0.1.0/24`) and associate it with an Availability Zone.
- Private Subnet: Assign a different CIDR block (e.g., `10.0.2.0/24`) and associate it with the same Availability Zone as your public subnet.
3. Create an Internet Gateway (IGW)
An Internet Gateway allows communication between your VPC and the internet. Create an IGW and attach it to your `remote-iot-vpc`.
4. Configure Route Tables
Route tables dictate where network traffic from your subnets is directed.
- Public Route Table: Create a new route table. Add a route that points all internet-bound traffic (`0.0.0.0/0`) to the Internet Gateway. Associate this route table with your public subnet.
- Private Route Table: You can use the main route table associated with your VPC, or create a new one. For the private subnet, ensure there is no direct route to the Internet Gateway for `0.0.0.0/0`. Traffic from the private subnet will be routed through your jump host or a NAT Gateway/Instance.
5. Create a Security Group for SSH Access
Security groups act as virtual firewalls for your EC2 instances and other resources. Create a new security group (e.g., `ssh-access-sg`). Add an inbound rule to allow SSH traffic (port 22) from your specific IP address or a trusted range (e.g., your home IP or `0.0.0.0/0` if you need broader access, though the latter is less secure). This security group will be applied to your jump host.
6. Launch an EC2 Instance (Jump Host)
Launch a t2.micro or t3.micro EC2 instance (eligible for Free Tier) in your public subnet. This instance will serve as your jump host, a bastion server through which you'll SSH into your private IoT devices.
- Choose an Amazon Machine Image (AMI) (e.g., Amazon Linux 2 or Ubuntu Server).
- Select an instance type (t2.micro/t3.micro).
- In network settings, select your `remote-iot-vpc` and the public subnet. Enable "Auto-assign Public IP."
- Apply the `ssh-access-sg` security group.
- Create a new key pair (e.g., `iot-key-pair.pem`) and download it. You'll need this to SSH into your jump host.
This article will focus on how to configure a secure and efficient remote IoT environment.
Configuring SSH Access for Your Remote IoT Devices
Once your AWS environment is set up, the next critical step is to configure SSH access. This is where the "download free" aspect comes into play, as SSH clients are readily available and free to use on most operating systems.
1. Generate SSH Key Pair (if not already done)
If you created a key pair when launching your EC2 instance, you already have one. Otherwise, you can generate one using `ssh-keygen` on your local machine:
ssh-keygen -t rsa -b 4096 -f ~/.ssh/iot_rsa_keyThis creates a private key (`iot_rsa_key`) and a public key (`iot_rsa_key.pub`). Keep your private key secure and never share it.
2. SSH into Your Jump Host
Use the private key you downloaded (or generated) to connect to your EC2 jump host. Ensure the private key has the correct permissions (`chmod 400 your-key-pair.pem`).
ssh -i /path/to/your-key-pair.pem ec2-user@YOUR_EC2_PUBLIC_IP(Replace `ec2-user` with `ubuntu` if you chose Ubuntu AMI).
3. Prepare Jump Host for SSH Forwarding (Optional but Recommended)
To seamlessly SSH into your Raspberry Pi devices in the private subnet, you can use SSH agent forwarding or an SSH config file on your local machine. This allows your local SSH client to use your private key to authenticate with the Raspberry Pi via the jump host without storing the private key on the jump host itself.
Add the following to your local `~/.ssh/config` file:
Host jump-host Hostname YOUR_EC2_PUBLIC_IP User ec2-user IdentityFile /path/to/your-key-pair.pem ForwardAgent yes Host raspberry-pi Hostname 10.0.2.X # Private IP of your Raspberry Pi User pi ProxyJump jump-host IdentityFile /path/to/your-key-pair.pem # Or use agent forwardingThis setup streamlines the process of connecting to your Raspberry Pi, making remote management efficient and secure. Remote IoT VPC SSH download free is a powerful and accessible solution for secure remote access.
Integrating Raspberry Pi with AWS VPC for Secure IoT
Now that your AWS VPC and SSH access are configured, it's time to bring your Raspberry Pi into the secure fold. This step involves preparing your Raspberry Pi and ensuring it can communicate within your private AWS VPC, accessible only via your jump host.
1. Prepare Your Raspberry Pi
If you haven't already, install an operating system like Raspberry Pi OS (formerly Raspbian) onto an SD card for your Raspberry Pi. You can download the image from the official Raspberry Pi website. Use a tool like Raspberry Pi Imager to flash the OS onto the SD card.
Before booting, enable SSH on the Raspberry Pi. You can do this by creating an empty file named `ssh` (no extension) in the boot directory of the SD card. For headless setup, also create a `wpa_supplicant.conf` file for Wi-Fi configuration.
Once booted, connect the Raspberry Pi to your local network. Find its local IP address. You'll need to SSH into it locally first to configure its network settings for the VPC.
2. Connect Raspberry Pi to AWS VPC
Connecting your Raspberry Pi to the AWS VPC's private subnet requires a secure tunnel. The most common and secure methods involve:
- VPN Client on Raspberry Pi: Install a VPN client (e.g., OpenVPN, WireGuard) on your Raspberry Pi and configure it to connect to a VPN server running on your jump host or a dedicated VPN EC2 instance within your VPC. This creates a secure tunnel, making the Raspberry Pi appear as if it's directly on the VPC's private network.
- SSH Tunneling/Proxying: As configured in the previous section, you can use your jump host as a proxy. Your Raspberry Pi doesn't need to be directly connected to the VPC's private subnet in the traditional sense; rather, your SSH connection from your local machine to the Pi is tunneled through the jump host. This is a simpler setup for initial testing and small deployments. The Raspberry Pi itself would typically be on a local network that has internet access, and your jump host would initiate the connection to it, or the Pi would initiate an SSH reverse tunnel to the jump host. For the most secure and scalable approach, a VPN is preferred, placing the Pi directly within the VPC's private network.
For a direct connection into the private subnet, your Raspberry Pi would need to be physically connected to a network that routes to your VPC (e.g., via AWS Direct Connect or a Site-to-Site VPN, which are beyond the Free Tier). For most hobbyist and small-scale projects using the Free Tier, the SSH tunneling through a public jump host (or a VPN connection from the Pi to the VPC) is the practical approach. In this guide, we assume the Raspberry Pi is on a network that can reach your jump host, or that you're establishing a VPN connection from the Pi to your VPC.
3. Configure SSH on Raspberry Pi for VPC Access
Once your Raspberry Pi is connected to the VPC (or accessible via your jump host), ensure its SSH server is properly configured. It's highly recommended to disable password authentication and rely solely on SSH key pairs for enhanced security.
- Copy your public SSH key (from your local machine, or a new one generated specifically for the Pi) to the Raspberry Pi's `~/.ssh/authorized_keys` file.
- Edit `/etc/ssh/sshd_config` on the Raspberry Pi to set `PasswordAuthentication no` and `PermitRootLogin no`. Restart the SSH service (`sudo systemctl restart ssh`).
Now, you can SSH into your Raspberry Pi from your local machine via the jump host:
ssh raspberry-pi(If you configured your `~/.ssh/config` as suggested earlier).
This robust setup ensures that your remote IoT devices are securely managed, leveraging the power of AWS VPC and SSH. Whether you’re a beginner or an experienced developer, this guide will provide valuable insights into aws remote iot vpc ssh download free and help you get started with downloading free tools and setting up your environment.
Optimizing and Troubleshooting Common Remote IoT Issues
Even with a meticulously planned setup, you might encounter issues or seek ways to optimize your remote IoT environment. From understanding the basics to troubleshooting common issues, we’ve got you covered.
Enhancing Security for Your Remote IoT Setup
While the AWS VPC and SSH provide a strong security foundation, continuous vigilance and additional measures are crucial for a truly secure remote IoT system:
- Principle of Least Privilege: Ensure that your security groups, IAM roles, and SSH users have only the minimum necessary permissions.
- Regular Updates: Keep your Raspberry Pi OS and all installed software up to date. This includes the SSH server and client software.
- Strong SSH Keys: Always use strong SSH key pairs (e.g., RSA 4096-bit) and protect your private keys with strong passphrases.
- Disable Root Login: Never allow direct SSH login as the root user on your Raspberry Pi. Use a regular user account and `sudo` for administrative tasks.
- Monitor Logs: Regularly review SSH logs on your jump host and Raspberry Pi for any suspicious activity. AWS CloudWatch can be used to collect and analyze logs from your EC2 instances.
- Network ACLs: Consider using Network Access Control Lists (NACLs) in your VPC for an additional layer of stateless firewalling at the subnet level.
- VPC Flow Logs: Enable VPC Flow Logs to capture information about the IP traffic going to and from network interfaces in your VPC. This is invaluable for security monitoring and troubleshooting.
Securing your IoT environment is paramount, and AWS remote IoT VPC SSH provides a robust solution to ensure your devices are protected.
Common Pitfalls and Troubleshooting Tips
Even with a clear guide, you might run into common issues. Here are some tips for troubleshooting:
- SSH Connection Timeouts:
- Check Security Groups: Ensure your jump host's security group allows inbound SSH (port 22) from your IP address.
- Check Network ACLs: Verify that no NACLs are blocking port 22 traffic.
- Public IP: Confirm your EC2 jump host has a public IP address and that you're using the correct one.
- Key Permissions: Ensure your private key file has `chmod 400` permissions.
- Cannot SSH into Raspberry Pi via Jump Host:
- Raspberry Pi IP: Verify the private IP address of your Raspberry Pi is correct in your SSH config.
- Raspberry Pi SSH Server: Ensure SSH is enabled and running on your Raspberry Pi.
- Firewall on Pi: Check if a firewall (e.g., `ufw`) on the Raspberry Pi is blocking SSH connections.
- Network Connectivity: Confirm your Raspberry Pi can communicate with the jump host (e.g., if using a VPN, verify the VPN tunnel is up).
- SSH Key on Pi: Ensure your public key is correctly placed in `~/.ssh/authorized_keys` on the Raspberry Pi.
- AWS Free Tier Limits Exceeded:
- Monitor Billing: Regularly check the AWS Billing Dashboard to track your usage against Free Tier limits.
- Stop Unused Instances: Stop EC2 instances when not in use to avoid accruing hours. Terminate instances you no longer need.
- Data Transfer
AWS Custom VPC. I wanted to launch & connect my EC2… | by Naveen Singh
Making an SSH connection to the AWS Guest VPC – remote.it
AWS Virtual Private Cloud - Guide - Whizlabs Blog
