Mastering Remote IoT Device SSH: Secure Access & Management
In our increasingly connected world, the Internet of Things (IoT) is no longer a futuristic concept but a daily reality. From smart home gadgets to industrial sensors, these devices are everywhere, quietly collecting data and performing tasks. But what happens when you need to interact with them, update their software, or troubleshoot an issue when you're miles away? This is where secure remote access becomes not just convenient, but absolutely essential. This remoteiot device ssh tutorial will walk you through the entire process, ensuring you gain the skills needed to connect and manage your devices securely, turning what might seem like a complex challenge into a straightforward task.
Whether you're a tech enthusiast, hobbyist, or just curious about IoT, this article will help you navigate the landscape of remote device management. One of the critical aspects of managing IoT devices is ensuring secure remote access, and SSH (Secure Shell) provides a robust solution for this purpose. This article will delve into the fundamentals of SSH and its application in remote IoT environments, empowering you to confidently interact with your devices from anywhere. This tutorial is designed for anyone looking to understand and implement SSH for remote IoT access, whether you're a developer, IT professional, or hobbyist, this guide will provide you with the knowledge and practical steps you need.
Table of Contents
- The Indispensable Role of SSH in IoT Management
- Setting the Stage: Prerequisites for Remote IoT SSH
- Step-by-Step: Enabling SSH on Your IoT Device
- Connecting from Your Computer: Windows and Mac
- Enhancing Security: Best Practices for Remote IoT SSH
- The Power of RemoteIoT Web SSH: Access from Anywhere
- Real-World Applications and Use Cases of Remote IoT SSH
- When SSH Falls Short and What's Next
The Indispensable Role of SSH in IoT Management
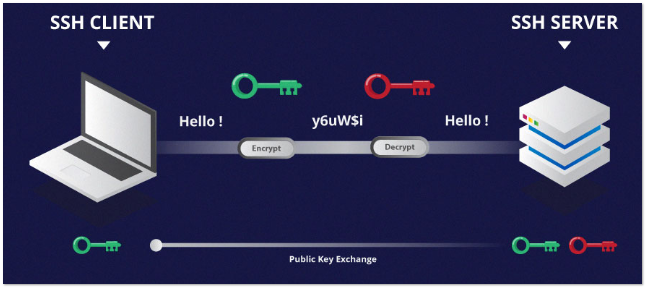
At its core, SSH, or Secure Shell, is a cryptographic network protocol that allows for secure data communication, remote command-line login, and other secure network services between two networked computers. Think of it as a highly secure, encrypted tunnel through which you can send commands and receive information from your remote IoT device. Unlike older, unencrypted protocols like Telnet, SSH encrypts all traffic, including passwords, commands, and output, making it incredibly difficult for eavesdroppers to intercept sensitive data. For IoT devices, where security is paramount, SSH isn't just a convenience; it's a necessity. These devices often operate in exposed environments, and without robust security measures, they can become easy targets for cyberattacks, potentially compromising your data, privacy, or even broader network security. With more and more devices going online, the risk of cyber threats is real, and SSH is your best defense against unauthorized access and data breaches. It greatly increases efficiency and security, making it possible for you to manage your devices with peace of mind. SSH provides a reliable and encrypted channel, ensuring that only authorized individuals can access and control your IoT infrastructure. This robust security framework is why SSH is the go-to solution for remote IoT device management.Setting the Stage: Prerequisites for Remote IoT SSH
Before we dive into the practical steps of establishing a remote IoT SSH connection, it's crucial to ensure you have the necessary tools and a basic understanding of the environment. Preparing adequately will save you time and frustration down the line. First, you'll need your **IoT device** itself. This could be a Raspberry Pi, an ESP32 board, an industrial sensor gateway, or any device running a Linux-based operating system that supports SSH. For the purpose of this tutorial, we'll often refer to a Raspberry Pi as a common and accessible example. Second, you'll need a **computer** (desktop or laptop) from which you'll initiate the SSH connection. This computer will act as your SSH client. Third, ensure both your IoT device and your computer have **internet access**. For truly remote access beyond your local network, your IoT device will need a way to be reached from the internet. This often involves configuring your home or office router for port forwarding, or utilizing services like Dynamic DNS (DDNS) if your internet service provider assigns dynamic IP addresses. While we'll touch upon this, securing your network and understanding NAT traversal is a broader topic that warrants careful consideration. Finally, a basic familiarity with the **command line interface (CLI)** is highly recommended. SSH operates primarily through text commands, so knowing how to navigate directories, execute commands, and edit files in a Linux environment will be incredibly beneficial. Don't worry if you're a complete beginner; this remoteiot device ssh tutorial will guide you through the essential commands.Step-by-Step: Enabling SSH on Your IoT Device
The first critical step in securing your remote IoT device with SSH is to enable the SSH server on the device itself. The process can vary slightly depending on your specific IoT hardware and its operating system, but for most Linux-based devices, it's quite straightforward.Preparing Your Raspberry Pi (Example Device)
The Raspberry Pi is a popular choice for IoT projects due to its versatility and community support. Enabling SSH on a Raspberry Pi is relatively simple: 1. **During OS Installation (Recommended for Headless Setup):** When flashing Raspberry Pi OS to your SD card using Raspberry Pi Imager, you can enable SSH directly. Look for the "Advanced Options" (often by pressing Ctrl+Shift+X or clicking the gear icon). Here, you can enable SSH, set a username and password, and even configure Wi-Fi credentials, allowing for a completely headless setup from the start. 2. **After OS Installation (If you have a monitor/keyboard):** * Boot your Raspberry Pi and log in. * Open the terminal. * Type `sudo raspi-config` and press Enter. * Navigate to "Interface Options" -> "P2 SSH" -> "Would you like the SSH server to be enabled?" -> Select "Yes". * Exit `raspi-config` and reboot your Pi if prompted. 3. **Manual Method (Creating an `ssh` file):** For a headless setup without using the imager's advanced options, after flashing the OS to the SD card, but *before* inserting it into the Pi, create an empty file named `ssh` (no extension) in the boot partition of the SD card. When the Raspberry Pi boots, it will detect this file and enable SSH automatically.Configuring Other Linux-Based IoT Devices
For other IoT devices running Debian, Ubuntu, or similar Linux distributions, the process typically involves installing the OpenSSH server package: 1. **Update Package List:** Open a terminal on your IoT device and run:
How to do SSH into an IoT device? – Robocraze
How To Use SSH to Connect to a Remote Server | by abdelrahman yasser

How to do SSH into an IoT device? – Robocraze
