Your Ultimate Ear Piercing Chart: Explore Styles & Safety
Perhaps, every second person around you has ear piercings, transforming their ears into canvases of personal expression. From subtle studs to elaborate curated ear stacks, the world of ear adornment is vast and exciting. Are you curious about different ear piercings and eager to discover what types of ear piercings are popular nowadays and which one to choose for yourself? This comprehensive guide is designed to be your ultimate ear piercing chart, providing everything you need to know before embarking on your piercing journey.
Whether you’re a piercing enthusiast looking to add to your collection or a newbie considering your first ever ear adornment, understanding the different types of ear piercings and their placements is crucial. This detailed ear piercing map chart will help you explore the diverse world of ear piercings with our comprehensive chart and guide. We'll dive into types, placements, pain levels, healing times, and aftercare tips, all to help you plan your perfect ear stack safely and stylishly. From classic lobe piercings to adventurous cartilage placements, discover the perfect ear piercing to express your unique style.
Table of Contents
- What is an Ear Piercing Labeled Chart and Why Do You Need One?
- The Anatomy of Your Ear: Understanding Piercing Placements
- Lobe Piercings: The Classic and Versatile Choices
- Cartilage Piercings: Exploring the Diverse World
- Pain Levels, Healing Times, and Aftercare: What to Expect
- Choosing Your Perfect Ear Stack: Tips for a Curated Look
- Jewelry Types and Materials: Adorning Your New Piercing
- Safety First: How to Choose a Reputable Piercer
What is an Ear Piercing Labeled Chart and Why Do You Need One?
An ear piercing chart is essentially a visual diagram that contains the different types of ear piercings, meticulously labeled with their names and precise positions on the ear. Its primary goal is to show you the ones that best suit your style and needs, while also ensuring they are safe for your unique ear anatomy. This ear piercing chart is a diagram showing the names for each different type of ear piercing, together with their position on the ear, making it an invaluable tool for anyone considering new ear adornments. Why is such a chart so crucial? Imagine walking into a piercing studio without a clear idea of what you want or even what's possible. A comprehensive ear piercing chart acts as your personal guide, demystifying the intricate world of ear anatomy and the myriad of piercing options available. It helps you understand the terminology, visualize placements, and even get a preliminary idea of pain levels and healing times associated with each type. No matter what type of discreet or extravagant ear addition you have in mind, this ultimate ear piercing chart will help guide you toward your desired style, allowing you to explore the ultimate ear piercing chart with clear visuals and piercing types. It’s perfect for planning your curated ear or choosing your first, empowering you with knowledge before you make a decision that's literally skin-deep.The Anatomy of Your Ear: Understanding Piercing Placements
Before we delve into specific piercing types, it's essential to understand the basic anatomy of your ear. Your ear is primarily composed of two main parts: the soft, fleshy lobe and the harder, more rigid cartilage. Each area offers unique possibilities for piercing, with varying levels of pain, healing times, and suitable jewelry. The lobe is the softest part at the bottom of your ear, rich in blood supply, which makes it less painful to pierce and quicker to heal. The cartilage, on the other hand, is the firm, flexible tissue that forms the upper and inner structures of your ear. Piercings in the cartilage tend to be more sensitive, take longer to heal, and require more diligent aftercare due to the reduced blood flow in this area. Understanding these distinctions is fundamental to making informed decisions about your piercings. Different areas of the cartilage have specific names – like the helix (the outer rim), the tragus (the small flap in front of the ear canal), the conch (the bowl-shaped part), and the rook (the fold of cartilage above the tragus). Knowing these terms, as presented in an ear piercing labeled chart, will help you communicate effectively with your piercer and confidently choose placements that align with your aesthetic vision and lifestyle.Lobe Piercings: The Classic and Versatile Choices
Lobe piercings are by far the most common and widely accepted type of ear piercing, often serving as the gateway to the world of body modification for many. They are known for their relatively low pain level and quick healing time, making them an excellent choice for first-timers. The versatility of lobe piercings allows for a wide array of jewelry options, from simple studs to elaborate hoops and dangle earrings.Standard Lobe Piercing
The standard lobe piercing is placed in the center of the earlobe. It's the quintessential first piercing for most people and is incredibly adaptable.- Placement: The fleshy, softest part at the bottom of the ear.
- Pain Level: Very low (1/10) due to the soft tissue and good blood supply.
- Healing Time: Typically 6-8 weeks, though it can feel healed sooner. Full healing can take up to 3 months.
- Jewelry: Studs, hoops, dangle earrings, barbells.
- Aftercare: Clean twice daily with a sterile saline solution. Avoid touching or rotating the jewelry unnecessarily.
Upper Lobe Piercing
As the name suggests, upper lobe piercings are placed slightly above the standard lobe piercing, still within the fleshy part of the ear, but closer to the cartilage. Many people opt for multiple upper lobe piercings to create a stacked or graduated look.- Placement: Just above the standard lobe, still in the fleshy part before the cartilage begins.
- Pain Level: Low (2/10), slightly more than a standard lobe due to being a bit denser.
- Healing Time: 2-3 months, similar to a standard lobe but can take a little longer.
- Jewelry: Small studs, rings, or delicate hoops.
- Aftercare: Consistent cleaning with sterile saline solution, avoiding pressure from headphones or sleeping on it.
Transverse Lobe Piercing
A more unique and less common lobe piercing, the transverse lobe piercing goes horizontally through the earlobe, rather than front to back. It requires specific anatomy and is often done with a straight or curved barbell.- Placement: Horizontally through the earlobe, from one side to the other.
- Pain Level: Moderate (4/10), as it goes through more tissue.
- Healing Time: 6-12 months, as it's a more complex piercing that involves a larger area of tissue.
- Jewelry: Straight or curved barbells.
- Aftercare: Strict adherence to aftercare is crucial due to the longer healing time and potential for irritation.
Cartilage Piercings: Exploring the Diverse World
Cartilage piercings offer a vast array of options for those looking to explore more adventurous and intricate ear adornments. While generally more painful and slower to heal than lobe piercings, they provide incredible opportunities for unique self-expression and curated ear designs. Each cartilage piercing type, clearly outlined in an ear piercing labeled chart, has its own distinct placement and aesthetic.Helix Piercing
The helix piercing is one of the most popular cartilage piercings, placed on the outer rim of the ear. It's versatile and can accommodate various jewelry styles.- Placement: The upper outer rim of the ear.
- Pain Level: Low to moderate (3-4/10), feels like a sharp pinch.
- Healing Time: 6-12 months, or even longer for full maturity.
- Jewelry: Rings, studs, barbells. Multiple helix piercings (double or triple helix) are also common.
- Aftercare: Regular saline cleaning, avoid snagging, and be mindful of sleeping on the pierced side.
Forward Helix Piercing
Located on the small, flat area of cartilage where the helix curves forward, just above the tragus. This piercing offers a subtle yet striking accent.- Placement: The small outer rim of the ear, just above the tragus, closer to the face.
- Pain Level: Moderate (4-5/10), similar to a helix but can feel a bit more intense due to the denser cartilage.
- Healing Time: 6-12 months.
- Jewelry: Small studs or tiny rings.
- Aftercare: Diligent cleaning, avoiding pressure from glasses or headphones.
Tragus Piercing
The tragus is the small, thick piece of cartilage that protrudes in front of the ear canal. A tragus piercing adds a chic and minimalist touch.- Placement: The small, triangular piece of cartilage in front of the ear canal.
- Pain Level: Low to moderate (3-4/10), more pressure than sharp pain.
- Healing Time: 6-12 months.
- Jewelry: Small studs, flat-back labrets, or tiny rings.
- Aftercare: Be careful with earbuds and headphones, as they can irritate the piercing.
Anti-Tragus Piercing
Positioned on the cartilage fold opposite the tragus, just above the earlobe. This piercing is less common but offers a unique look.- Placement: The cartilage fold directly above the earlobe, opposite the tragus.
- Pain Level: Moderate to high (6-7/10), as the cartilage here is quite thick.
- Healing Time: 6-18 months.
- Jewelry: Curved barbells or small rings.
- Aftercare: Requires careful cleaning and protection from bumps due to its exposed location.
Daith Piercing
The daith piercing is located in the innermost fold of cartilage, just above the ear canal. It has gained popularity not only for its aesthetic but also for anecdotal claims of helping with migraines (though scientific evidence is limited).- Placement: The innermost fold of cartilage, right above the ear canal opening.
- Pain Level: Moderate (5/10), can feel like a sharp pressure.
- Healing Time: 6-18 months.
- Jewelry: Captive bead rings, seamless rings, or heart-shaped rings.
- Aftercare: Can be challenging to clean due to its hidden location; use cotton swabs carefully.
Rook Piercing
The rook piercing is placed in the fold of cartilage above the tragus, a deep, curved ridge. It’s a distinctive piercing that can be quite striking.- Placement: The fold of cartilage in the upper inner ear, above the tragus and below the helix.
- Pain Level: Moderate to high (6/10), as it goes through a thick fold of cartilage.
- Healing Time: 6-18 months.
- Jewelry: Curved barbells or small rings.
- Aftercare: Prone to swelling initially; requires consistent cleaning and minimal disturbance.
Conch Piercing (Inner & Outer)
The conch refers to the large, bowl-shaped area of cartilage in the middle of the ear. It can be pierced in two main ways:- Inner Conch: Placed in the deeper part of the conch, often adorned with a stud.
- Placement: The flat, bowl-shaped area in the center of the ear.
- Pain Level: Moderate (5/10), feels like a dull pressure.
- Healing Time: 6-12 months.
- Jewelry: Flat-back labrets or studs.
- Outer Conch: Placed closer to the outer rim of the conch, often with a ring that encircles the ear.
- Placement: The outer part of the conch, closer to the helix.
- Pain Level: Moderate (5/10).
- Healing Time: 6-12 months.
- Jewelry: Rings that "hug" the ear, or studs.
- Aftercare (for both): Be careful with hair, hats, and headphones.
Industrial Piercing
Also known as a "scaffold" piercing, this involves two separate helix piercings connected by a single, long straight barbell. It's a bold statement piercing.- Placement: Two piercings, typically one forward helix and one helix, connected by a single bar.
- Pain Level: High (7-8/10), as it involves two piercings through thick cartilage.
- Healing Time: 9-18 months, or even longer, making it one of the longest healing piercings.
- Jewelry: Straight barbell.
- Aftercare: Extremely diligent aftercare is crucial due to the complexity and long healing time. Prone to irritation bumps.
Snug Piercing
The snug piercing is located on the inner ridge of cartilage, just above the anti-tragus. It's a challenging piercing due to the small, specific anatomy required.- Placement: The prominent inner ridge of cartilage, parallel to the outer rim, above the anti-tragus.
- Pain Level: High (7-8/10), as it goes through a dense and sensitive area.
- Healing Time: 9-18 months, often one of the slowest to heal.
- Jewelry: Small curved barbells.
- Aftercare: Very prone to irritation and swelling; requires meticulous care and patience.
Orbital Piercing
An orbital piercing involves two holes connected by a single piece of jewelry, typically a ring, giving the appearance of the jewelry "orbiting" a part of the ear. It can be placed in various locations, most commonly the helix or conch.- Placement: Two holes through the same general area of cartilage (e.g., helix or conch), connected by one ring.
- Pain Level: Moderate to high (5-7/10), depending on the location and thickness of cartilage.
- Healing Time: 6-12 months, similar to other cartilage piercings.
- Jewelry: Captive bead rings or seamless rings.
- Aftercare: Requires careful cleaning of both entry and exit points.
Pain Levels, Healing Times, and Aftercare: What to Expect
Understanding the pain levels and healing times associated with different ear piercings, as detailed in an ear piercing labeled chart, is crucial for managing expectations and preparing for your piercing journey. Pain is subjective, but generally, softer tissues like the lobe hurt less than dense cartilage. Healing times vary significantly, ranging from a few weeks for lobes to over a year for complex cartilage piercings like industrials or snugs. **General Pain Scale (1-10):** * **1-2:** Lobe, Upper Lobe * **3-4:** Helix, Tragus, Daith * **5-6:** Forward Helix, Inner/Outer Conch, Rook, Orbital * **7-8:** Anti-Tragus, Industrial, Snug, Transverse Lobe **General Healing Times:** * **Lobe Piercings:** 6 weeks to 3 months * **Cartilage Piercings:** 6 months to 18 months, or even longer for full maturity. **Crucial Aftercare Tips (YMYL Principle):** Proper aftercare is paramount for successful healing and preventing complications like infection or irritation. This falls under the YMYL (Your Money or Your Life) principle, as improper care can lead to serious health issues. 1. **Clean Twice Daily:** Use a sterile saline solution (0.9% sodium chloride) or a piercing-specific aftercare spray. Do not use alcohol, hydrogen peroxide, or harsh soaps, as these can irritate and dry out the piercing. 2. **Hands Off!** Avoid touching, twisting, or rotating your jewelry. This introduces bacteria and disrupts the delicate healing process. 3. **Avoid Pressure:** Do not sleep on your new piercing. Use a travel pillow or a donut pillow to create a space for your ear. Be mindful of headphones, hats, and glasses. 4. **Keep it Dry:** Ensure your piercing is completely dry after cleaning or showering. Pat gently with a clean paper towel or use a hairdryer on a cool setting. 5. **Be Patient:** Healing takes time. Do not change jewelry prematurely, even if it "looks" healed. Consult your piercer for downsizing or jewelry changes. 6. **Healthy Lifestyle:** A balanced diet, adequate sleep, and hydration support your body's healing process. Avoid excessive alcohol and smoking, which can hinder healing. 7. **Seek Professional Help:** If you notice signs of infection (excessive redness, swelling, pus, fever, severe pain), consult your piercer and a medical professional immediately. Do not remove the jewelry unless advised by a doctor, as this can trap the infection.Choosing Your Perfect Ear Stack: Tips for a Curated Look
With such a diverse world of ear piercings, planning your perfect ear stack safely becomes an exciting endeavor. A curated ear is a collection of piercings that work together harmoniously to create a unique and aesthetically pleasing look. This involves considering the balance, symmetry (or intentional asymmetry), and overall flow of your chosen piercings. Here are some tips for planning your curated ear, drawing inspiration from an ear piercing labeled chart: * **Start with Anatomy:** Not every piercing is suitable for every ear. Your piercer will assess your anatomy to determine viable placements. For instance, some ears might not have the right fold for a snug or industrial. * **Consider Healing Time:** If you're planning multiple piercings, space them out. Healing multiple cartilage piercings simultaneously can be taxing on your body and increase the risk of complications. Prioritize one or two at a time. * **Balance is Key:** Think about how different piercings will look together. You might want to balance a bolder piercing (like an industrial) with more delicate ones (like multiple helix studs). * **Jewelry Compatibility:** Consider the types of jewelry you want to wear. Some piercings are best suited for studs, others for rings, and some for barbells. Plan your ear stack around the jewelry styles you love. * **Personal Style:** Your ear stack should reflect your unique style. Whether you prefer a minimalist look with tiny studs or a maximalist approach with elaborate chains and charms, the ear piercing chart is here to guide you toward your desired style. * **Consult Your Piercer:** A professional piercer is an invaluable resource. They can offer expert advice on placement, suitability, and help you visualize your ideal ear stack. They can also guide you on the journey from helix to tragus, helping you find the perfect piercing to express your unique style.Jewelry Types and Materials: Adorning Your New Piercing
The right jewelry is essential not only for aesthetics but also for safe healing. Learn about different ear piercing types, placements, healing times, and the best jewelry for each style. Choosing the correct material and style is critical, especially for initial piercings. **Recommended Materials for Initial Piercings (E-E-A-T Principle):** For new piercings, biocompatible materials are crucial to minimize irritation and allergic reactions. This is a key aspect of trustworthiness and expertise. * **Implant-Grade Titanium (ASTM F-136):** This is widely considered the best material for initial piercings. It's lightweight, nickel-free, hypoallergenic, and extremely durable. * **Surgical Stainless Steel (316L or 316LVM):** A common and affordable option, but ensure it's implant-grade and nickel-release compliant. Individuals with nickel allergies should avoid it. * **Niobium:** Similar to titanium, it's inert and hypoallergenic, though less common. * **14k or 18k Gold (Nickel-Free):** High-quality gold can be used, but ensure it's solid gold (not plated) and nickel-free, as nickel is a common allergen. White gold often contains nickel, so yellow or rose gold is generally safer. **Common Jewelry Styles for Ear Piercings:** * **Studs/Labrets:** Ideal for most cartilage piercings (helix, tragus, conch, forward helix) and initial lobe piercings. Flat-back labrets are particularly comfortable for sleeping and reducing irritation. * **Rings (Captive Bead Rings, Seamless Rings, Clickers):** Popular for helix, daith, rook, and orbital piercings. They allow for some movement, which can be beneficial for healing in certain placements. * **Barbells (Straight, Curved):** Straight barbells are used for industrial piercings. Curved barbells are suitable for rook, anti-tragus, and snug piercings. * **Hoops/Dangle Earrings:** Primarily for healed lobe piercings, though small, lightweight hoops can be used in healed helix piercings. Always ensure your jewelry is internally threaded or threadless (push-pin) for initial piercings. Externally threaded jewelry can scrape the piercing channel during insertion, causing trauma. Your piercer will typically start you with a slightly longer piece of jewelry to accommodate initial swelling, which will then be "downsized" to a snugger fit after the initial swelling subsides (usually 4-8 weeks). This downsizing is vital for proper healing and preventing irritation.Safety First: How to Choose a Reputable Piercer
When it comes to ear piercings, safety is paramount. This is where the E-E-A-T and YMYL principles truly come into play. Choosing a reputable and experienced piercer is the single most important decision you'll make, impacting not only the aesthetic outcome but also your health and safety. **What to Look for in a Professional Piercer and Studio:** 1. **Licensing and Certification:** Check if the piercer and studio are licensed and regulated by local health authorities. This ensures they meet sanitation and safety standards. 2. **Sterilization Practices:** The studio should use an autoclave for sterilizing all tools and jewelry. Needles should be single-use and disposed of immediately after use in a sharps container. The piercing room should be clean and organized. 3. **Experience and Portfolio:** Ask about the piercer's experience, especially with the specific piercing you want. A good piercer will have a portfolio of their work. 4. **Knowledge of Anatomy:** A professional piercer understands ear anatomy thoroughly and will assess your ear to ensure the chosen piercing is viable and safe for you. 5. **Quality Jewelry:** They should only use implant-grade, biocompatible jewelry for initial piercings (titanium, surgical steel, niobium, nickel-free gold). 6. **Clear Aftercare Instructions:** A reputable piercer will provide detailed verbal and written aftercare instructions and be available for follow-up questions or concerns. 7. **Professionalism and Communication:** They should be friendly, patient, and willing to answer all your questions. They should never pressure you into a piercing. 8. **Cleanliness and Hygiene:** Observe the studio's overall cleanliness. Piercers should wash their hands and wear fresh gloves for each client. Avoid mall kiosks or places that use piercing guns. Piercing guns are unhygienic, cannot be properly sterilized, and cause blunt force trauma to the tissue, leading to more pain, tissue damage, and a higher risk of complications. Always opt for a professional piercer who uses a sterile needle. Your health and the success of your piercing depend on it.Conclusion
The world of ear piercings is rich with possibilities for self-expression, from the classic lobe to the intricate industrial. This ultimate ear piercing chart has walked you through every single type of ear piercing, including their names, placements, pain levels, healing times, and essential aftercare tips. We hope this comprehensive guide has helped you understand each one, empowering you to plan your curated ear or choose your first piercing with confidence and knowledge. Remember, whether you’re a piercing enthusiast or a newbie considering your first, understanding the different types of ear piercings and their placements is crucial. Always prioritize safety by choosing a reputable piercer and adhering strictly to aftercare instructions. Want to express yourself with the timeless art of ear piercing? Explore our detailed ear piercing map chart to find the best piercing for you. Learn about placements, aftercare, and shop jewelry for every piercing type. What's your favorite ear piercing, or which one are you planning to get next? Share your thoughts and experiences in the comments below! We'd love to hear from you.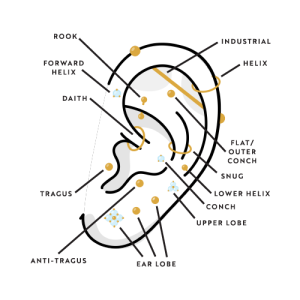
Labelled Ear Piercings - Essential Beauty & Piercing

piercings types Ear Piercing Diagram, Ear Piercing Guide, Faux Piercing

Ear Piercings Guide: Names, Types & Charts (with Pictures) | Body
