Securely Connect Remote IoT: P2P Downloads On Windows 10 FREE
In an increasingly interconnected world, the Internet of Things (IoT) has become an integral part of our lives, from smart homes to industrial automation. However, the convenience of remote access often comes with significant security challenges. This comprehensive guide dives deep into the concept of securely connecting remote IoT devices using P2P SSH downloads on Windows for free, equipping you with the knowledge and actionable steps to safeguard your digital ecosystem.
Whether you're managing a smart home system, running an industrial IoT network, or simply ensuring the safety of your personal devices, understanding how to establish secure connections is paramount. This article serves as your comprehensive guide, meticulously outlining the steps needed to establish a secure connection using P2P SSH on your Windows 10 machine, empowering you to manage your IoT devices with confidence and peace of mind.
Table of Contents:
- The Growing Need for Secure Remote IoT Access
- Understanding P2P Direct Communication for IoT
- Demystifying P2P SSH: The Secure Backbone
- Preparing Your Windows 10 System for P2P SSH
- A Comprehensive Guide to Securely Connecting Your Raspberry Pi
- Step-by-Step: Establishing Your Secure P2P IoT Connection
- Best Practices for Maintaining IoT Security
- Troubleshooting Common P2P SSH Connection Issues
- Conclusion: Empowering Your IoT Journey with Secure P2P Access
The Growing Need for Secure Remote IoT Access
The proliferation of IoT devices has transformed industries and daily life, offering unprecedented levels of automation, data collection, and convenience. From smart thermostats adjusting temperatures based on your presence to complex industrial sensors monitoring machinery health, IoT is everywhere. However, this vast network of connected devices presents a significant attack surface for cyber threats. Unsecured IoT devices can become entry points for hackers, leading to data breaches, system compromises, or even physical harm in critical infrastructure scenarios. The ability to securely connect remote IoT devices is no longer a luxury but a fundamental necessity.
Traditional methods of remote access, such as VPNs or port forwarding, can be complex to set up for individual IoT devices and may introduce vulnerabilities if not configured perfectly. They often rely on a central server, creating a single point of failure and potential bottleneck. This is where the innovative approach of peer-to-peer (P2P) communication, especially when combined with the robust security of SSH, offers a compelling alternative. It promises a more direct, efficient, and inherently more secure way to interact with your remote IoT ecosystem, making it possible to securely connect remote IoT P2P using a Raspberry Pi, and download it for free on Windows.
Understanding P2P Direct Communication for IoT
At its core, P2P communication involves two or more devices interacting directly with each other without the need for an intermediary server to handle all data traffic. Think of it like a direct phone call between two people, rather than routing every word through a central switchboard. In the context of IoT, this means your Windows 10 machine can establish a direct, encrypted link with your remote Raspberry Pi or other IoT device. This fundamental shift in network architecture brings significant benefits, particularly for security and efficiency.
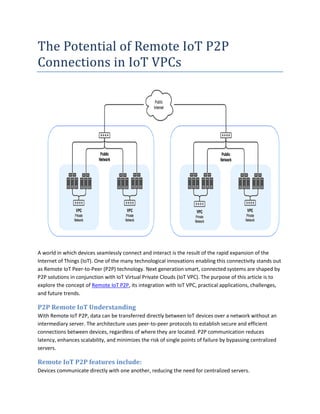
What is RemoteIoT VPC?
The concept of a "RemoteIoT VPC" (Virtual Private Cloud) leverages this P2P direct communication infrastructure to create an isolated network environment. Unlike traditional VPCs that rely on cloud providers, RemoteIoT VPC focuses on establishing a secure, direct connection between your local machine and your remote IoT device. This means that once the connection is established, no central server is involved, and all interactions take place directly between the two peers. This significantly reduces latency and enhances privacy, as your data isn't passing through third-party servers. It's a powerful framework that allows you to learn how to securely connect RemoteIoT VPC Raspberry Pi with a free download, providing a robust solution for managing your IoT deployments.
The Advantages of P2P for IoT Security
The P2P model offers several compelling advantages for IoT security. Firstly, by eliminating the central server as a single point of failure, it makes the network more resilient to DDoS attacks and server outages. If a central server goes down, traditional setups fail; with P2P, as long as the two peers can find each other, the connection remains viable. Secondly, data privacy is enhanced because information flows directly between the devices, reducing the risk of eavesdropping or data interception by third parties. Thirdly, it can lead to improved performance due to reduced latency, as data doesn't need to travel through multiple hops. This guide outlines a secure method for establishing P2P connections, emphasizing these inherent benefits.
Demystifying P2P SSH: The Secure Backbone
While P2P provides the direct communication channel, SSH (Secure Shell) provides the cryptographic security. SSH is a cryptographic network protocol for operating network services securely over an unsecured network. It's widely used for remote command-line login and secure file transfers. When combined with P2P, P2P SSH creates an incredibly robust and secure tunnel for managing your IoT devices. It encrypts all data transmitted between your Windows 10 machine and your IoT device, protecting against eavesdropping, tampering, and unauthorized access. Securely connecting remote IoT devices using P2P SSH is not only possible but also surprisingly straightforward. In this guide, we'll walk you through everything you need to know to leverage this powerful combination.
SSH uses strong encryption algorithms to protect the data in transit and relies on public-key cryptography for authentication, which is far more secure than password-based authentication alone. This means you can establish a trusted relationship between your Windows 10 PC and your IoT device without constantly exchanging sensitive credentials. The P2P aspect ensures that this secure tunnel is direct, bypassing potential vulnerabilities associated with intermediate servers. This comprehensive guide dives deep into the intricacies of establishing a secure P2P connection for your remote IoT devices, specifically focusing on the Raspberry Pi platform, which is a popular choice for DIY IoT projects.
Preparing Your Windows 10 System for P2P SSH
Before you can securely connect remote IoT P2P using a Raspberry Pi and download it for free on Windows, you must carefully follow the installation and configuration steps. Your Windows 10 machine will serve as the control center, so setting it up correctly is crucial. This involves ensuring you have the necessary tools and understanding how to configure them for a P2P SSH connection.
Essential Tools and Prerequisites
To begin, you'll need a few essential tools and to ensure your Windows 10 system meets certain prerequisites:
- Windows 10 Operating System: Ensure your system is up-to-date with the latest security patches.
- OpenSSH Client: Windows 10 (version 1803 and later) includes an OpenSSH client by default, which is excellent. You can verify its installation by opening PowerShell as an administrator and typing `ssh`. If it's not installed, you can add it via "Optional features" in Windows Settings.
- A P2P Overlay Network Tool: This is the crucial component that facilitates the P2P connection. While the term "free download" is used, it often refers to open-source or freemium software that creates a virtual network layer over the internet, allowing direct peer discovery and communication. Examples include ZeroTier, Nebula, or similar tools that enable virtual LANs over the internet. These tools create a secure tunnel that P2P SSH can then leverage.
- Text Editor: A simple text editor like Notepad++ or VS Code for editing configuration files.
- Administrator Privileges: You'll need administrative rights on your Windows 10 machine to install software and modify network settings.
- Internet Connection: Both your Windows 10 PC and your IoT device need internet access to initially establish the P2P overlay network.
Downloading and Configuring P2P SSH Clients
The "free download" aspect typically refers to the P2P overlay network software itself, combined with the built-in OpenSSH client in Windows. Here's a general approach:
- Choose Your P2P Overlay Network Software: Research and select a reputable, open-source, or free-tier P2P overlay network solution (e.g., ZeroTier, which has a free tier for personal use). Download the Windows client from their official website. Always prioritize official sources to avoid malicious software.
- Install the P2P Software: Follow the installation instructions for your chosen P2P software. This usually involves a straightforward setup wizard. Once installed, you'll typically need to create an account and join or create a network. This network acts as your private, secure virtual LAN.
- Configure the P2P Network: Each P2P overlay tool has its own configuration steps. Generally, you'll add your Windows 10 machine and your remote IoT device (e.g., Raspberry Pi) to the same virtual network. This process often involves authorizing devices based on their unique network IDs. Once both devices are part of the same virtual network, they will be assigned virtual IP addresses, allowing them to "see" each other directly, even if they are on different physical networks behind NATs or firewalls.
- Verify P2P Connectivity: After configuring the P2P network, use a simple `ping` command from your Windows 10 machine to the virtual IP address of your IoT device to confirm they can communicate.
- Ensure SSH is Enabled on IoT Device: Before attempting to connect, ensure that SSH is enabled on your remote IoT device (e.g., Raspberry Pi). For Raspberry Pi, this can be done via `sudo raspi-config` under "Interface Options".
By following these guidelines outlined in this guide, you can securely connect remote IoT devices using P2P SSH on Windows 10. This will empower you to manage your IoT devices efficiently and securely from anywhere.
A Comprehensive Guide to Securely Connecting Your Raspberry Pi
The Raspberry Pi is a quintessential IoT device, widely used for everything from home automation to environmental monitoring. Securely connecting your Raspberry Pi to a remote IoT network using P2P SSH is a common and highly effective use case. This section focuses on the specifics of preparing your Raspberry Pi for a P2P SSH connection.
First, ensure your Raspberry Pi is running the latest version of Raspberry Pi OS (formerly Raspbian). It's crucial for security and compatibility. You'll need to enable SSH on the Raspberry Pi if you haven't already. This can be done via the `raspi-config` tool (Interface Options -> SSH -> Enable) or by creating an empty file named `ssh` in the boot directory of the SD card before first boot.
Next, install the same P2P overlay network client (e.g., ZeroTier, Nebula) on your Raspberry Pi that you installed on your Windows 10 machine. The installation process for Linux-based systems like Raspberry Pi OS is usually straightforward, often involving a few command-line commands. Once installed, join the Raspberry Pi to the same virtual network you created for your Windows 10 PC. This step is critical for allowing the P2P direct communication. After joining, verify that the Raspberry Pi has received a virtual IP address from the P2P network and that it can be pinged from your Windows 10 machine using that virtual IP.
Remember, security is key, so always follow best practices, such as using strong, unique passwords or, even better, SSH key-based authentication instead of passwords. This comprehensive guide dives deep into the intricacies of establishing a secure P2P connection for your remote IoT devices, specifically focusing on the Raspberry Pi platform.
Step-by-Step: Establishing Your Secure P2P IoT Connection
With both your Windows 10 machine and your Raspberry Pi (or other IoT device) configured on the same P2P overlay network, establishing the SSH connection is the final, straightforward step. Using IoT SSH from anywhere on Windows 10 is a powerful skill that can enhance your ability to manage IoT devices securely and efficiently.
- Open PowerShell or Command Prompt on Windows 10: Press `Win + X` and select "Windows PowerShell (Admin)" or "Command Prompt (Admin)".
- Initiate the SSH Connection: Use the `ssh` command followed by the username on your IoT device and its virtual IP address.
For example, if your Raspberry Pi's username is `pi` and its virtual IP is `192.168.192.10`, you would type:ssh username@virtual_ip_addressssh pi@192.168.192.10 - Accept Host Key (First Connection): The first time you connect, SSH will ask you to verify the host's authenticity. Type `yes` and press Enter to add the device's host key to your known hosts file. This prevents "man-in-the-middle" attacks.
- Enter Password or Use SSH Key:
- Password: If you're using password authentication, you'll be prompted to enter the password for the specified username on your IoT device.
- SSH Key: If you've set up SSH key-based authentication (highly recommended for security), the connection will proceed automatically without a password prompt, provided your private key is correctly loaded.
- You're Connected! Once authenticated, you will see the command prompt of your remote IoT device. You can now execute commands, transfer files, monitor sensors, automate tasks, or manage your smart home system as if you were directly connected to it.
This article serves as a comprehensive guide to navigating the landscape of secure remote access for your IoT ecosystem, specifically focusing on the power and practicality of peer-to-peer SSH. By following these steps, you've taken a giant leap forward in your IoT journey, gaining secure and direct control over your devices.
Best Practices for Maintaining IoT Security
While securely connecting remote IoT devices using P2P SSH is a significant step, security is an ongoing process. Here are crucial best practices to ensure the long-term integrity of your IoT setup:
- Use SSH Key-Based Authentication: Always prefer SSH keys over passwords. Generate a strong passphrase for your private key and store it securely. This eliminates the risk of brute-force password attacks.
- Change Default Credentials: Immediately change default usernames and passwords on all new IoT devices. Default credentials are a primary target for attackers.
- Keep Software Updated: Regularly update the operating system (e.g., Raspberry Pi OS), P2P overlay network software, and any applications running on your IoT devices. Updates often include critical security patches.
- Least Privilege Principle: Configure user accounts on your IoT devices with the minimum necessary permissions. Avoid running services or applications as root unless absolutely necessary.
- Monitor Device Activity: Periodically check logs on your IoT devices for unusual activity or failed login attempts.
- Physical Security: Where possible, ensure the physical security of your IoT devices. Unauthorized physical access can bypass many software-based security measures.
- Network Segmentation: If you have multiple IoT devices, consider segmenting your network. This limits the lateral movement of an attacker if one device is compromised.
- Regular Backups: Back up critical configurations and data from your IoT devices. This ensures quick recovery in case of a security incident or device failure.
By the end of this article, you will understand the importance of securing IoT connections, the best practices for downloading P2P software, and how to implement these robust security measures. But here's the thing—security should always be at the forefront of your mind.
Troubleshooting Common P2P SSH Connection Issues
Even with careful setup, you might encounter issues. Here are some common problems and their solutions:
- "Connection refused" or "No route to host":
- Check P2P Network: Ensure both your Windows 10 PC and the IoT device are online and successfully joined to the same P2P overlay network. Verify their virtual IP addresses.
- Ping Test: Try pinging the IoT device's virtual IP from Windows 10. If it fails, the P2P network isn't fully established or configured correctly.
- SSH Service Running: Ensure the SSH service is running on your IoT device. On Raspberry Pi, use `sudo systemctl status ssh`.
- Firewall: Check firewalls on both your Windows 10 PC and the IoT device. Ensure that SSH (port 22, or a custom port if you changed it) is allowed through the firewall.
- "Permission denied (publickey, password)":
- Incorrect Password: Double-check the password.
- SSH Key Issues: If using keys, ensure your public key is correctly installed in the `~/.ssh/authorized_keys` file on the IoT device, and your private key is accessible and correctly specified on your Windows 10 machine. Check file permissions for your SSH keys.
- Incorrect Username: Verify the username you're trying to log in with.
- Slow Connection/Lag:
- Internet Speed: While P2P is direct, it still relies on underlying internet connectivity. Check the internet speed at both ends.
- P2P Overlay Performance: Some P2P overlay networks might have varying performance depending on your location and the network's infrastructure.
- Device Load: If your IoT device is under heavy load, its SSH responsiveness might be affected.
- P2P Network Not Connecting:
- Network ID/Authentication: Double-check that both devices are using the correct network ID and are authorized within the P2P overlay network's control panel.
- Internet Access: Ensure both devices have active internet access to connect to the P2P service initially.
By systematically checking these points, you can often resolve most connection issues. Remember, perseverance is key when setting up secure remote access, and understanding the underlying principles will greatly aid in troubleshooting.
Conclusion: Empowering Your IoT Journey with Secure P2P Access
The ability to securely connect remote IoT devices using P2P SSH is a game-changer for anyone managing an IoT ecosystem. It provides a robust, efficient, and inherently more secure alternative to traditional remote access methods, eliminating reliance on central servers and enhancing data privacy. By following the comprehensive steps outlined in this guide, you can confidently set up your Windows 10 machine to communicate directly with your Raspberry Pi or other IoT devices, all without incurring direct software costs for the core components.
We've broken down the complexities of securely connecting remote IoT devices, explained why P2P SSH is the way to go, and provided you with actionable steps to achieve this. From understanding RemoteIoT VPCs to configuring your Windows 10 system and Raspberry Pi, you now possess the knowledge to take control of your IoT security. Remember, the journey into IoT is continuous, and staying informed about security best practices is paramount. We encourage you to implement the security measures discussed and continue exploring the vast potential of your securely connected IoT devices.
What are your thoughts on P2P SSH for IoT? Have you tried setting up a similar system? Share your experiences and insights in the comments below! If you found this guide helpful, consider sharing it with others who might benefit, and explore our other articles on IoT security and home automation.

Securely Connect Remote IoT P2P SSH Raspberry Pi Free Server

How To Securely and Directly Connect Raspberry Pi with RemoteIoT P2P
The Potential of Remote IoT P2P Connections in IoT VPCs | PDF
