Keeping Your Pi Pristine: A Comprehensive Raspberry Pi Health Check Guide
Table of Contents
- Understanding the Vital Signs of Your Raspberry Pi
- Deep Dive into Core Health Metrics
- Advanced Tools for Raspberry Pi Health Monitoring
- Remote Raspberry Pi Health Monitoring Solutions
- Instant Deployment Health Checks
- Proactive Maintenance for Raspberry Pi Longevity
- Troubleshooting Common Raspberry Pi Health Issues
- The Indispensable Value of Regular Health Checks
- Conclusion: A Healthy Pi, A Happy Project
Understanding the Vital Signs of Your Raspberry Pi
Just like a human body, your Raspberry Pi has vital signs that indicate its overall health. These include its temperature, how much of its processing power and memory it's using, the integrity of its storage, and its network connectivity. Neglecting these areas can lead to sluggish performance, data corruption, or even premature hardware failure. While it's pretty hard to break a Pi via software, hardware issues, especially related to power supply or the SD card, are common culprits for problems. Checking the health of your Raspberry Pi involves a systematic approach to monitoring these critical aspects. By understanding what constitutes "normal" operation for your specific Pi model and workload, you can quickly identify deviations that signal potential issues. This proactive stance is key to maintaining a reliable and efficient system, whether it's running a complex server or a simple IoT device.Deep Dive into Core Health Metrics
To truly understand the well-being of your Raspberry Pi, you need to delve into its core operational metrics. These metrics provide a snapshot of your system's current state and can help predict future problems. We’ll explore the most crucial ones in detail, offering practical commands and insights to empower you in your Raspberry Pi health check endeavors.Monitoring Your Pi's Temperature
Temperature is arguably one of the most critical health metrics for any computer, and your Raspberry Pi is no exception. Excessive heat can lead to thermal throttling, where the CPU reduces its clock speed to prevent damage, resulting in significantly degraded performance. In extreme cases, prolonged high temperatures can shorten the lifespan of the components. The Raspberry Pi's SoC (System on a Chip) has built-in thermal sensors that you can query directly from the command line. A simple command like `vcgencmd measure_temp` will display the current core temperature in Celsius. For continuous monitoring, especially during demanding tasks, you might want to log this data or use a graphical tool. Ideal operating temperatures for a Raspberry Pi typically range from 40°C to 60°C under normal load. If you consistently see temperatures above 70°C, it's a strong indicator that your Pi might need better cooling, perhaps a heatsink or a fan, to ensure its long-term health.Assessing Resource Utilization: CPU and RAM
Understanding how your Raspberry Pi utilizes its CPU and RAM is fundamental to optimizing its performance and ensuring stability. An overstressed CPU or insufficient RAM can cause your Pi to become unresponsive, slow, or even crash. Several tools and software, like `htop`, provide an excellent real-time overview of your system's processes, CPU usage per core, and memory consumption. To check CPU usage, the `top` command (or the more user-friendly `htop`) is invaluable. It shows a list of running processes, sorted by CPU usage, allowing you to identify any rogue applications consuming excessive resources. For a quick snapshot of CPU load averages, `uptime` is useful. Memory usage can be checked with the `free -h` command, which displays total, used, and free physical and swap memory in a human-readable format. High RAM usage might indicate memory leaks in applications or simply that your Pi is running too many demanding tasks simultaneously. If your Pi constantly relies on swap memory, it's a sign that it's running out of physical RAM, which can severely impact performance as swap space on an SD card is significantly slower than RAM. Regularly reviewing these metrics helps you ensure your Pi has enough headroom to operate efficiently.Ensuring SD Card Integrity: The Heart of Your Pi
The SD card is arguably the most vulnerable component of your Raspberry Pi, serving as both its operating system drive and primary storage. Its health directly impacts the stability and reliability of your entire system. A failing SD card can lead to boot failures, corrupted files, and data loss. To check the health of your Raspberry Pi SD card, there are various methods you can employ. These include visually inspecting the card for physical damage, checking for read/write errors, and performing file system checks. One of the most common methods to check the health of your Raspberry Pi SD card is to perform a file system check using the `fsck` command. For a non-destructive health check, you could start with `fsck`. Run it as root on each partition on the target card. It's crucial to remember that `fsck` will need the partition to be unmounted before it can run safely and effectively. For example, if your SD card is mounted as `/dev/mmcblk0p2`, you would first unmount it using `sudo umount /dev/mmcblk0p2` and then run `sudo fsck -f /dev/mmcblk0p2`. The `-f` flag forces a check even if the filesystem appears clean. While `fsck` can repair minor inconsistencies, it's not a panacea for a physically failing card. Regular backups of your SD card are paramount, as they are your last line of defense against data loss from an unrecoverable card failure. Additionally, using high-quality, reputable SD cards designed for continuous use can significantly reduce the risk of premature failure.Checking Network Connectivity and Strength
For many Raspberry Pi projects, network connectivity is essential. Whether your Pi is serving web pages, streaming media, or communicating with other devices, a stable and strong network connection is vital. Checking your network status involves verifying both wired (Ethernet) and wireless (Wi-Fi) connections. For Wi-Fi, the `wlan` module allows you to scan the Wi-Fi networks in your Raspberry Pi’s neighborhood, determine which one it is linked to, and assess the signal strength. Commands like `iwconfig` or `ip a` can show you your wireless interface status, including the SSID it's connected to and signal quality. To get more detailed information about your network connection, you can use `nmcli device wifi list` to see available networks and their signal strengths. By clicking on details (or using more verbose command-line options), you'll be able to see the full technical details of the network your Pi is connected to, including channel, security, and more. For both wired and wireless connections, using the `ping` command to test connectivity to your router (e.g., `ping 192.168.1.1`) and then to an external website (e.g., `ping google.com`) can quickly diagnose if your Pi can reach the local network and the internet. If you encounter issues, checking your network configuration files (e.g., `/etc/dhcpcd.conf` or `/etc/network/interfaces`) and restarting network services might be necessary. In the "advanced information" section of network diagnostics, many additional commands are available for deeper troubleshooting, such as `netstat` for network statistics or `tcpdump` for packet analysis.Advanced Tools for Raspberry Pi Health Monitoring
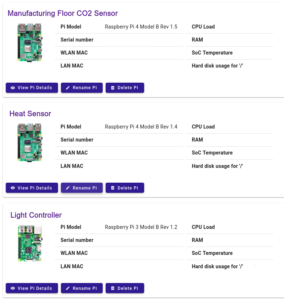
While command-line utilities are powerful, sometimes you need more comprehensive or user-friendly solutions for your Raspberry Pi health check. Several advanced tools and specialized operating systems have been developed to provide deeper insights and easier monitoring capabilities. These tools often consolidate various metrics into a single interface, making it simpler to get a holistic view of your Pi's health. One notable example is `Pidoctor OS`. This is a small operating system specifically designed to test Raspberry Pis and collect information about them, such as their MAC addresses, CPU details, and memory status. It’s a fantastic utility for initial diagnostics or for checking a new Pi before deployment. It is supported on all currently available Raspberry Pi models, making it a versatile diagnostic tool. Beyond a dedicated OS, applications like `Picockpit` offer powerful monitoring capabilities. To monitor your Raspberry Pi system’s health, you can use `Picockpit’s app Pidoctor`. This application provides a web-based dashboard where you can see real-time data on CPU usage, temperature, disk space, network activity, and more. `Pidoctor` will also allow you to learn many details about your Raspberry Pi, including where it was manufactured (for some models), its serial number, and other unique identifiers. These advanced tools go beyond basic command-line outputs, offering historical data, alerts, and often a more intuitive user experience, which is invaluable for long-term monitoring or managing multiple Raspberry Pis.Remote Raspberry Pi Health Monitoring Solutions
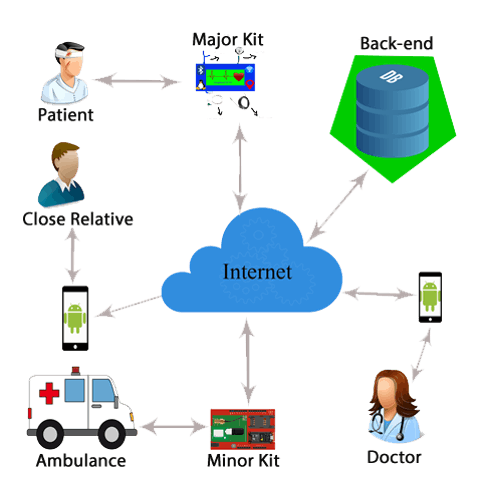
For many Raspberry Pi users, especially those with headless setups or devices deployed in remote locations, local monitoring isn't practical. Monitoring your Raspberry Pi’s health remotely can be tricky, as it requires a robust and secure way to access its metrics without being physically present. Many tools exist, but they are usually complicated to set up or consume too many system resources, which can be counterproductive for a low-power device like the Pi. However, cloud-based services offer a compelling solution for remote Raspberry Pi health monitoring. This tutorial will show you how to use a cloud service to monitor the health of your Raspberry Pi and alert you when something is wrong. Services like `IoT Guru Cloud` are designed specifically for this purpose. They typically involve installing a small agent on your Raspberry Pi that securely sends data to a cloud dashboard. This tutorial will show you how to use `IoT Guru Cloud` to monitor the health of your Raspberry Pi and alert you when something is wrong. At the end of this tutorial, you will run a script or agent that establishes this connection. These platforms provide real-time dashboards, historical data logging, and configurable alert systems (email, SMS, push notifications) that notify you when critical thresholds are crossed (e.g., high temperature, low disk space, network disconnect). While some setup is required, the long-term benefits of remote access, centralized monitoring for multiple devices, and automated alerts far outweigh the initial effort. They transform a potentially complex task into a streamlined, manageable process, ensuring your remote Pis are always in top condition.Instant Deployment Health Checks
When deploying a Raspberry Pi for a new project, especially in a critical application, you want to ensure everything is "all good" on the hardware and basic software configuration immediately. Something we can run immediately on deployment to get an all good (or not) on the hardware is incredibly valuable. This isn't about long-term monitoring but rather a quick diagnostic sweep to confirm the foundational elements are sound before diving into application-specific setup. This can be achieved through a simple shell script designed to execute a series of rapid checks. Such a script might:- Verify network connectivity by pinging a known gateway or external server.
- Check the current CPU temperature.
- Confirm available disk space using `df -h`.
- Ensure critical services (like SSH, web server, or specific application services) are running.
- Test basic GPIO functionality if applicable to the project.
Proactive Maintenance for Raspberry Pi Longevity
Beyond reactive troubleshooting and monitoring, proactive maintenance is crucial for extending the life and ensuring the consistent performance of your Raspberry Pi. Think of it as preventative medicine for your single-board computer. Regular software updates are paramount. Running `sudo apt update && sudo apt full-upgrade` periodically keeps your operating system and installed packages up-to-date, patching security vulnerabilities and improving performance. Equally important are regular backups of your SD card. As mentioned, SD cards are prone to failure. Having a recent image of your system allows for quick recovery in case of corruption or hardware failure, minimizing downtime and data loss. Tools like `dd` or specialized imaging software can create full backups. Proper shutdown procedures are also vital. Always use `sudo shutdown -h now` or `sudo poweroff` rather than simply pulling the power plug. Abrupt power cuts can corrupt the file system on your SD card, leading to unbootable systems or data loss. Finally, ensuring adequate cooling (heatsinks, fans, proper case ventilation) and a stable, sufficient power supply (using the recommended power adapter) are fundamental hardware maintenance steps that prevent overheating and power-related issues, which are common causes of instability and hardware degradation.Troubleshooting Common Raspberry Pi Health Issues
Even with the best monitoring and proactive maintenance, issues can arise. Knowing how to troubleshoot common Raspberry Pi health problems effectively can save you a lot of frustration. If your Pi is running slow, first check CPU temperature and resource utilization (`htop`). High temperatures or maxed-out CPU/RAM indicate an overloaded system. Identify the culprit process and consider optimizing your code, offloading tasks, or upgrading to a more powerful Pi model. Network connectivity issues often stem from incorrect Wi-Fi credentials, weak signal strength, or DHCP problems. Use `ip a`, `iwconfig`, and `ping` to diagnose. Restarting your router or the Pi's network services (`sudo systemctl restart networking`) can often resolve transient issues. SD card corruption often manifests as boot failures, read/write errors, or missing files. After ensuring the card is unmounted, run `fsck` as a first step. If errors persist, it might be time to replace the card and restore from a backup. Visual inspection for physical damage can also sometimes reveal issues. Power supply problems can lead to intermittent reboots, undervoltage warnings (a small lightning bolt icon on the screen), or instability. Always use a power supply that meets or exceeds the Pi's recommended amperage. Remember, documentation and online communities are your best friends. The Raspberry Pi Foundation's official forums and countless online tutorials offer solutions to almost any problem you might encounter.The Indispensable Value of Regular Health Checks
At this point, it should be abundantly clear that regular Raspberry Pi health checks are not just a recommendation but a necessity for anyone serious about their projects. The benefits extend far beyond merely fixing problems after they occur. By keeping tabs on your Pi’s health metrics, you can catch problems early, often before they escalate into critical failures that cause significant downtime. This proactive approach allows for optimized resource allocation. If you notice consistently high CPU usage, you can investigate which processes are consuming resources and either optimize them or adjust your project's scope. Similarly, monitoring disk space prevents unexpected halts due to a full SD card. Ultimately, regular health checks translate directly into avoiding frustrating downtime. Imagine your home automation system failing because the Pi's SD card corrupted, or your media server grinding to a halt due to overheating. These scenarios can be largely prevented by a consistent monitoring routine. It’s an investment of time that pays dividends in reliability, performance, and peace of mind, ensuring your Raspberry Pi continues to be a reliable and efficient component of your digital life.Conclusion: A Healthy Pi, A Happy Project
A robust Raspberry Pi health check routine is the cornerstone of any successful and sustainable project. We've explored the critical metrics – temperature, resource utilization, SD card integrity, and network connectivity – and discussed both fundamental command-line tools and advanced monitoring solutions like Pidoctor OS and cloud services. We also touched upon the importance of immediate deployment checks and proactive maintenance. By integrating these practices into your routine, you transform your approach from reactive problem-solving to proactive prevention. This not only extends the lifespan of your beloved Raspberry Pi but also ensures the continuous, reliable operation of your projects, saving you time, effort, and potential headaches. So, take the time to implement these checks; your Raspberry Pi, and your projects, will thank you for it. What health checks do you perform on your Raspberry Pi? Share your tips and experiences in the comments below!
(PDF) Health Monitoring System using Raspberry Pi and IOT
Top 15 Raspberry Pi Medical and Healthcare IoT Projects With Arduino
PiDoctor | PiCockpit
