SSH Raspberry Pi IoT Projects: Unlocking Remote Control & Security
In this comprehensive guide, we will explore everything you need to know about SSH remote IoT on Raspberry Pi, a powerful combination that empowers you to manage and control your Internet of Things devices from virtually anywhere in the world. Whether you're a seasoned developer or just embarking on your IoT journey, mastering SSH (Secure Shell) is an indispensable skill for anyone working with Raspberry Pi-based projects. This article will delve into the core concepts, practical setups, and crucial security measures to ensure your IoT ecosystem is robust, accessible, and protected.
The convergence of the versatile Raspberry Pi and the robust SSH protocol opens up a universe of possibilities for remote IoT solutions. Imagine controlling your home automation system while on vacation, monitoring sensor data from a remote agricultural field, or updating software on a network of devices without physically touching them. SSH makes this not just possible, but secure and efficient. This guide is designed to be your ultimate resource, walking you through the intricacies of setting up, utilizing, and securing SSH for your Raspberry Pi IoT projects, ensuring you can interact with your devices reliably and securely from anywhere on the globe.
Table of Contents
- The Indispensable Role of SSH in Raspberry Pi IoT Projects
- Understanding SSH: The Secure Shell Protocol
- Setting Up SSH on Your Raspberry Pi for IoT Control
- Advanced Remote Access Solutions for Raspberry Pi IoT
- Best Practices for SSH Security in IoT Deployments
- Practical SSH IoT Projects with Raspberry Pi
- Accessing Your Raspberry Pi IoT from Anywhere: Mobile & Beyond
- Troubleshooting Common SSH Issues in IoT Projects
The Indispensable Role of SSH in Raspberry Pi IoT Projects
The Raspberry Pi has, without a doubt, revolutionized the world of embedded systems and IoT. Its compact size, affordability, and incredible versatility make it a go-to choice for hobbyists and professionals alike to build everything from smart home hubs to industrial monitoring systems. However, once these devices are deployed, especially in remote or difficult-to-access locations, managing them becomes a significant challenge. This is where SSH steps in as an indispensable tool. SSH remote access is a powerful solution for managing IoT projects on a Raspberry Pi, providing a secure conduit for interaction. Imagine you have a Raspberry Pi running a weather station in your garden, or perhaps a security camera system at a vacation home. Physically connecting a keyboard, mouse, and monitor to each Pi for maintenance, software updates, or data retrieval is simply impractical. SSH allows you to bypass this physical limitation entirely. By combining the versatility of Raspberry Pi and the power of SSH (Secure Shell), you can remotely control and monitor devices, automate tasks, and even create innovative, self-sustaining systems. This capability transforms your Raspberry Pi from a local device into a globally accessible component of your IoT network. Whether you're setting up a home automation system or running a complex network of sensors, SSH provides the backbone for reliable and secure remote management, making it an essential skill for any IoT enthusiast.Understanding SSH: The Secure Shell Protocol
Before diving into practical applications, it's crucial to understand what SSH is and how it functions. SSH, or Secure Shell, is a cryptographic network protocol for operating network services securely over an unsecured network. Its most common applications are remote command-line login and remote command execution, but it also supports secure tunnel creation, port forwarding, and file transfers (SFTP). For Raspberry Pi IoT projects, SSH is the primary method for remote administration, offering a robust and secure channel for communication. At its core, SSH works by establishing a secure, encrypted connection between a client (your computer, smartphone, or another server) and a server (your Raspberry Pi). When you initiate an SSH connection, the client and server perform a "handshake" to negotiate encryption algorithms and exchange keys. This process ensures that all data transmitted during the session – including your commands, output, and credentials – is encrypted and protected from eavesdropping or tampering. This level of security is paramount, especially when dealing with IoT devices that might be exposed to the internet. SSH uses strong cryptographic techniques, including public-key cryptography for authentication and symmetric encryption for data transfer, making it a highly reliable protocol for remote access. This article will walk you through the basics of SSH, ensuring you grasp its fundamental principles before moving on to practical implementation.Setting Up SSH on Your Raspberry Pi for IoT Control
Getting SSH up and running on your Raspberry Pi is a straightforward process, but it's the foundational step for any remote IoT project. Modern versions of Raspberry Pi OS (formerly Raspbian) come with SSH server pre-installed, but it might not be enabled by default for security reasons. Enabling SSH is your gateway to remote control, allowing you to manage your IoT devices without a direct physical connection. There are several ways to enable SSH on your Raspberry Pi: 1. **Using `raspi-config` (Graphical or Command Line):** * Boot your Raspberry Pi with a monitor and keyboard. * Open a terminal and type `sudo raspi-config`. * Navigate to `Interface Options` -> `SSH` -> `Yes`. * Reboot your Pi. 2. **Creating a file on the boot partition (Headless Setup):** * If you're setting up a new Pi without a monitor, insert the SD card into your computer. * On the `boot` partition (the small FAT32 partition), create an empty file named `ssh` (no extension). * Eject the SD card safely and insert it into your Raspberry Pi. When the Pi boots, it will detect this file and enable SSH. The file will be deleted automatically after the first boot. 3. **Using `systemctl` (After initial boot):** * If SSH was disabled or you want to ensure it's running, you can use: * `sudo systemctl enable ssh` (to enable it on boot) * `sudo systemctl start ssh` (to start it immediately) Once SSH is enabled, your Raspberry Pi is ready to accept incoming SSH connections. The next step is to connect to it from your client machine.Basic SSH Connection Steps
To connect to your Raspberry Pi via SSH, you'll need its IP address on your local network. You can find this by running `hostname -I` on the Pi's terminal. Once you have the IP address (e.g., `192.168.1.100`), open a terminal on your client computer (Linux/macOS) or use an SSH client like PuTTY (Windows). The basic SSH command format is: `ssh username@raspberry_pi_ip_address` For a default Raspberry Pi OS setup, the username is usually `pi`. So, you would type: `ssh pi@192.168.1.100` The first time you connect, you'll be asked to confirm the authenticity of the host. Type `yes` and press Enter. Then, you'll be prompted for the password for the `pi` user (default is `raspberry`). After entering the password, you'll be logged into your Raspberry Pi's command line, ready to manage your IoT devices.Securing Your Initial SSH Setup
While SSH provides a secure channel, the default setup requires immediate attention to enhance security. Implementing SSH on Raspberry Pi requires adherence to best practices to ensure maximum security, especially for IoT deployments. 1. **Change Default Password:** The very first thing you should do after logging in is change the default `pi` user password. * Type `passwd` and follow the prompts to set a strong, unique password. 2. **Create a New User (Optional but Recommended):** For better security, it's often recommended to create a new user with administrative privileges and disable the default `pi` user's SSH access. * `sudo adduser your_new_username` * `sudo usermod -aG sudo your_new_username` * You can then disable the `pi` user or restrict its access. 3. **Disable Password Authentication (Use SSH Keys):** This is a critical security measure. SSH key-based authentication is far more secure than passwords. * Generate an SSH key pair on your client machine (if you don't have one): `ssh-keygen -t rsa -b 4096` * Copy your public key to the Raspberry Pi: `ssh-copy-id pi@192.168.1.100` (or `your_new_username@...`) * Once you can log in using your key, edit the SSH daemon configuration file on the Pi: `sudo nano /etc/ssh/sshd_config` * Find the line `PasswordAuthentication yes` and change it to `PasswordAuthentication no`. * Restart the SSH service: `sudo systemctl restart ssh`. * **Always test key-based login from a new terminal before closing your current SSH session to ensure you don't lock yourself out!** By taking these initial steps, you significantly bolster the security of your Raspberry Pi, making it a more robust foundation for your IoT projects.Advanced Remote Access Solutions for Raspberry Pi IoT
While direct SSH connections work perfectly within your local network, accessing your Raspberry Pi IoT projects from outside your home network (e.g., from work, a coffee shop, or another country) requires additional configuration. Simply opening ports on your router (port forwarding) can be risky if not done carefully, as it exposes your Pi directly to the internet. Fortunately, there are more secure and user-friendly solutions available, especially for those who don't have a static IP address or prefer not to deal with complex router configurations. Remote IoT VPC SSH Raspberry Pi is essentially a setup where you use your trusty Raspberry Pi as a gateway to control and monitor IoT devices from anywhere in the world, often leveraging services that create secure tunnels.Leveraging Ngrok for Secure Tunnels
Ngrok is a fantastic tool that creates secure tunnels from your local machine to the internet, bypassing firewalls and NATs. It's incredibly useful for exposing local services, including SSH, to the outside world without needing to configure port forwarding on your router. For your Raspberry Pi IoT projects, Ngrok provides a secure, temporary, and easy-to-set-up remote access solution. **How Ngrok works:** You run an Ngrok client on your Raspberry Pi, which connects to the Ngrok cloud service. Ngrok then assigns a public URL or TCP address that tunnels back to your Pi. This means you connect to Ngrok's public address, and Ngrok securely forwards your connection to your Pi. **Steps to use Ngrok for SSH:** 1. **Sign up for Ngrok:** Go to ngrok.com and create a free account. You'll get an authtoken. 2. **Download Ngrok:** Download the ARM version of the Ngrok client for your Raspberry Pi. * `wget https://bin.equinox.io/c/4VmDzA7iaHb/ngrok-stable-linux-arm.zip` * `unzip ngrok-stable-linux-arm.zip` 3. **Authenticate Ngrok:** Add your authtoken to your Pi. * `./ngrok authtoken YOUR_AUTHTOKEN` 4. **Start an SSH tunnel:** * `./ngrok tcp 22` (Port 22 is the default SSH port) Ngrok will then display a public TCP address (e.g., `tcp://0.tcp.ngrok.io:12345`). You can now SSH to your Pi using this address: `ssh pi@0.tcp.ngrok.io -p 12345` Ngrok is perfect for temporary access or testing. For persistent access, you might consider a paid Ngrok plan or Cloudflare Tunnel.Cloudflare Tunnel: A Robust Alternative
Cloudflare Tunnel (formerly Argo Tunnel) is another powerful and secure solution for exposing local services to the internet without opening firewall ports. It's particularly appealing for IoT projects because it leverages Cloudflare's global network, offering enhanced security, reliability, and performance. Unlike Ngrok, Cloudflare Tunnel is often used for more permanent, production-grade deployments, and it's free for a single tunnel. **How Cloudflare Tunnel works:** You install `cloudflared` (the Cloudflare Tunnel daemon) on your Raspberry Pi. This daemon establishes an outbound-only connection to Cloudflare's network, creating a secure tunnel. You then configure Cloudflare to route traffic from a domain (which you own and manage through Cloudflare) through this tunnel to your Pi. **Steps to use Cloudflare Tunnel for SSH:** 1. **Own a Domain:** You need a domain name managed by Cloudflare. 2. **Install `cloudflared`:** Follow Cloudflare's official documentation to install `cloudflared` on your Raspberry Pi. 3. **Authenticate `cloudflared`:** Authenticate `cloudflared` with your Cloudflare account. 4. **Create a Tunnel:** Use `cloudflared tunnel create YOUR_TUNNEL_NAME`. 5. **Configure DNS and Routing:** Map a subdomain (e.g., `ssh.yourdomain.com`) to your tunnel within the Cloudflare dashboard and configure the tunnel to point to `ssh://localhost:22` on your Pi. 6. **Run the Tunnel:** Start the tunnel on your Pi: `cloudflared tunnel run YOUR_TUNNEL_NAME`. Cloudflare Tunnel offers significant advantages, including DNS-level security, DDoS protection, and the ability to easily manage multiple services through a single tunnel. By enabling SSH, configuring port forwarding or using free tools like Ngrok and Cloudflare Tunnel, and securing your connection, you can unlock the full potential of your Raspberry Pi IoT projects. This article will explore the top free SSH remote access solutions for IoT, especially focusing on their application with Raspberry Pi devices.Best Practices for SSH Security in IoT Deployments
Security is not an afterthought; it's a fundamental requirement for any IoT deployment, especially when remote access is involved. A compromised IoT device can be a gateway for attackers into your home network or a platform for malicious activities. This Raspberry Pi IoT SSH tutorial will explore the security features of SSH and provide tips to enhance its protection for your IoT projects. Implementing SSH on Raspberry Pi requires adherence to best practices to ensure maximum security. Here are some key practices to follow: 1. **Always Use SSH Key Authentication:** As mentioned, this is the most critical step. SSH keys are far more secure than passwords, as they are nearly impossible to guess or brute-force. Disable password authentication in `sshd_config` once key-based login is confirmed. 2. **Disable Root Login:** The `root` user has ultimate privileges. Logging in directly as `root` via SSH is a security risk. Ensure `PermitRootLogin no` is set in `/etc/ssh/sshd_config`. Instead, log in as a regular user and use `sudo` for administrative tasks. 3. **Change the Default SSH Port:** The default SSH port is 22. While not a security measure in itself (it doesn't make your system inherently more secure), changing it to a non-standard port (e.g., 2222, 22222) can reduce the noise from automated port scanners and brute-force attempts targeting port 22. * In `/etc/ssh/sshd_config`, change `Port 22` to `Port YOUR_NEW_PORT`. Remember to update your SSH client commands accordingly (`ssh -p YOUR_NEW_PORT user@ip`). 4. **Configure a Firewall (UFW):** Implement a firewall on your Raspberry Pi to restrict incoming connections to only necessary ports. UFW (Uncomplicated Firewall) is easy to use. * `sudo apt update && sudo apt install ufw` * `sudo ufw default deny incoming` * `sudo ufw default allow outgoing` * `sudo ufw allow ssh` (or `sudo ufw allow YOUR_NEW_SSH_PORT/tcp`) * `sudo ufw enable` 5. **Keep Your Raspberry Pi OS Up-to-Date:** Regularly update your system packages to patch known vulnerabilities. * `sudo apt update && sudo apt upgrade -y` 6. **Install Fail2Ban:** Fail2Ban is a service that scans log files (e.g., SSH logs) for malicious activity (like repeated failed login attempts) and automatically bans the IP addresses of the attackers. * `sudo apt install fail2ban` * Fail2Ban is generally well-configured out-of-the-box for SSH. 7. **Limit User Access:** Only allow necessary users to SSH into the Pi. You can explicitly allow specific users in `sshd_config` using `AllowUsers username1 username2`. 8. **Monitor SSH Logs:** Periodically check SSH authentication logs (`/var/log/auth.log`) for suspicious activity. By diligently applying these security best practices, you can significantly fortify your Raspberry Pi IoT projects against potential threats, ensuring your remote access remains secure and reliable.Practical SSH IoT Projects with Raspberry Pi
The true power of SSH for Raspberry Pi IoT projects lies in its practical application. Once your Raspberry Pi is set up and secured, you can start using SSH to manage your IoT devices. This section will cover some common SSH-enabled IoT scenarios, demonstrating how SSH facilitates remote control and monitoring. Mastering SSH control IoT is the ultimate guide to unlocking these possibilities. 1. **Remote Home Automation Control:** * **Scenario:** You have a Raspberry Pi controlling smart lights, thermostats, or door locks via relays or smart home protocols (e.g., MQTT, Home Assistant). * **SSH Use:** SSH into your Pi to issue commands to turn lights on/off, adjust temperature settings, or check sensor readings. You can also deploy updated automation scripts or troubleshoot issues without being physically present. For instance, `ssh pi@your_pi_ip 'python /home/pi/scripts/turn_light_on.py'`. 2. **Environmental Monitoring and Data Logging:** * **Scenario:** A Pi equipped with temperature, humidity, or air quality sensors in a remote location (e.g., greenhouse, server room). * **SSH Use:** Remotely retrieve logged sensor data files (`scp`), check the status of the data collection script, restart services, or even plot data using command-line tools. You can also set up cron jobs via SSH to automate data uploads to cloud services. 3. **Remote Camera Surveillance:** * **Scenario:** A Raspberry Pi with a camera module acting as a security camera. * **SSH Use:** Access the Pi to start/stop video recording, capture still images, check storage space, or adjust camera settings. You can even stream video over SSH tunnels (though this might be resource-intensive for direct video, it's great for controlling the camera software). 4. **Network Monitoring and Management:** * **Scenario:** A Raspberry Pi serving as a network monitoring tool, checking device uptime, bandwidth usage, or acting as a DNS server. * **SSH Use:** Log in to view network statistics, restart network services, update DNS records, or diagnose connectivity issues on your network. 5. **Automated Task Deployment and Updates:** * **Scenario:** You have multiple Raspberry Pis deployed across different locations for various IoT tasks. * **SSH Use:** Use SSH to push software updates, deploy new scripts, or configure services on all your Pis simultaneously using simple shell scripts or configuration management tools like Ansible (which uses SSH as its transport layer). This is incredibly efficient for managing a fleet of devices. These examples illustrate that SSH is not just for logging in; it's a powerful framework for managing, controlling, and interacting with your IoT devices in a highly flexible and secure manner. The ability to execute commands, transfer files, and manage processes remotely makes SSH an indispensable asset for any serious Raspberry Pi IoT developer.Accessing Your Raspberry Pi IoT from Anywhere: Mobile & Beyond
The true promise of remote IoT solutions is the ability to access, manage, and control your IoT devices, like a Raspberry Pi, from a remote location. This extends beyond just your desktop computer. Modern technology allows you to manage your Raspberry Pi IoT projects from virtually any internet-connected device, including your smartphone or tablet. Setting up SSH access for your Raspberry Pi IoT projects from an Android device (or iOS) is easier than you might think, whether you’re new to IoT or an experienced developer. **SSH Clients for Mobile Devices:** * **Android:** * **Termux:** A powerful terminal emulator that includes SSH client capabilities. It's a full Linux environment on your phone, allowing you to run standard SSH commands. * **JuiceSSH:** A popular and feature-rich SSH client for Android, offering a user-friendly interface, key management, and session organization. * **ConnectBot:** An open-source SSH client that is well-regarded for its reliability and features. * **iOS:** * **Termius:** A cross-platform SSH client available for iOS (and other platforms), offering a clean interface, key management, and cloud synchronization. * **Blink Shell:** A powerful Mosh and SSH client for iOS, popular among developers for its robust features and customizable interface. Using these apps, you can establish an SSH connection to your Raspberry Pi just as you would from a desktop. You'll enter your Pi's IP address (or the Ngrok/Cloudflare Tunnel address), username, and password or select your SSH key. Once connected, you have full command-line access to your Pi, enabling you to check sensor data, trigger actions, or troubleshoot issues on the go. **Web-Based SSH Terminals:** For situations where you might not have an SSH client installed or prefer a browser-based solution, some services offer web-based SSH terminals. These typically require you to expose your SSH service to a specific port and then access it through a web interface. While convenient, ensure these services are reputable and secure, as you are entrusting your SSH connection to a third party. For direct SSH access, dedicated clients are generally preferred for security and performance. The ability to manage your Raspberry Pi IoT devices from a mobile device significantly enhances the flexibility and responsiveness of your projects. It means you can be anywhere in the world and still have your finger on the pulse of your IoT ecosystem.Troubleshooting Common SSH Issues in IoT Projects
Even with the best preparation, you might encounter issues when setting up or maintaining SSH access to your Raspberry Pi IoT projects. Knowing how to troubleshoot common problems can save you a lot of time and frustration. 1. **"Connection refused" Error:** * **Cause:** The SSH server (sshd) is not running on your Raspberry Pi, or a firewall is blocking the connection. * **Solution:** * Check if SSH is enabled and running on the Pi: `sudo systemctl status ssh`. If not, start it: `sudo systemctl start ssh`. * Verify firewall rules on the Pi (`sudo ufw status`) and ensure port 22 (or your custom SSH port) is allowed. * Check if the Pi is actually online and reachable (`ping raspberry_pi_ip_address`). 2. **"Permission denied (publickey, password)" Error:** * **Cause:** Incorrect password, incorrect SSH key, or incorrect permissions on the SSH key files/directories. * **Solution:** * Double-check your password. * If using SSH keys, ensure your public key is correctly installed on the Pi in `~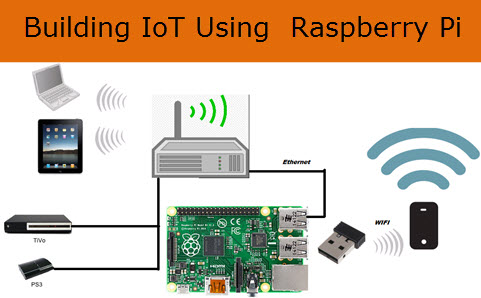
Building The (Internet of Things) IOT Using Raspberry Pi
10 Raspberry Pi Projects For Learning IoT

Creative ideas and projects with Raspberry Pi
