Mastering SSH Syntax: Your Gateway To Secure Remote Management
In the vast landscape of network administration and remote server management, one command stands out as an indispensable tool for security and efficiency: SSH. The secure shell (SSH) command in Linux is a protocol used to securely connect to remote machines over a network. It allows users to execute commands on remote servers and provides a secure encrypted connection between two hosts over an insecure network. This connection can also be used for terminal access, file transfers, and for tunneling, making it a cornerstone for anyone dealing with remote systems.
Whether you're a seasoned system administrator or a curious beginner venturing into the world of remote computing, understanding the nuances of SSH syntax is paramount. It's the key to unlocking seamless, secure interactions with servers located anywhere in the world. From simply logging in to executing complex commands or transferring sensitive files, mastering the syntax of the SSH command empowers you with unparalleled control and security. This comprehensive guide will walk you through everything you need to know about SSH syntax, ensuring you can manage remote systems with confidence and precision.
Table of Contents
- Understanding the Core of SSH: A Secure Foundation
- Deciphering the Basic SSH Syntax
- Essential SSH Options for Enhanced Control
- Advanced SSH Syntax: Executing Remote Commands Directly
- SSH for File Transfers: SCP and SFTP Syntax
- Securing Your SSH Connections: Best Practices and Key Management
- Troubleshooting Common SSH Syntax Issues
- SSH on Different Platforms: Linux, macOS, and Windows
Understanding the Core of SSH: A Secure Foundation
Before diving deep into the intricacies of SSH syntax, it's crucial to grasp the fundamental concepts behind this powerful protocol. SSH, or Secure Shell, is far more than just a command; it's a cryptographic network protocol for operating network services securely over an unsecured network. Its primary function is to provide a secure channel over an unsecured network by using strong cryptography. This makes it an essential tool if you want to manage remote systems, especially those containing sensitive data.
What is SSH and Why is it Indispensable?
At its heart, SSH creates a secure, encrypted tunnel between your local machine (the client) and a remote machine (the server). Imagine sending sensitive instructions or data across the internet. Without SSH, this information would be transmitted in plain text, vulnerable to eavesdropping and interception. SSH encrypts all traffic, including passwords, commands, and output, ensuring that your communication remains private and protected from malicious actors. This robust security is why the ssh command is so widely adopted and considered indispensable for remote administration.
Beyond its security features, SSH offers remarkable versatility. It's not just for logging into a remote terminal. It facilitates secure file transfers using companion tools like SCP (Secure Copy Protocol) and SFTP (SSH File Transfer Protocol). It also supports port forwarding (tunneling), allowing you to securely access services that are otherwise restricted or located behind firewalls. To effectively manage remote servers via SSH, using both interactive SSH sessions and direct SSH commands is key, adapting to the specific task at hand.
The Fundamental Role of the SSH Client
When we talk about the "ssh command," we are primarily referring to the SSH client program. Ssh (ssh client) is a program for logging into a remote machine and for executing commands on a remote machine. It is intended to provide secure encrypted communications between two systems. This client is pre-installed on most Linux and macOS distributions, making it readily available for use. For Windows users, you'll need to install a version of OpenSSH, which is now often included by default in recent Windows 10/11 versions, or use third-party clients like PuTTY, to be able to SSH from your machine.
The client initiates the connection, authenticates with the server, and then establishes the secure channel. This client-server architecture is fundamental to how SSH operates. The client sends your commands, and the server executes them, sending back the output, all within the encrypted tunnel. This seamless interaction, powered by the robust SSH protocol, ensures that your remote management tasks are not only efficient but also impervious to common network threats.
Deciphering the Basic SSH Syntax
The syntax of the ssh command in Linux is straightforward once you understand its components. The basic syntax for using the ssh command is as follows:
$ ssh [options] [user@]hostname [command]Here, the square brackets (`[]`) represent optional arguments, meaning you don't always need to include them. The core of any SSH connection lies in specifying who you are and where you want to go.
The Anatomy of an SSH Command
Let's break down the components of the basic SSH syntax:
ssh: This is the command itself, invoking the Secure Shell client.[options]: These are flags that modify the behavior of the SSH client. They typically start with a hyphen (`-`) followed by a letter (e.g., `-p` for port, `-i` for identity file). We'll explore common options in detail later.[user@]hostname: This is the most crucial part for establishing a connection.user: This is the username you want to log in as on the remote server. If you omit this, SSH will attempt to log in with your current local username by default. For example, if your local username is `john` and you want to log in as `admin` on the remote server, you would specify `admin@hostname`.hostname: This can be either the remote server's hostname (e.g., `example.com`) or its IP address (e.g., `192.168.1.100`). Replace `[hostname or ip]` with the actual address of your remote server. SSH connects and logs into the specified hostname.
[command]: This optional argument allows you to execute a single command on the remote server and then immediately disconnect. If you omit this, SSH will establish an interactive shell session, allowing you to type multiple commands.
Understanding these elements is the foundation for mastering SSH syntax. It allows you to tailor your connection to specific needs, whether it's a simple login or a complex automated task.
Connecting to a Remote Server: The First Step
To connect to a remote system using SSH, we’ll use the `ssh` command. The most common use case is simply logging into a remote server to get a terminal session. In order to login to a remote system using SSH, you will use the `ssh` command in your terminal.
Here's how you'd typically initiate a connection:
$ ssh username@your_remote_server_ip_or_hostnameFor example, if your username on the remote server is `ubuntu` and the server's IP address is `203.0.113.45`, you would type:
$ ssh ubuntu@203.0.113.45If your local username is the same as your remote username, you can simplify it:
$ ssh 203.0.113.45Upon executing this command for the first time to a new host, you might see a message about the authenticity of the host not being established. This is SSH's way of verifying the server's identity. You'll be asked to confirm by typing `yes`. This adds the server's fingerprint to your `~/.ssh/known_hosts` file, preventing future warnings unless the server's fingerprint changes (which could indicate a security risk).
After confirming, you will typically be prompted for your password for the specified `username` on the remote server. Once authenticated, you will be presented with a command prompt from the remote server, indicating a successful and secure connection.
Essential SSH Options for Enhanced Control
The power of SSH syntax truly shines when you start utilizing its various options. These flags allow you to customize your connection, specify authentication methods, and manage various aspects of the SSH session. Here's an overview of frequently used commands and their options:
| Option | Description | Example |
|---|---|---|
-p <port> | Specifies the port number to connect to on the remote host. The default SSH port is 22. | ssh -p 2222 user@host |
-i <identity_file> | Selects a file from which the identity (private key) for public key authentication is read. | ssh -i ~/.ssh/my_key user@host |
-v | Verbose mode. Increases the verbosity of the output, useful for debugging connection issues. | ssh -v user@host |
-X or -Y | Enables X11 forwarding. Allows graphical applications on the remote server to display on your local machine. -Y enables trusted X11 forwarding. | ssh -X user@host |
-L <local_port>:<remote_host>:<remote_port> | Local port forwarding. Forwards a local port to a remote host/port through the SSH tunnel. | ssh -L 8080:localhost:80 user@host |
-R <remote_port>:<local_host>:<local_port> | Remote port forwarding. Forwards a remote port to a local host/port through the SSH tunnel. | ssh -R 8080:localhost:80 user@host |
-D <local_port> | Dynamic port forwarding. Creates a SOCKS proxy on a local port. | ssh -D 1080 user@host |
-N | Do not execute a remote command. Useful for port forwarding when you don't need an interactive shell. | ssh -N -L 8080:localhost:80 user@host |
-f | Goes to background immediately before executing the command. Useful with -N for persistent tunnels. | ssh -f -N -L 8080:localhost:80 user@host |
-A | Enables agent forwarding. Allows you to use your local SSH agent to authenticate to other servers from the remote host. | ssh -A user@host |
-o <option> | Allows you to specify configuration options directly on the command line. | ssh -o StrictHostKeyChecking=no user@host |
These options can be combined to create highly specific and powerful SSH commands. For instance, to connect to a server on a non-standard port using a specific private key, you would use:
$ ssh -p 2222 -i ~/.ssh/my_private_key.pem admin@myremoteserver.comMastering these options significantly enhances your ability to manage remote systems securely and efficiently using SSH syntax.
Advanced SSH Syntax: Executing Remote Commands Directly
One of the most powerful features of SSH is the ability to execute commands on a remote machine without first establishing an interactive shell session. This is incredibly useful for scripting, automation, and performing quick, one-off tasks. The syntax for this is straightforward: you simply append the command you wish to execute after the `user@hostname` part of your SSH command.
$ ssh [options] user@hostname "command to execute"For example, to check the disk space usage on a remote server:
$ ssh user@hostname "df -h"The output of the `df -h` command will be displayed directly on your local terminal, and the SSH connection will terminate automatically once the command completes. This is a crucial aspect of efficient remote management via SSH, as it avoids the overhead of maintaining an open interactive session for simple tasks.
You can also chain multiple commands using shell operators like `&&` (AND) or `;` (sequence):
$ ssh user@hostname "cd /var/www/html && ls -l"In this example, SSH will first change the directory to `/var/www/html` and then list its contents. If the `cd` command fails, `ls -l` will not be executed due to the `&&` operator.
When executing commands directly, pay attention to quoting. If your command contains spaces or special characters that the local shell might interpret, enclose the entire remote command in double quotes (`"`). This ensures that the command is passed to the remote server as a single string.
This direct command execution capability is fundamental for automating tasks with tools like `cron` jobs or CI/CD pipelines, making SSH syntax a versatile component of modern DevOps practices.
SSH for File Transfers: SCP and SFTP Syntax
While the `ssh` command itself is primarily for terminal access and command execution, the SSH protocol also underpins secure file transfer utilities: SCP (Secure Copy Protocol) and SFTP (SSH File Transfer Protocol). These tools leverage the same secure connection established by SSH, ensuring your file transfers are encrypted and authenticated.
SCP Syntax: Quick File Copies
SCP is ideal for simple, quick file transfers between hosts. Its syntax is similar to the `cp` (copy) command in Linux, but with the added ability to specify remote locations using SSH-like syntax.
To copy a file from your local machine to a remote server:
$ scp /path/to/local/file.txt user@hostname:/path/to/remote/directory/Example:
$ scp ~/documents/report.pdf admin@mywebserver.com:/var/www/html/To copy a file from a remote server to your local machine:
$ scp user@hostname:/path/to/remote/file.txt /path/to/local/directory/Example:
$ scp admin@mywebserver.com:/var/log/apache2/access.log ~/logs/To copy a directory recursively, use the `-r` option:
$ scp -r /path/to/local/directory/ user@hostname:/path/to/remote/directory/Like SSH, SCP also supports the `-P` option for specifying a non-standard port (note the uppercase `P` for SCP, unlike SSH's lowercase `p`).
$ scp -P 2222 -i ~/.ssh/my_key local_file.txt user@host:/remote/path/SFTP Syntax: Interactive File Management
SFTP provides a more interactive and feature-rich experience for file management, similar to an FTP client but over a secure SSH connection. It allows you to navigate remote directories, create/delete files and folders, and manage permissions.
To start an SFTP session:
$ sftp user@hostnameOnce connected, you'll be presented with an `sftp>` prompt. Here are some common SFTP commands:
ls: List files on the remote server.lls: List files on your local machine.cd <directory>: Change directory on the remote server.lcd <directory>: Change directory on your local machine.get <remote_file>: Download a file from the remote server.put <local_file>: Upload a file to the remote server.mget <remote_files>: Download multiple files.mput <local_files>: Upload multiple files.mkdir <directory>: Create a directory on the remote server.rm <file>: Delete a file on the remote server.exitorbye: Exit the SFTP session.
SFTP is particularly useful when you need to perform multiple file operations or manage directory structures, offering greater flexibility than SCP for complex file transfer scenarios. Both SCP and SFTP rely on the underlying SSH protocol, meaning their security is directly tied to your SSH configuration and practices.
Securing Your SSH Connections: Best Practices and Key Management
While SSH inherently provides secure communications, its effectiveness largely depends on how you use it. Adhering to best practices, especially regarding authentication and key management, is crucial for maintaining a robust security posture. This aligns perfectly with E-E-A-T principles, emphasizing expertise and trustworthiness in handling sensitive access.
1. Use SSH Key-Based Authentication
The most significant security enhancement you can implement is to move away from password-based authentication to SSH key-based authentication. Instead of a password, you use a pair of cryptographic keys: a public key (stored on the server) and a private key (stored securely on your local machine). When you connect, the server challenges your client, which then proves its identity using the private key without ever transmitting it over the network.
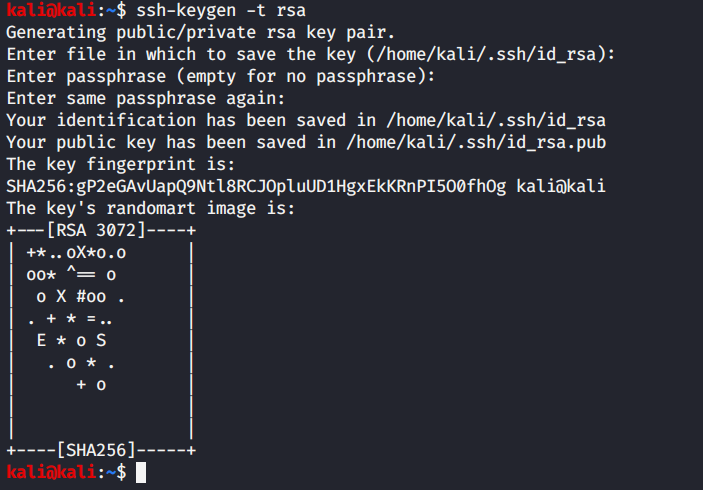
- Generate Key Pair: Use `ssh-keygen` on your local machine:
This creates `id_rsa` (private key) and `id_rsa.pub` (public key) in your `~/.ssh/` directory.$ ssh-keygen -t rsa -b 4096 - Copy Public Key to Server: Use `ssh-copy-id` (recommended) or manually copy:
This command automatically appends your public key to the `~/.ssh/authorized_keys` file on the remote server.$ ssh-copy-id user@hostname - Protect Your Private Key: Your private key should never leave your local machine and should be protected with a strong passphrase. Ensure its permissions are set correctly (`chmod 400 ~/.ssh/id_rsa`).
2. Disable Password Authentication (on Server)
Once you have key-based authentication working reliably, it's highly recommended to disable password authentication on your SSH server. This eliminates the risk of brute-force attacks against weak passwords. This is configured in the SSH daemon configuration file, typically `/etc/ssh/sshd_config`, by setting `PasswordAuthentication no` and restarting the SSH service.
3. Change Default SSH Port
While not a security panacea, changing the default SSH port (22) to a non-standard port (e.g., 2222 or anything above 1024) can reduce the volume of automated attacks targeting your server. Attackers often scan for port 22, so moving it can make your server less visible to casual scanners. Remember to specify the new port using the `-p` option in your SSH syntax:
$ ssh -p 2222 user@hostname4. Use an SSH Agent
An SSH agent is a program that holds your private keys in memory, allowing you to use them without re-entering your passphrase every time you connect. This is especially useful if you have multiple keys or frequently connect to different servers. You can add your keys to the agent using `ssh-add`:
$ ssh-add ~/.ssh/my_private_key5. Keep Software Updated
Regularly update your SSH client and server software to ensure you have the latest security patches and bug fixes. Outdated software can contain vulnerabilities that attackers might exploit.
By implementing these best practices, you significantly strengthen the security of your remote connections, making your use of SSH syntax not just efficient, but also highly secure and trustworthy.
Troubleshooting Common SSH Syntax Issues
Even with a solid understanding of SSH syntax, you might occasionally encounter issues. Knowing how to diagnose and resolve these problems is an essential skill for effective remote management. Here are some common problems and troubleshooting tips:
1. Permission Denied (Publickey, Password)
This is perhaps the most frequent error. It means the server rejected your authentication attempt.
- Incorrect Username/Password: Double-check the username you're trying to log in as and ensure you're typing the correct password (if using password authentication). Remember, replace `[username]` with your remote server username.
- Incorrect Private Key Permissions: If using key-based authentication, ensure your private key file has strict permissions (read-only for owner): `chmod 400 ~/.ssh/id_rsa`.
- Public Key Not on Server: Verify that your public key is correctly installed in `~/.ssh/authorized_keys` on the remote server and that the `authorized_keys` file and `~/.ssh` directory have correct permissions (usually `600` for the file, `700` for the directory).
- SSH Daemon Configuration: The server's SSH daemon (`sshd`) might be configured to disallow password authentication or certain key types. Check `/etc/ssh/sshd_config` on the server.
2. Connection Timed Out / Connection Refused
These errors indicate that your client couldn't establish a connection with the server.
- Incorrect IP Address/Hostname: Verify the IP address or hostname. A simple typo can prevent connection.
- Server Not Running/Down: The remote server might be offline or the SSH service (`sshd`) might not be running.
- Firewall Blocking Connection: A firewall (either on your local machine, the remote server, or somewhere in between) might be blocking port 22 (or your custom SSH port). Ensure the port is open.
- Incorrect Port: If the server is using a non-standard SSH port, you must specify it with the `-p` option in your SSH syntax.
3. Host Key Verification Failed
This error occurs when the server's cryptographic fingerprint (host key) doesn't match what your client expects (stored in `~/.ssh/known_hosts`).
- Legitimate Server Change: The server might have been reinstalled, or its IP address changed, resulting in a new host key. In this case, you'll need to remove the old entry from your `~/.ssh/known_hosts` file (the error message usually tells you which line to remove).
- Man-in-the-Middle Attack: This is a serious warning. It could indicate that someone is trying to impersonate the server. Do NOT proceed without verifying the server's identity through an out-of-band method.
4. Using Verbose Mode for Debugging
When in doubt, use the verbose option (`-v`, `-vv`, or `-vvv`) with your SSH command. This will print detailed debugging information about the connection process, which can often pinpoint the exact issue.
$ ssh -v user@hostnameThis output can reveal issues with authentication, configuration files, or network problems, guiding you towards a solution. Remember, understanding the SSH syntax also means understanding how to debug its behavior effectively.
SSH on Different Platforms: Linux, macOS, and Windows
The beauty of SSH
How to Enable and Use SSH Commands on Windows 10
SSH Commands in Linux with Usage Examples

Cómo instalar Win32-OpenSSH para Windows de Microsoft - return(GiS);
